How Do I Create A Multiple Choice Sheet In Word Easily
Creating a multiple choice sheet in Word is simpler than most people think. You can use built-in form tools, tables, and the Developer tab to build professional answer sheets fast. This guide walks you through every method with clear, easy-to-follow steps. Whether you are a teacher, trainer, or student, you will find practical tips that save time and look great. By the end, you will know exactly how to make a polished multiple choice sheet in Word without any hassle.
Have you ever needed to create a multiple choice sheet in Word and felt completely lost? You are not alone. Many people assume it requires advanced skills or expensive software. The truth is, Microsoft Word has everything you need built right in.
Whether you are a teacher preparing a class quiz, a trainer building a workplace assessment, or a student organizing a survey, knowing how to set up a multiple choice sheet in Word is a valuable skill. It saves you time, gives you full control over formatting, and produces professional results. In this guide, I will walk you through every method step by step.
You will learn how to enable the right tools, build your sheet from scratch, and avoid common pitfalls. I will also share design tips that make your answer sheets easy to read and fill out. By the time you finish reading, you will feel confident creating your own multiple choice sheet in Word for any purpose.
Key Takeaways
- Developer Tab is Essential: Enabling the Developer tab unlocks powerful form controls for creating interactive multiple choice sheets in Word.
- Multiple Methods Work: You can use content controls, tables with checkboxes, or even linked dropdown menus to build your answer sheet.
- Design Matters: A clean layout with proper spacing and numbering makes your multiple choice sheet easy to read and fill out.
- Templates Save Time: You can save your finished sheet as a template and reuse it for future quizzes and exams.
- Test Before Sharing: Always preview your sheet in Print Layout or fill it out yourself to catch formatting issues early.
- Bubble Sheets Are Possible: With a bit of creativity, you can create bubble-style answer sheets similar to standardized test forms.
📑 Table of Contents
- What Is a Multiple Choice Sheet in Word?
- How to Enable the Developer Tab in Word
- Method 1: Using the Developer Tab and Form Controls
- Method 2: Using Tables and Checkboxes for a Printable Sheet
- Method 3: Creating a Bubble Answer Sheet
- Design Tips for a Professional Multiple Choice Sheet
- Common Mistakes to Avoid When Creating a Multiple Choice Sheet
- Quick Tips for Faster Sheet Creation
- Comparison: Best Methods for Creating a Multiple Choice Sheet
- How to Save Your Multiple Choice Sheet as a Reusable Template
- Final Thoughts
What Is a Multiple Choice Sheet in Word?
A multiple choice sheet in Word is a document that presents several questions, each with a set of answer options. Users select one answer per question by marking a box, circle, or bubble. These sheets are commonly used for quizzes, exams, surveys, and feedback forms.
Word gives you the flexibility to design these sheets in many ways. You are not limited to plain text. You can add checkboxes, dropdown menus, and even bubble shapes that look like official test forms. The key is knowing which tools to use and where to find them.
Some people use tables to organize their questions and options. Others prefer the Developer tab tools for interactive forms. Both approaches work well. I will cover each one in detail so you can pick the method that suits your needs best.
How to Enable the Developer Tab in Word
Before you start building, you need to turn on a hidden feature called the Developer tab. This tab gives you access to form controls like checkboxes, dropdown menus, and text input fields. Without it, you will miss out on the most powerful tools for creating a multiple choice sheet in Word.
Steps to Enable the Developer Tab
- Open Microsoft Word on your computer.
- Click on the “File” menu in the top left corner.
- Select “Options” from the left sidebar.
- A new window will pop up. Click on “Customize Ribbon” in the left panel.
- On the right side, find the checkbox next to “Developer” and check it.
- Click “OK” to save your changes.
Now the Developer tab will appear at the top of your Word ribbon. You can click on it anytime to access form controls. This single step makes a huge difference when you are learning how to create a multiple choice sheet in Word efficiently.
Method 1: Using the Developer Tab and Form Controls
This is the most professional method for creating an interactive multiple choice sheet in Word. Form controls let users click a box or select from a dropdown right inside the document. It works great for digital forms that people fill out on their computers.
Adding Checkbox Controls
Checkboxes are the most common element on any answer sheet. Here is how to add them:
- Place your cursor where you want the first checkbox.
- Click on the “Developer” tab in the ribbon.
- Find the “Controls” group and click the checkbox icon.
- A small checkbox will appear in your document.
- Repeat this for each answer option.
You can resize the checkbox by clicking on it and dragging the corners. I recommend keeping them small and neat so they do not distract from the questions. This method works perfectly when you want a clean, modern look for your multiple choice sheet in Word.
Using Dropdown Menus for Answer Selection
Dropdown menus are another great option. Instead of a checkbox, users click a dropdown and pick their answer. This method is especially useful for digital assessments where you want a streamlined look.
- Click on the Developer tab.
- Choose the “Dropdown List” control from the Controls group.
- Click on the inserted dropdown and then click “Properties.”
- Add your answer choices one by one in the dropdown properties window.
- Repeat for each question.
Dropdown menus keep your sheet looking tidy. They are especially helpful when you have long answer options that would make a checkbox layout too wide. Many educators prefer this approach for answer sheet creation in Word because it looks polished and professional.
Method 2: Using Tables and Checkboxes for a Printable Sheet
If you need a printable multiple choice sheet in Word, the table method is your best friend. Tables help you align questions, answer options, and checkboxes neatly on the page. When printed, everything lines up perfectly.
Setting Up Your Table
Start by creating a table with the right number of rows and columns. For a standard quiz, you might want four columns: one for the question number, one for the question text, and two for the answer options. You can adjust the column widths to fit your content.
Here is a simple layout to follow:
- Column 1: Question number (e.g., 1, 2, 3).
- Column 2: The question text itself.
- Column 3: Answer option A and B.
- Column 4: Answer option C and D.
To insert a table, go to the “Insert” tab and click “Table.” Choose the number of rows and columns you need. You can always add or remove rows later as you add more questions.
Adding Checkboxes Inside Table Cells
Once your table is set up, you can insert small checkboxes or bullet symbols in the answer cells. For a printable version, use the simple checkbox symbol from the “Symbol” menu. This gives your sheet a clean, traditional test paper look.
If you want interactive checkboxes for a digital version, use the Developer tab method described earlier. Place one checkbox inside each answer cell. This way, people can fill out the sheet on their computer before printing.
Method 3: Creating a Bubble Answer Sheet
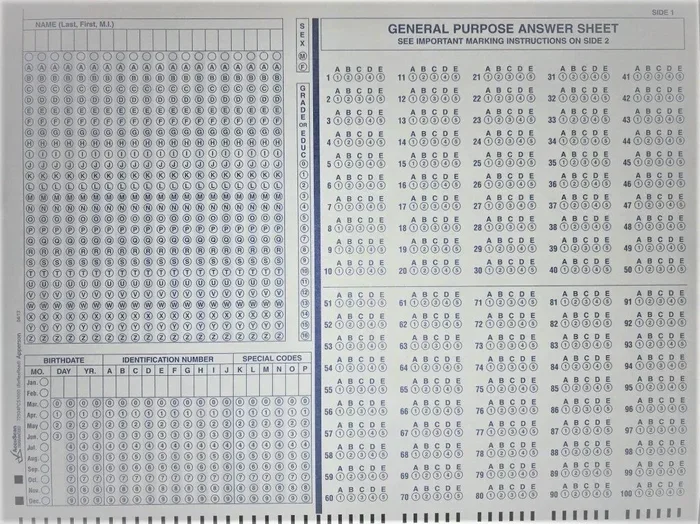
Bubble answer sheets are what most people picture when they think of standardized tests. They feature rows of small circles that students fill in with a pencil. You can recreate this look in Word with a bit of effort.
Drawing Bubble Circles
To create bubble circles, use the “Shapes” tool under the “Insert” tab. Choose the oval shape and draw small circles in a row. Copy and paste them for each answer option. Arrange them neatly using the table method as your guide.
Another quick trick is to use the “Bullet” feature with a circle bullet style. Type your options and set the bullet to a circle shape. This creates a bubble-like appearance without much work. It is a popular shortcut for anyone learning how to create a multiple choice sheet in Word quickly.
Adding Answer Grids
For a more authentic bubble sheet feel, create a separate answer grid section at the top of your page. This grid contains numbers 1 through 50 (or however many questions you have) with five bubbles each. Students fill in the bubble that matches their answer.
Use a light gray or dashed border around the grid to keep it subtle. This separates the answer grid from the question section and makes the sheet easy to navigate. Many teachers love this format for exam day because it saves paper and reduces confusion.
Design Tips for a Professional Multiple Choice Sheet
A good multiple choice sheet in Word is not just about functionality. The design matters just as much. A well-designed sheet is easier to read, less confusing for test takers, and looks more credible.
Keep It Clean and Simple
Avoid cluttering your sheet with too many colors or decorative elements. Stick to a clean white background with black text. Use a standard font like Arial or Calibri in size 11 or 12. These fonts are easy to read and print well on any printer.
Use plenty of white space between questions. Cramped sheets cause confusion and mistakes. Give each question room to breathe. Your goal is to make the sheet as stress-free as possible for the person filling it out.
Number Your Questions Clearly
Every question should have a clear number. This helps test takers track their progress and makes it easy to grade later. You can use bold numbers or a slightly larger font size to make them stand out.
Consistency is key. If you start with “1.” then keep that format for every question. Switching between formats like “1.” and “Question 1” will only create confusion.
Include Instructions at the Top
Always add brief instructions at the top of your sheet. Tell the user how many choices each question has and whether to mark one or more answers. Clear instructions reduce errors and make the sheet more user-friendly.
Common Mistakes to Avoid When Creating a Multiple Choice Sheet
Even experienced Word users make mistakes when building answer sheets. Here are the most common ones and how to avoid them.
Forgetting to Save as a Template
After you create your perfect multiple choice sheet in Word, save it as a template file (.dotx). This way, you can reuse the layout anytime without starting from scratch. Simply go to File > Save As and choose Word Template as the file type.
Ignoring Print Preview
Always check your sheet in Print Preview before printing a full batch. Font sizes and spacing can look different on paper than they do on screen. You do not want to waste a stack of paper because something looked off on your monitor.
Using Inconsistent Formatting
Mixing fonts, sizes, and spacing across your sheet looks unprofessional and confusing. Pick a style at the beginning and stick with it throughout. Use Word’s Styles feature to apply consistent formatting to all your headings and body text.
Overcomplicating the Layout
Sometimes less is more. A simple table with checkboxes works just as well as a fancy design. Do not spend hours on complex layouts when a straightforward approach gets the job done just as effectively. Keep your focus on clarity and usability.
Quick Tips for Faster Sheet Creation
Here are some expert tips that will speed up your workflow when building a multiple choice sheet in Word:
- Use keyboard shortcuts: Press Ctrl+Enter to insert a page break and keep questions on separate pages.
- Copy and paste rows: When using tables, copy an entire row and paste it to quickly add new questions.
- Use the Format Painter: Click the Format Painter tool to copy formatting from one question to the next in seconds.
- Lock your template: Use the Developer tab to lock non-interactive areas so users only fill in the answer fields.
- Add page numbers: Insert automatic page numbers so pages stay in order during printing and grading.
- Use section breaks: Separate the instructions, questions, and answer grid into different sections for better control.
Comparison: Best Methods for Creating a Multiple Choice Sheet
Not sure which method to choose? Here is a quick comparison of the three main approaches to creating a multiple choice sheet in Word:
| Method | Best For | Difficulty Level | Interactive? |
|---|---|---|---|
| Developer Tab Controls | Digital forms and interactive assessments | Medium | Yes |
| Tables with Checkboxes | Printable quizzes and exams | Easy | No (printable) |
| Bubble Sheet Layout | Standardized tests and large exams | Medium | No (printable) |
Each method has its strengths. The Developer Tab method is best for digital use. The Table method is the easiest for beginners. The Bubble Sheet method works well for large-scale testing. Choose the one that matches your needs and skill level.
How to Save Your Multiple Choice Sheet as a Reusable Template
Once you have created your multiple choice sheet in Word, you do not want to rebuild it every time. Saving it as a template is the smartest move you can make.
Go to File > Save As and select “Word Template” from the file type dropdown. Give your template a clear name like “Quiz Answer Sheet Template.” The next time you need a new sheet, simply open the template and start filling in your questions. You will save yourself a ton of time and effort.
You can also store your templates in a dedicated folder on your computer or cloud drive. This makes them easy to find and share with colleagues or fellow teachers. A well-organized template library is a game changer for anyone who creates assessments regularly.
Final Thoughts
Creating a multiple choice sheet in Word does not have to be complicated. With the right tools and a clear plan, you can build a professional answer sheet in under thirty minutes. Whether you choose the Developer Tab method, the table approach, or a bubble sheet layout, Word gives you all the tools you need.
Start with the method that feels most comfortable to you. Practice a few times, and soon you will be creating sheets quickly and confidently. Remember to keep your design clean, your instructions clear, and always preview before printing. These small habits make a big difference in the final result.
Now that you know exactly how to create a multiple choice sheet in Word, it is time to put your skills into action. Open Word, pick a method, and start building. You will be surprised how easy and satisfying the process can be. Happy creating!
Frequently Asked Questions
Can I create a multiple choice sheet in Word for free?
Yes, Microsoft Word already includes all the tools you need. You do not need any extra software or paid add-ins. The Developer tab, tables, and form controls are all built into Word at no additional cost.
How do I make my multiple choice sheet look professional?
Use a clean font like Arial or Calibri, keep the layout simple, and add clear instructions at the top. Consistent spacing and proper alignment make a huge difference. A well-organized table with neat checkboxes gives your sheet a polished, professional appearance.
Can I create an interactive digital answer sheet in Word?
Absolutely. By using the Developer tab and form controls like checkboxes and dropdown menus, you can create a digital answer sheet that users can fill out on their computers. Just remember to save it in a format that preserves the interactive elements.
What is the easiest way to create a multiple choice sheet in Word for beginners?
The table method is the easiest for beginners. Insert a table, add your questions and answer options in the cells, and place checkboxes or bullet symbols in the answer columns. It is straightforward, visual, and requires no advanced Word skills.
Can I print my multiple choice sheet on standard paper?
Yes, all the methods described in this guide work with standard 8.5 x 11 inch paper. Always use Print Preview to check your layout before printing a full batch. Adjust margins and font sizes if needed to fit everything on one page.
How can I grade a multiple choice sheet created in Word more easily?
Number your questions clearly and keep your answer key separate. If you use a bubble answer sheet format, it is easy to grade manually or scan with an optical mark recognition tool. For digital sheets, consider using Word’s tracking features to review responses systematically.