Do You Need Special Wiring For A Wi Fi Thermostat
Most homes can use a Wi-Fi thermostat with existing wiring, but you may need a C wire or a simple adapter. This guide explains wifi thermostat wiring basics, common setups, and how to check if your system is compatible. You will learn whether special wiring is truly necessary and what steps to take before buying a new smart thermostat.
Have you been thinking about upgrading to a Wi-Fi thermostat? Maybe you want to save on energy bills or just enjoy the convenience of controlling your home temperature from your phone. But before you buy one, a common question pops up: do you need special wiring for a Wi-Fi thermostat?
The short answer is no, not always. Many existing thermostat setups already have the wiring needed. But some homes need a small upgrade, like adding a C wire. This guide will walk you through everything you need to know about wifi thermostat wiring in plain, simple language. You will learn how to check your current setup, what wires you need, and how to install your new smart thermostat with confidence.
We will also cover common mistakes people make and share expert tips that can save you time and money. Whether you are a DIY beginner or a seasoned homeowner, this guide has something useful for you. Let us dive in and take the mystery out of thermostat wiring.
Key Takeaways
- Understanding Do You Need Special Wiring For A Wi Fi Thermostat: Provides essential knowledge
📑 Table of Contents
- What Is a Wi-Fi Thermostat and Why Does Wiring Matter?
- Common Wiring Setups for Wi-Fi Thermostats
- Do You Actually Need Special Wiring for a Wi-Fi Thermostat?
- How to Check Your Current Thermostat Wiring
- Installing a Wi-Fi Thermostat: Step-by-Step Guide
- What to Do If Your Wiring Is Not Compatible
- Key Takeaways
- Popular Wi-Fi Thermostats and Their Wiring Needs
- Frequently Asked Questions About Wi-Fi Thermostat Wiring
- Final Thoughts on Wi-Fi Thermostat Wiring
What Is a Wi-Fi Thermostat and Why Does Wiring Matter?
A Wi-Fi thermostat is a smart device that connects to your home wireless network. It lets you control your heating and cooling from anywhere using a phone app. Popular brands like Nest, Ecobee, and Honeywell all make great options. But these devices need a proper power source to work reliably.
Wiring matters because your thermostat draws power from your HVAC system. If the wiring is not set up correctly, the thermostat may not turn on. It might keep shutting off or fail to connect to your Wi-Fi network. Understanding your thermostat wiring setup helps you avoid these frustrating problems.
How Does a Thermostat Get Power?
Most traditional thermostats use very little power. They get their electricity directly from the HVAC system through the wires. A low voltage wiring setup sends a small amount of current to keep the thermostat running. Wi-Fi thermostats need a bit more power because they have screens, Wi-Fi chips, and smart features.
This is where the C wire comes in. The C wire, or common wire, provides a constant flow of power. Without it, some thermostats use batteries, and others steal small amounts of power from the HVAC system. This method is called power stealing, and it can cause issues with some systems.
Why People Upgrade to Wi-Fi Thermostats
There are many good reasons to switch to a smart thermostat. Here are the most popular benefits:
- Energy savings: Smart thermostats learn your schedule and adjust temperatures automatically. This can lower your heating and cooling bills by 10 to 15 percent.
- Remote control: Change the temperature from your couch or even when you are away from home.
- Comfort: Some models offer room sensors and multi-zone control for better comfort.
- Integration: Wi-Fi thermostats work with Alexa, Google Home, and Apple HomeKit.
- Reports: Get detailed energy usage reports to track your savings over time.
Common Wiring Setups for Wi-Fi Thermostats
Not all thermostat wiring is the same. Different homes have different setups. Understanding what you have is the first step to knowing if you need special wiring for your Wi-Fi thermostat.
The Standard 4-Wire Setup
The most common setup in older homes is a 4-wire system. It includes R, W, Y, and G wires. Here is what each wire does:
- R wire: Powers the thermostat from the heating system.
- W wire: Controls the heating.
- Y wire: Controls the cooling.
- G wire: Controls the fan.
This setup works for many basic Wi-Fi thermostats. But without a C wire, the thermostat may need to steal power or use batteries. This can lead to occasional shutdowns or Wi-Fi disconnections.
The 5-Wire Setup With a C Wire
A 5-wire setup includes all four standard wires plus a C wire. The C wire, or common wire, provides continuous power. This is the ideal setup for Wi-Fi thermostats. Most smart thermostats work perfectly with a C wire in place.
If your home has a 5-wire setup, you are in luck. You likely do not need any special wiring. Just match the wires to the correct terminals on your new thermostat. The thermostat compatibility will be smooth and straightforward.
The 2-Wire Setup
Some older homes have only 2 wires. These systems are very basic and often control just heating or just cooling. A 2-wire setup can be tricky for Wi-Fi thermostats. You may need a power adapter or a special thermostat designed for low-power systems.
The Heat Pump Wiring Setup
Homes with heat pumps have a different wiring configuration. They usually include additional wires like O, B, and Aux. Heat pump systems need a thermostat that supports reversing valve control. Make sure your Wi-Fi thermostat is compatible with heat pump wiring before purchasing.
Do You Actually Need Special Wiring for a Wi-Fi Thermostat?
This is the big question, and the answer depends on your current setup. Let us break it down so you know exactly where you stand.
When You Do NOT Need Special Wiring
You do not need special wiring if your home has a standard 4-wire or 5-wire setup. Most modern homes built after the 1980s already have a C wire or enough wires to support a Wi-Fi thermostat. In these cases, the thermostat installation process is simple and direct.
Many popular Wi-Fi thermostats come with a power adapter that plugs into a standard outlet. These battery-powered or adapter-powered models do not rely on your HVAC wiring at all. This is a great option if your wiring is limited.
When You DO Need Special Wiring
You may need to add or modify wiring if your home has a 2-wire setup or no C wire. In these cases, you have a few options:
- Add a C wire: Run a new wire from your HVAC system to the thermostat location. This is the most reliable solution.
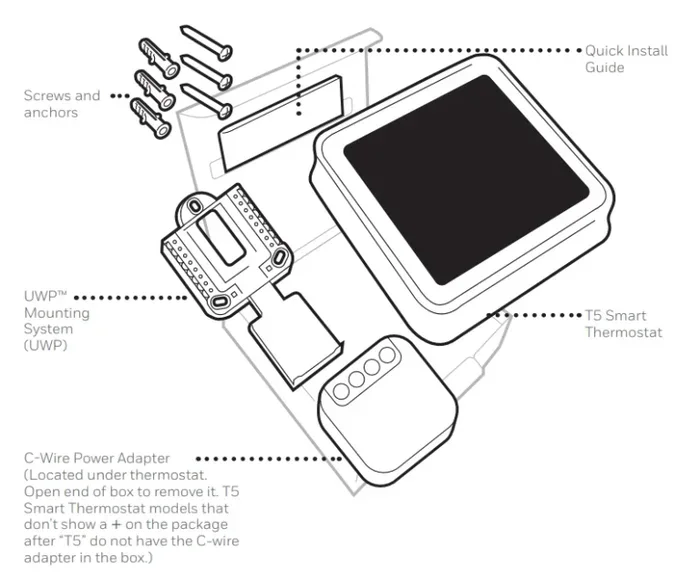
- Use a power adapter: Some thermostats come with a small adapter that provides power without a C wire.
- Use a C wire adapter: Devices like the Venstar Add-A-Wire or similar adapters can create a C wire from your existing setup.
- Choose a battery-powered model: Some Wi-Fi thermostats run on batteries and need no wiring changes at all.
The Role of the C Wire in Wi-Fi Thermostat Wiring
The C wire is the most talked-about wire when it comes to smart thermostats. It provides a constant power source that keeps your thermostat running 24/7. Without it, your thermostat might lose connection or shut down during heating or cooling cycles.
Here is a quick comparison of setups with and without a C wire:
| Feature | With C Wire | Without C Wire |
|---|---|---|
| Power Source | Constant power from HVAC | Battery or power stealing |
| Wi-Fi Stability | Strong and consistent | May drop connection |
| Screen Brightness | Full brightness always | May dim or shut off |
| Installation | Simple plug-and-play | May need adapter or batteries |
| Long-Term Reliability | Very reliable | Battery replacement needed |
As you can see, having a C wire makes a big difference. It is the gold standard for smart thermostat wiring and ensures the best performance.
How to Check Your Current Thermostat Wiring
Before you buy a new Wi-Fi thermostat, check what wires you currently have. This step takes just a few minutes and can save you from buying the wrong product. Here is how to do it safely.
Step-by-Step Wiring Check
- Turn off your HVAC system: Switch off the power at the breaker or the system switch near the unit. Safety first.
- Remove the thermostat cover: Gently pull off the front plate of your current thermostat. You will see the wires connected to terminals.
- Label each wire: Use a piece of tape or a marker to note which wire goes to which terminal. Take a photo with your phone for reference.
- Check for a C wire: Look for a wire connected to the C terminal. If you see one, you have a C wire. If the C terminal is empty, you do not have one.
- Count the wires: Note the total number of wires. This helps you determine your setup type.
- Turn the power back on: Once you are done, restore power to your HVAC system.
Understanding Wire Colors
Wire colors can give you clues about what each wire does. However, colors are not always reliable because previous owners or installers may have used different colors. Here is a general guide to thermostat wiring colors:
- Red wire: Usually the R wire (power for heating).
- White wire: Usually the W wire (heating control).
- Yellow wire: Usually the Y wire (cooling control).
- Green wire: Usually the G wire (fan control).
- Blue wire: Often the C wire (common wire), but not always.
Expert Insight
HVAC professionals recommend always taking a photo of your wiring before disconnecting anything. This simple step saves hours of confusion during installation. If you are unsure about any wire, consult a licensed HVAC technician. It is always better to be safe than to damage your system.
Installing a Wi-Fi Thermostat: Step-by-Step Guide
Once you know your wiring setup, you can move forward with installation. Most Wi-Fi thermostats come with clear instructions, but here is a general overview of the process.
What You Will Need
- Your new Wi-Fi thermostat
- A screwdriver (usually Phillips head)
- Your phone or tablet with the thermostat app
- Your labeled wires from the check above
- A level tool for mounting
Installation Steps
- Turn off the HVAC power: Always start by shutting off the system at the breaker.
- Remove the old thermostat: Detach the base plate and disconnect the wires. Keep them labeled.
- Mount the new base plate: Use the template included with your thermostat to mark and drill holes if needed. Thread the wires through the wall.
- Connect the wires: Match each wire to the correct terminal on the new base plate. Tighten the screws securely.
- Attach the thermostat display: Snap the display onto the base plate.
- Turn the power back on: Restore power at the breaker.
- Follow the app setup: Open the thermostat app and follow the on-screen instructions to connect to your Wi-Fi network.
Quick Tips for a Smooth Installation
- Do not let the wires touch each other while they are disconnected. This can cause a short circuit.
- Use the included wall anchors for a secure mount.
- Make sure the base plate is level before tightening the screws.
- Test the heating and cooling separately after installation.
- If the screen does not turn on, double-check the C wire or battery installation.
Common Mistakes to Avoid
One of the biggest mistakes is forcing a wire into the wrong terminal. Always match the wire label or color to the correct terminal. Another mistake is skipping the C wire check. Without a C wire, your thermostat may work at first but cause problems later. Also, do not forget to turn the power back on before testing your new thermostat.
What to Do If Your Wiring Is Not Compatible
If you discover that your current wiring does not support a Wi-Fi thermostat, do not worry. You have several options to make it work.
Option 1: Hire an Electrician to Add a C Wire
The most reliable fix is to have a professional electrician or HVAC technician add a C wire to your system. This typically costs between $100 and $300 depending on your location and the complexity of the job. Once the C wire is in place, you can install any Wi-Fi thermostat you want.
Option 2: Use a Power Extender Kit
Some thermostat brands sell power extender kits. These kits use your existing wires to create a C wire signal. They are affordable and easy to install. The Ecobee brand, for example, includes a power extender kit with many of its models. This is a great budget-friendly solution for homes without a C wire.
Option 3: Choose a Battery-Powered Wi-Fi Thermostat
If you do not want to change any wiring, look for a battery-powered Wi-Fi thermostat. These models run on AA or AAA batteries and need no C wire at all. The trade-off is that you will need to replace the batteries every few months to a year.
Option 4: Use a Plug-In Power Adapter
Some Wi-Fi thermostats come with a plug-in adapter. You run a low-voltage wire from the adapter to the thermostat base. This gives the thermostat a constant power source without needing a C wire from the HVAC system.
Key Takeaways
- Most homes do not need special wiring: A standard 4-wire or 5-wire setup works with most Wi-Fi thermostats.
- The C wire is the gold standard: It provides constant power and ensures the best performance for your smart thermostat.
- You have options if wiring is limited: Power adapters, battery-powered models, and C wire extenders can solve compatibility issues.
- Always check your wiring first: Take a photo and label each wire before purchasing a new thermostat.
- Installation is usually straightforward: Most Wi-Fi thermostats come with clear instructions and app-based setup.
- When in doubt, call a pro: An HVAC technician can quickly assess your wiring and make any needed upgrades.
Popular Wi-Fi Thermostats and Their Wiring Needs
Not all Wi-Fi thermostats are the same when it comes to wiring requirements. Here is a look at some popular models and what they need.
Google Nest Thermostat
The Nest Thermostat works with most standard 4-wire and 5-wire setups. It can also work without a C wire by using power stealing. However, Nest recommends having a C wire for the best experience. The Nest app provides a compatibility check tool that makes it easy to see if your system works with this thermostat.
Ecobee SmartThermostat
Ecobee thermostats come with a power extender kit in the box. This kit solves the no-C-wire problem for most systems. Ecobee is a great choice if your home has a 4-wire setup without a C wire. The included extender kit makes the thermostat installation process smooth for most users.
Honeywell Home T9
The Honeywell T9 supports both wired and battery-powered operation. It works with 4-wire setups and includes options for remote room sensors. This thermostat is flexible and works well in homes with limited wiring options.
Amazon Echo Thermostat
The Echo Thermostat is designed for simplicity. It works with 2-wire, 4-wire, and 5-wire systems. It is a good choice for those who want a straightforward smart thermostat without complicated wiring requirements.
Frequently Asked Questions About Wi-Fi Thermostat Wiring
Can I install a Wi-Fi thermostat myself?
Yes, most homeowners can install a Wi-Fi thermostat themselves if they follow the instructions carefully. The process is similar to replacing a traditional thermostat. Just make sure to turn off the power first and label your wires before disconnecting them. If you feel unsure at any point, it is always best to call a professional.
What happens if I do not have a C wire?
Without a C wire, your Wi-Fi thermostat may still work. Many models use power stealing or batteries to operate. However, you might experience Wi-Fi disconnections or screen dimming. Adding a C wire or using a power extender kit solves these issues and gives you the most reliable performance.
Is adding a C wire expensive?
Adding a C wire typically costs between $100 and $300 if you hire a professional. The actual wire and materials are inexpensive. The cost comes from the labor involved in running the wire through your walls. Some homeowners choose to add the wire themselves if they are comfortable with basic electrical work.
Can I use a Wi-Fi thermostat with a boiler or radiant heating system?
Yes, but the wiring may be different. Boilers and radiant heating systems often use a different wiring setup than forced-air systems. Check the thermostat compatibility before purchasing. Some Wi-Fi thermostats are specifically designed for hydronic or radiant heating systems. Always verify the product specifications match your system type.
Do Wi-Fi thermostats work with smart home systems?
Most modern Wi-Fi thermostats work with popular smart home platforms. You can control them using Alexa, Google Assistant, or Apple HomeKit. Before buying, check that the thermostat you choose supports your preferred smart home ecosystem. This ensures seamless integration and voice control capability.
What is the lifespan of a Wi-Fi thermostat?
A good quality Wi-Fi thermostat can last 5 to 10 years with proper care. The screen and internal electronics may wear out over time. Battery-powered models need regular battery replacements. Wired models with a C wire tend to last longer because they have a stable power source. Keeping your thermostat software updated also helps extend its lifespan.
Final Thoughts on Wi-Fi Thermostat Wiring
So, do you need special wiring for a Wi-Fi thermostat? In most cases, the answer is no. Your existing thermostat wiring is likely good enough to support a smart thermostat upgrade. The key is to check your current setup first and understand what wires you have.
If you have a C wire, you are in great shape. If you do not, you still have plenty of options like power adapters, battery-powered models, and C wire extenders. The world of Wi-Fi thermostat wiring is much less intimidating than it seems at first glance.
Take your time, do your research, and follow the steps in this guide. Whether you choose a Nest, Ecobee, Honeywell, or another brand, the right thermostat can make your home more comfortable and your energy bills lower. Start by checking your wiring today, and you will be well on your way to enjoying the benefits of a smart thermostat in no time.
The investment in a Wi-Fi thermostat pays for itself quickly through energy savings and the daily convenience of controlling your home climate from anywhere. With the right wifi thermostat wiring setup, you will wonder why you did not upgrade sooner.