How Do I Design An Excel Spreadsheet To Track Rentals
Designing an Excel spreadsheet to track rentals is one of the smartest moves a landlord or property manager can make. This guide walks you through every step to create a custom rental tracking spreadsheet that handles income, expenses, tenant data, and lease details. You will learn column setups, formula tips, and automation tricks that save hours of manual work.
Managing rental properties can feel overwhelming. You have tenants to track, payments to record, expenses to log, and reports to generate. Without a solid system, things slip through the cracks fast. That is where a well-designed Excel spreadsheet for rental tracking comes in handy.
So, how do I design an Excel spreadsheet to track rentals? The answer is simpler than you think. With the right columns, formulas, and a bit of planning, you can build a tool that does the heavy lifting for you. This guide breaks it all down into clear, actionable steps. You will walk away with a template you can use right away.
Whether you manage one property or twenty, this approach works. It keeps your rental data organized, your finances clear, and your stress level low. Let us dive in and build something that actually works.
Key Takeaways
- Start with a clear layout: Define the columns you need before you build anything in Excel.
- Use formulas and conditional formatting: These features automate calculations and highlight overdue payments instantly.
- Separate income from expenses: Keeping these categories distinct makes monthly reporting much easier.
- Add a dashboard view: A summary tab gives you a quick snapshot of your rental portfolio performance.
- Back up your file regularly: Cloud storage and auto-save features protect your data from loss.
- Keep it simple at first: Start with basic columns and expand as your needs grow.
📑 Table of Contents
- Why Use Excel for Rental Tracking?
- Planning Your Rental Tracking Spreadsheet
- Setting Up Your Excel Spreadsheet Step by Step
- Adding Formulas and Automation
- Building a Dashboard for Quick Insights
- Common Mistakes to Avoid When Designing Your Spreadsheet
- Expert Tips to Level Up Your Rental Spreadsheet
- Conclusion
Why Use Excel for Rental Tracking?
Before we start building, let us talk about why Excel is such a great choice. Many landlords and property managers already have Microsoft Office on their computers. Excel is familiar, flexible, and powerful. You do not need expensive software to get professional results.
Here are some big reasons to use Excel for your rental property management needs:
- Cost-effective: You likely already own Excel through Microsoft 365 or a standalone license.
- Fully customizable: You control every column, formula, and layout choice.
- No monthly fees: Unlike property management software, Excel does not charge you a recurring fee per property.
- Portable: You can open your file on any computer and your data stays intact.
- Scalable: Start with one property and expand to dozens without switching tools.
Excel also gives you powerful tools like conditional formatting, pivot tables, and charting features. These make your data come alive. You can spot trends, catch problems early, and make smarter decisions about your rental portfolio.
When Spreadsheets Work Best
Excel shines when you have fewer than about fifty units. For larger portfolios, you might eventually want dedicated property management software. But for most individual landlords and small property managers, Excel is the sweet spot. It gives you control without complexity.
Planning Your Rental Tracking Spreadsheet
Good design starts before you type anything. Take a few minutes to plan your layout. This saves you from rebuilding later. Think about what data you really need to track.
Start by asking yourself these questions:
- How many properties am I tracking?
- Do I need to track individual units or just properties?
- What payment methods do my tenants use?
- Do I want to include maintenance and repair costs?
- Will I need to generate monthly or annual reports?
Your answers shape your spreadsheet design. A single-family landlord needs different columns than a multi-unit property manager. Keep your actual needs at the center of the design process.
Core Data Points Every Rental Tracker Needs
Every solid rental tracking spreadsheet should capture these essential data points:
- Tenant name and contact info: Full name, phone number, email, and emergency contact.
- Property address: Street address, city, state, and ZIP code.
- Unit number: Especially important for multi-unit properties.
- Lease start and end dates: This helps you track lease renewals and expirations.
- Monthly rent amount: The agreed-upon rent for each unit.
- Payment due date: When rent is expected each month.
- Payment received date and amount: Track actual payments against what is due.
- Expense categories: Maintenance, repairs, property management fees, insurance, taxes, and utilities.
Write these down on a piece of paper before you open Excel. Having a clear list makes the build process much smoother.
Setting Up Your Excel Spreadsheet Step by Step
Now comes the fun part. Let us build your spreadsheet from scratch. I will walk you through each tab and column so you can follow along.
Tab 1: Tenant and Property Directory
Create your first tab and label it “Directory.” This tab serves as your master reference. It holds all the key information about your tenants and properties in one place.
Set up these columns in your directory tab:
- Tenant Name – Full legal name of the tenant.
- Phone Number – Primary contact number.
- Email Address – For digital communication.
- Property Address – Full address of the rental.
- Unit Number – Apartment or unit identifier.
- Lease Start Date – When the lease begins.
- Lease End Date – When the lease expires.
- Monthly Rent – The rent amount in dollars.
- Security Deposit – Amount collected at move-in.
- Status – Active, Vacant, or Ended.
Use the Format as Table feature in Excel. This gives you filter buttons at the top of each column. You can quickly sort tenants by status, find units by address, or filter for active leases. It is a small step that saves a ton of time.
Tab 2: Monthly Rent Tracker
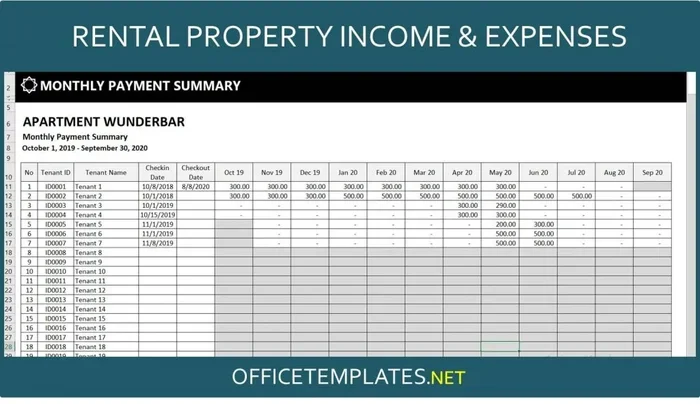
This is the heart of your rental income tracking spreadsheet. Create a second tab called “Rent Tracker.” Each row represents one month for one unit.
Use these columns:
- Month/Year – The payment period.
- Tenant Name – Who paid.
- Property Address – Which unit.
- Rent Due – The amount expected.
- Rent Paid – The amount received.
- Payment Date – When the payment arrived.
- Balance Due – Calculated automatically using a formula.
- Payment Method – Check, bank transfer, cash, or online.
- Late Fee – Any penalty charged for late payment.
- Notes – Any relevant details or comments.
For the Balance Due column, use this simple formula: =D2-E2-F2. This subtracts the amount paid and any late fee from the rent due. Excel will calculate this automatically for every row.
Tab 3: Expense Log
Create a third tab called “Expenses.” Tracking your costs is just as important as tracking income. This tab keeps everything organized.
Set up these columns:
- Date – When the expense occurred.
- Property Address – Which property the expense relates to.
- Category – Maintenance, repairs, insurance, taxes, management fees, or other.
- Description – A brief note about the expense.
- Amount – The cost in dollars.
- Paid Via – Check, credit card, bank transfer, or cash.
- Receipt Attached – Yes or No.
This tab becomes invaluable at tax time. You will have every expense organized by category and property. No more scrambling to find receipts or remember what you spent last year.
Adding Formulas and Automation
This is where your spreadsheet transforms from a simple table into a powerful tool. Formulas do the math for you, so you never have to calculate totals by hand again.
Essential Formulas for Your Rental Tracker
Here are the formulas that make your Excel rental template truly useful:
- SUM: =SUM(F2:F100) adds up all rent payments in a column. Great for monthly totals.
- AVERAGE: =AVERAGE(G2:G100) calculates your average monthly rent collected.
- IF statement: =IF(E2>D2,”Overdue”,”Paid”) flags late payments automatically.
- COUNTIF: =COUNTIF(H:H,”Overdue”) counts how many tenants are behind on rent.
- VLOOKUP: Pulls tenant details from your Directory tab based on name or unit number.
You do not need to memorize all of these. Start with SUM and IF statements. Add more formulas as you grow comfortable. Each new formula makes your tracker more powerful.
Using Conditional Formatting to Highlight Problems
Conditional formatting is a game-changer. It automatically changes cell colors based on the data inside them. Set up rules like these:
- Red highlight: Any cell in the Balance Due column that is greater than zero.
- Green highlight: Any cell where the payment status shows “Paid.”
- Yellow highlight: Lease end dates within 60 days.
Now you can glance at your spreadsheet and instantly see what needs attention. Red cells scream “fix this.” Green cells mean everything is current. It is visual management at its finest.
Building a Dashboard for Quick Insights
Create a fourth tab called “Dashboard.” This is your at-a-glance summary. It pulls key numbers from your other tabs and displays them in one place.
Your dashboard should show:
- Total monthly rent collected – A big bold number right at the top.
- Total monthly expenses – So you can see your net income at a glance.
- Number of vacant units – Helps you focus on filling empty spaces.
- Overdue payments – A count and list of tenants who owe money.
- Occupancy rate – The percentage of units that are currently rented.
- Year-to-date profit – Total income minus total expenses for the current year.
You can create simple bar charts and pie charts on this tab. They make your data visual and easy to understand. Even if you are not a spreadsheet wizard, charts tell a clear story about your rental business.
Quick Tips for Dashboard Success
- Keep the dashboard clean. Do not clutter it with too much data.
- Use large fonts for key numbers. You want them readable at a glance.
- Link cells to your Rent Tracker and Expense tabs. This keeps everything live and updated.
- Update your dashboard weekly. Make it part of your routine.
Common Mistakes to Avoid When Designing Your Spreadsheet
Even with the best intentions, people make mistakes when building rental trackers. Here are the most common ones and how to avoid them.
Mistake 1: Starting Too Complex
Do not try to build the perfect spreadsheet on day one. Start with basic columns and add features as you go. Overcomplicating things early on leads to frustration and abandoned templates. Keep it simple and build from there.
Mistake 2: Inconsistent Data Entry
If you type “Apt 4B” in one row and “Unit 4B” in another, your data becomes messy. Pick one format and stick with it. Use data validation dropdown lists where possible. This forces consistent entries and prevents typos.
Mistake 3: Forgetting to Back Up
Hard drives crash. Laptops get stolen. If your only copy of the spreadsheet lives on one computer, you are at risk. Save your file to OneDrive, Google Drive, or Dropbox. Set up auto-save. A backup habit protects your hard work.
Mistake 4: Ignoring Lease Expiration Dates
Many landlords build great income trackers but forget to include lease end dates. When a lease expires, you need time to find a new tenant. Track those dates and set calendar reminders. This gives you a head start on renewal negotiations and marketing.
Mistake 5: Not Updating Regularly
A spreadsheet is only useful if you keep it current. Make a habit of entering payments and expenses weekly. Do not let weeks pile up. Regular updates keep your data accurate and your reports reliable.
Expert Tips to Level Up Your Rental Spreadsheet
Once you have the basics in place, try these pro tips to make your rental property spreadsheet even more powerful.
Add a Vacancy Tracker
Create a small section on your Dashboard that tracks vacant units. Include the date the unit became vacant and the date it was filled. This helps you calculate your average vacancy period. You can then set goals to reduce that number over time.
Use Data Validation for Dropdown Menus
Dropdown menus prevent typos and keep your data clean. In your Rent Tracker tab, create a dropdown for Payment Method with options like Check, Bank Transfer, Cash, and Online. In your Expense Log, create a dropdown for Category. These small touches make a big difference in data quality.
Create a Monthly Report Template
Build a fifth tab called “Monthly Report.” Use formulas to pull totals from your Rent Tracker and Expense tabs. Add a section for notes about each property. At the end of every month, fill in this template. Over time, you build a detailed record of your rental business performance.
Protect Your Formulas
Once you have formulas working, lock those cells. Go to Review > Protect Sheet in Excel. This prevents accidental edits to your formulas while still allowing data entry in the right cells. It is a small step that saves you from frustrating errors.
Track Rental Yield and Return on Investment
Advanced users can add a section that calculates rental yield. Divide your annual net income by your total property value. This gives you a percentage that shows how well each property is performing. Compare yields across properties to decide where to invest your time and money next.
Conclusion
Designing an Excel spreadsheet to track rentals does not have to be hard. Start with the basics. Build your Directory, Rent Tracker, and Expense tabs. Add formulas and conditional formatting to automate your work. Create a Dashboard for quick insights. Avoid the common mistakes that trip up other landlords. And keep improving your spreadsheet over time.
The key is to start now. Do not wait for the perfect template. Build something simple today and refine it as you learn what works for your rental business. Your future self will thank you when tax season arrives or when you need to make a quick decision about a property.
Take the first step today. Open Excel, create a new file, and start building. You will be amazed at how much easier rental management becomes when your data is organized and accessible. A well-designed rental tracking spreadsheet is one of the best investments you can make in your rental business.
Frequently Asked Questions
What columns should I include in a rental tracking spreadsheet?
Your spreadsheet should include columns for tenant name, property address, unit number, lease dates, monthly rent, payment dates, amounts paid, balance due, payment method, and expense categories. Start with these basics and add more columns as your needs grow. The key is to capture all the financial and tenant data in one organized place.
Can I use a free Excel template instead of building one from scratch?
Yes, Microsoft offers free rental tracker templates on the Excel template gallery. These can save you time and give you a solid starting point. However, building your own spreadsheet gives you full control over the layout and features. You can customize it exactly to match your rental business needs.
How often should I update my rental tracking spreadsheet?
Update your spreadsheet at least once a week. Enter all rent payments, expenses, and lease changes during your weekly review session. Consistent updates keep your data accurate and prevent backlogs. Many successful landlords make this part of their Monday morning routine.
Is Excel enough for managing multiple rental properties?
Excel works well for managing up to about fifty units. For larger portfolios, you may eventually want dedicated property management software. But for most individual landlords and small property managers, Excel provides all the tools you need. Its flexibility and customization options make it surprisingly powerful.
How can I protect my rental spreadsheet data?
Save your file to a cloud service like OneDrive or Google Drive for automatic backups. Use Excel’s Protect Sheet feature to lock formula cells. Keep a separate backup copy on an external drive. These simple steps protect your data from accidental loss or corruption.
What is the best way to track overdue rent payments in Excel?
Use an IF formula in your Balance Due column to automatically flag overdue amounts. Apply conditional formatting to highlight overdue rows in red. You can also use the COUNTIF function to get a total count of overdue payments at a glance. These tools make it easy to spot and follow up on late payments quickly.