Does Arduino Uno Have Bluetooth Capabilities Built In
Does Arduino Uno Have Bluetooth Capabilities Built In? The short answer is no. The Arduino Uno does not come with Bluetooth on the board. However, you can easily add wireless communication using a Bluetooth module like the HC-05 or HC-06. This guide covers everything from wiring to code, so you can start building wireless Arduino projects today.
The Arduino Uno is a staple in the maker world. It is affordable, easy to learn, and has a huge community. One question beginners often ask is: Does Arduino Uno Have Bluetooth Capabilities? They want to build wireless projects without extra complexity. The answer is not a simple yes or no. The board itself does not include Bluetooth. But you can add it with a small module. This guide will walk you through everything you need to know. You will learn about built-in options, external modules, wiring, coding, and fun project ideas.
Many people love the Arduino Uno for its simplicity. It has a USB connection for programming and serial communication. It also has plenty of digital and analog pins. However, wireless communication is not native. Bluetooth is a popular way to add wireless control. You can connect your Arduino to a phone or computer without cables. This opens up many possibilities. In this article, we will explore how to give your Arduino Uno Bluetooth capabilities. We will cover the basics, the modules you need, and step-by-step instructions.
Key Takeaways
- No built-in Bluetooth: The Arduino Uno lacks Bluetooth hardware on the board itself.
- Easy to add: You can connect a Bluetooth module such as HC-05 or HC-06 with just a few wires.
- Works with standard Serial: Bluetooth modules use the same Serial communication as the USB connection.
- Many project possibilities: From smartphone-controlled robots to wireless data loggers, the options are endless.
- Simple wiring: Only a few pins are needed, and no special libraries are required for basic communication.
- Watch out for voltage: The HC-05 module uses 3.3V logic, so level shifting may be needed for 5V Arduino.
📑 Table of Contents
- What Is the Arduino Uno and Why Is It So Popular?
- Does Arduino Uno Have Bluetooth Capabilities Built In?
- Understanding Bluetooth Modules for Arduino Uno
- Step-by-Step: Adding Bluetooth to Your Arduino Uno
- Fun Arduino Bluetooth Projects You Can Build
- Quick Tips and Common Mistakes to Avoid
- Conclusion: So, Does Arduino Uno Have Bluetooth Capabilities?
What Is the Arduino Uno and Why Is It So Popular?
The Arduino Uno is a microcontroller board based on the ATmega328P. It has 14 digital input/output pins, 6 analog inputs, and a 16 MHz crystal oscillator. It is programmed through the Arduino IDE using a USB cable. The board is very beginner-friendly. It has a large community and thousands of tutorials online. People use it for robots, sensors, displays, and more. The Uno is the go-to board for learning electronics. Its simplicity makes it perfect for first-time makers. You can plug it in, write a few lines of code, and see results fast.
The board has a USB port that serves two purposes. It provides power and it creates a serial communication link. This serial link is what you use to upload code and to print debug messages. The Serial Monitor in the Arduino IDE is a handy tool. It lets you see data from the board in real time. This same serial communication is the key to adding Bluetooth. A Bluetooth module can sit on top of the existing serial connection. It acts like a wireless bridge. So, when you ask Does Arduino Uno Have Bluetooth Capabilities, the real question is how to add that wireless bridge.
Does Arduino Uno Have Bluetooth Capabilities Built In?
The direct answer is no. The Arduino Uno does not have Bluetooth hardware on the board. There is no Bluetooth chip or antenna. The original Arduino Uno (R3) relies on the ATmega328P chip. That chip handles the core processing. It does not include wireless features. Some newer Arduino boards do have built-in Bluetooth. The Arduino Nano 33 IoT and the Arduino MKR WiFi 1010 come with wireless capabilities. But the classic Uno does not. If you want wireless communication with an Uno, you must add an external module.
So why do people sometimes think the Uno has Bluetooth? Maybe because the Uno has a USB connection. USB can be used for serial communication. Some people confuse that with wireless. Others may have seen Arduino boards with built-in Bluetooth and assumed all Arduinos have it. The truth is, the Uno is a wired board by design. It is meant to be simple and reliable. Adding Bluetooth is an easy upgrade. You just need the right module and a few wires. This keeps the board low-cost and flexible. You can choose the Bluetooth module that fits your project. You can pick a classic module or a newer BLE module.
The Truth About Built-in Wireless
Built-in wireless means the Bluetooth chip is soldered directly onto the PCB. The Arduino Nano 33 IoT has a u-blox module with Bluetooth and Wi-Fi. The MKR WiFi 1010 also has built-in wireless. These boards are great for IoT projects. They save you from wiring a separate module. But they cost more than the Uno. The Uno is still the king of entry-level boards. Its price is hard to beat. For many projects, adding a Bluetooth module to the Uno is the best approach. It gives you the wireless you need without a big price increase. The Uno also has a large pin header, making it easy to wire modules.
What the Arduino Uno Actually Offers
The Arduino Uno offers a robust serial communication interface. It has a hardware serial port (UART) on pins 0 (RX) and 1 (TX). This port is used for programming and Serial Monitor output. You can also use SoftwareSerial to create additional serial ports on other pins. This flexibility is perfect for adding a Bluetooth module. You can connect the module to the hardware serial or use SoftwareSerial to free up the main serial for debugging. The Uno also has a reset button, a power jack, and ICSP header. These features make it a complete development platform. When you add a Bluetooth module, you turn this wired platform into a wireless one.
Understanding Bluetooth Modules for Arduino Uno
To give your Arduino Uno Bluetooth capabilities, you need a Bluetooth module. These modules are small chips with a Bluetooth antenna. They communicate with the Arduino using serial communication. The most popular modules are the HC-05 and HC-06. They are cheap, widely available, and easy to use. There is also the HC-07 and BLE modules for newer projects. Let us look at the common options.
How Bluetooth Modules Work with Arduino
A Bluetooth module acts like a wireless serial cable. It replaces the USB cable between your Arduino and a computer or phone. The module has a UART interface. It connects to the Arduino’s TX and RX pins. When the Arduino sends data out, the module transmits it via Bluetooth. A paired device receives the data. The module can also receive data. It sends that data back to the Arduino. This two-way communication allows you to control things remotely. You can send commands from a phone app to the Arduino. The Arduino can then control motors, lights, or sensors. The whole process is seamless. The module handles the Bluetooth protocol. You just send and receive bytes like a normal serial connection.
HC-05 vs HC-06 vs BLE Modules: A Comparison
Not all Bluetooth modules are the same. The HC-05 and HC-06 are the most common. They use Bluetooth Classic. They are reliable and have a range of about 10 meters. They are perfect for simple wireless projects. BLE modules like the HM-10 use Bluetooth Low Energy. They use less power. They are great for battery-powered projects. Here is a quick comparison table to help you choose.
| Module | Type | Voltage | Range | Key Feature |
|---|---|---|---|---|
| HC-05 | Bluetooth Classic | 3.3V (5V tolerant) | ~10 meters | Master/Slave mode, AT commands |
| HC-06 | Bluetooth Classic | 3.3V | ~10 meters | Slave only, simpler setup |
| HM-10 (BLE) | Bluetooth Low Energy | 3.3V | ~30 meters | Low power, iOS compatible |
| HC-07 | BLE | 3.3V | ~20 meters | Dual mode, versatile |
The HC-05 is the most versatile. It can act as a master or slave. This means it can connect to other Bluetooth devices. The HC-06 is a slave only. It waits for a master to connect. For most Arduino projects, the HC-05 is the best choice. It is a bit more expensive but very flexible. The HM-10 BLE module is great for mobile apps. iOS devices prefer BLE. Android supports both Classic and BLE. If you want long battery life, go with BLE. If you want simplicity, the HC-05 or HC-06 is fine.
Step-by-Step: Adding Bluetooth to Your Arduino Uno
Now that you know which module to pick, let us wire it up. Adding Bluetooth to an Arduino Uno is straightforward. You need a few jumper wires and the module. I will show you how to connect an HC-05 module. The wiring is similar for HC-06 and HM-10. Always check your module’s pinout. Some modules have 6 pins, others have 4. We will use the basic 4-pin connection.
Wiring the Bluetooth Module
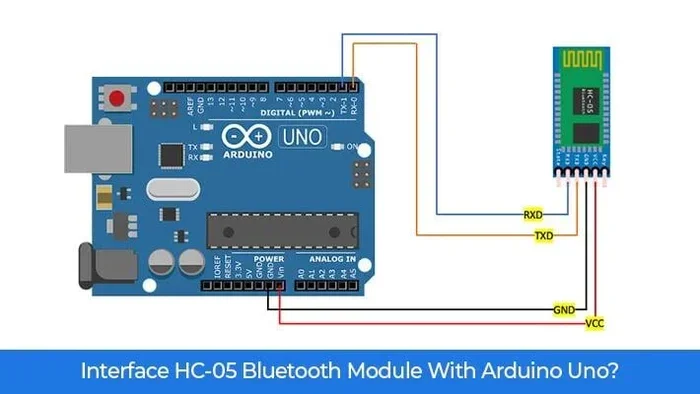
Here is the wiring guide for an HC-05 module to Arduino Uno. Use jumper wires to make the connections. Keep the wires short for better signal quality. Do not exceed 30 centimeters for reliable communication.
- HC-05 VCC → Arduino 5V (or 3.3V if your module requires it)
- HC-05 GND → Arduino GND
- HC-05 TXD → Arduino Pin 10 (SoftwareSerial RX)
- HC-05 RXD → Arduino Pin 11 (SoftwareSerial TX)
Important note about voltage levels. The HC-05 module uses 3.3V logic. The Arduino Uno outputs 5V on its digital pins. Connecting 5V directly to the HC-05 RX pin can damage it. The good news is that the HC-05 RX pin is often 5V tolerant. But to be safe, you can use a voltage divider. Two resistors (1kΩ and 2kΩ) will step down the 5V to 3.3V. This protects the module. Many people skip this and it works fine. But if you want a long-lasting project, add the voltage divider. It is a small effort for big peace of mind.
Uploading the Code
Before uploading code, you must disconnect the HC-05 RX and TX wires. The Bluetooth module shares the same serial port used for programming. If you leave it connected, the upload will fail. After uploading the code, reconnect the module. Here is a simple sketch that sends “Hello” every 2 seconds. Open the Serial Monitor to see the output. You can also use a Bluetooth terminal app on your phone to receive the data.
First, make sure the Arduino IDE is installed. Connect the Uno via USB. Select the correct board and port. Paste this code into the IDE and upload it. Once uploaded, reconnect the Bluetooth module wires. Open the Serial Monitor at 9600 baud. You should see “Hello” appearing every 2 seconds. Now pair your phone with the HC-05. The default PIN is usually 1234 or 0000. Use a Bluetooth terminal app like “Serial Bluetooth Terminal”. You should see the same “Hello” messages on your phone. That is the magic of wireless communication.
Fun Arduino Bluetooth Projects You Can Build
The real fun begins when you apply Bluetooth to real projects. The Arduino Uno becomes a wireless controller or a remote sensor hub. Here are some popular project ideas that use Bluetooth capabilities. Each project is easy to start and can be expanded.
Smartphone-Controlled Robot Car
This is a classic Arduino Bluetooth project. You build a simple robot car with two DC motors. The Arduino Uno controls the motors through a motor driver. Your phone acts as the remote control. You use a Bluetooth terminal app to send commands. For example, sending “F” makes the car go forward. “B” makes it go backward. “L” turns left, “R” turns right. The Arduino reads the serial input and activates the motors. This project teaches you about motor control and wireless communication. It is a great way to learn about Bluetooth modules in action. You can add an ultrasonic sensor for obstacle avoidance. Then the car can drive itself and still be controlled remotely.
Wireless Sensor Data Logger
Another useful project is a wireless sensor data logger. Connect a temperature and humidity sensor like the DHT11 to the Arduino. The Arduino reads the sensor values. Instead of printing them to the Serial Monitor, it sends them via Bluetooth. A paired phone or laptop receives the data. You can log it in an app or spreadsheet. This is perfect for environmental monitoring. You can place the sensor in a greenhouse and read data from your couch. The Bluetooth module eliminates the need for long cables. The setup is portable and wireless. You can even add an SD card module to store data locally. This project combines Bluetooth, sensors, and data handling. It is a great introduction to IoT concepts.
Bluetooth-Controlled LED Strip
Want to change the color of your room lights with your phone? This project uses an Arduino Uno and a Bluetooth module to control an addressable LED strip. The phone app sends color codes like “R255G0B0” for red. The Arduino parses the command and sets the LED strip color. You can create mood lighting or a color-changing display. The project uses the FastLED library for easy control. It is visually impressive and very satisfying to build. You can add a potentiometer for manual control too. This project shows how Bluetooth can make everyday objects smart. It is a stepping stone to home automation.
Quick Tips and Common Mistakes to Avoid
Adding Bluetooth to an Arduino Uno is easy, but there are pitfalls. Many beginners face connection issues or damaged modules. Here are some quick tips and common mistakes to help you succeed.
Quick Tips for Bluetooth Success
- Always disconnect RX/TX before uploading code. This prevents conflicts with the USB-to-Serial chip.
- Use 3.3V logic level shifters if needed. Protect your module from 5V Arduino pins.
- Keep wires short and soldered. Loose connections cause dropped characters in serial communication.
- Check the baud rate. The HC-05 default is 9600. Mismatched baud rates cause garbled text.
- Use the Serial Monitor for testing. Before pairing with a phone, test the module on a computer.
- Prepare the module in AT command mode. The HC-05 needs a special sequence to enter AT mode. This lets you change the name and PIN.
Common Mistakes That Break Bluetooth Connections
- Forgetting to cross TX and RX. The module TX goes to Arduino RX, and module RX goes to Arduino TX. Mixing them up is a common error.
- Leaving the module connected during upload. This causes upload errors and can freeze the IDE.
- Using a 5V power supply for a 3.3V module. Some modules are 5V tolerant, but others are not. Check your datasheet.
- Not pairing the device first. The Bluetooth module must be paired before data flows. You cannot send data to an unpaired device.
- Ignoring voltage divider on RX line. Long-term use can damage the module without level shifting.
- Using SoftwareSerial on pins 0 and 1. Pins 0 and 1 are used for hardware serial. Use other pins for SoftwareSerial to avoid conflicts.
Expert Insights: Bluetooth vs. Wi-Fi for Arduino Projects
Many makers wonder whether to use Bluetooth or Wi-Fi for wireless projects. Both have strengths. Bluetooth is great for short-range, low-power, point-to-point connections. It is simple to set up and uses very little power. Wi-Fi is better for internet-connected projects. It has a longer range and higher data rate. The Arduino Uno does not have built-in Wi-Fi either. You would need an ESP8266 or ESP32 module for Wi-Fi. If your project only needs to talk to a phone or a nearby laptop, Bluetooth is the way to go. If you need cloud access or remote control over the internet, Wi-Fi is better. The good news is that you can use both. Some projects use a Bluetooth module for local control and a separate Wi-Fi module for internet features. The Arduino Uno can handle multiple serial connections with SoftwareSerial. Choose the wireless technology that fits your project’s needs.
Conclusion: So, Does Arduino Uno Have Bluetooth Capabilities?
To answer the question once more: Does Arduino Uno Have Bluetooth Capabilities Built In? No, it does not. The classic Arduino Uno is a wired microcontroller board. It relies on USB for programming and serial communication. However, that does not stop you from adding wireless features. A small Bluetooth module like the HC-05 or HM-10 can give your Uno Bluetooth capabilities in minutes. The process is simple, affordable, and fun. You can build smartphone-controlled robots, wireless data loggers, and smart home gadgets. The Arduino Uno is a versatile platform. It works perfectly with external Bluetooth modules. You just need to know how to wire and code them.
Now you have the knowledge to get started. You understand the board’s limitations. You know which module to choose. You can wire it up safely. You can write basic code to send and receive data. You also know common mistakes to avoid. The world of wireless Arduino projects is open to you. Start with a simple LED control. Then move on to more complex robots or sensors. The Arduino community is full of inspiration. Share your projects and learn from others. With the Arduino Uno and a Bluetooth module, you have all the tools you need. Go build something amazing today.
Frequently Asked Questions
Can I use Bluetooth with Arduino Uno without any extra modules?
No, the Arduino Uno does not have Bluetooth hardware on the board. You must add an external Bluetooth module like the HC-05 or HM-10. These modules are inexpensive and easy to wire up. They turn your Uno into a wireless device in minutes.
What is the difference between HC-05 and HC-06 Bluetooth modules?
The HC-05 can act as both a master and a slave. It can connect to other Bluetooth devices. The HC-06 is a slave only and waits for a master to connect. For most Arduino projects, the HC-05 is more flexible. Both use Bluetooth Classic and work the same way with the Arduino.
Do I need to use a voltage divider when connecting a Bluetooth module?
It is a good practice to use a voltage divider on the RX line. The Arduino Uno outputs 5V, but Bluetooth modules use 3.3V logic. Many modules are 5V tolerant on the RX pin, but it can still cause issues over time. A simple voltage divider with two resistors protects your module and ensures reliable communication.
Can I control an Arduino Uno from an iPhone using Bluetooth?
Yes, you can. iOS devices support Bluetooth Low Energy (BLE) modules like the HM-10. Classic Bluetooth modules like HC-05 also work with iPhone using a Bluetooth serial app. You just need to pair the module and use a terminal app to send commands. The Arduino receives the data and acts on it.
How far can Bluetooth reach with an Arduino Uno project?
Standard Bluetooth modules like HC-05 have a range of about 10 meters (30 feet) in open space. BLE modules like HM-10 can reach up to 30 meters or more. The range depends on the environment, obstacles, and antenna design. For longer distances, you can use Bluetooth modules with external antennas or switch to Wi-Fi.
Is it hard to add Bluetooth to an existing Arduino Uno project?
No, it is very easy. You just need to wire the Bluetooth module to the Arduino’s TX and RX pins. You can use SoftwareSerial to keep the main serial free for debugging. The code uses the same Serial.print() and Serial.read() functions you already know. It is one of the simplest upgrades you can make to an Arduino project.