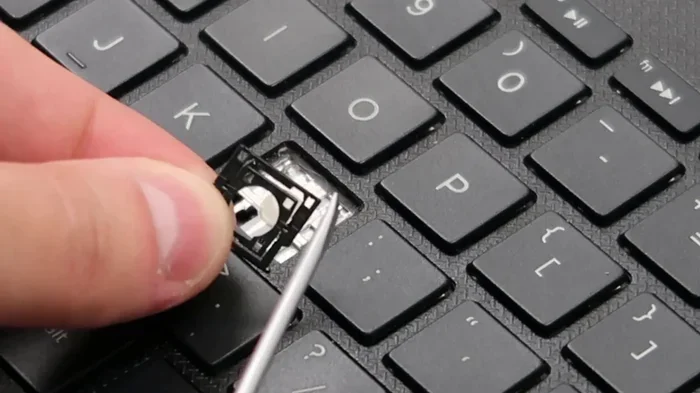
Can You Replace Individual Keys On A Laptop Without Damage
Yes, you can replace individual keys on a laptop without damage if you follow the right steps. Most modern laptops use removable keycaps held by small clips that pop back on easily. With the right tools and a little patience, you can swap out broken or missing keys in minutes and save hundreds compared to a full keyboard replacement.
Have you ever smashed a finger against your laptop and watched a key pop right off? Or maybe one of your keys just stopped working one day for no obvious reason. Either way, the first question that probably crossed your mind was, “Can I just replace that one key?”
The good news is that replacing individual keys on a laptop is absolutely possible. You do not need to buy a whole new keyboard. You do not need to be a tech expert. And you certainly do not need to break the bank. With the right approach, you can swap out a damaged key and have your laptop looking and working like new in under ten minutes.
In this guide, we will walk you through everything you need to know about replacing individual laptop keys. We will cover the different types of keyboard mechanisms, the tools you need, a step-by-step removal and replacement process, common mistakes to avoid, and when it makes sense to call a professional. Let us get started.
Key Takeaways
- Individual laptop keys are replaceable: Most keycaps attach with clips that can be removed and reattached safely.
- You need basic tools: A key retractor, small flathead screwdriver, and a replacement key kit are all you need.
- Know your keyboard type: Scissor-switch and butterfly-switch keyboards require different removal techniques.
- Avoid common mistakes: Forcing keys, losing clips, and using too much glue can cause permanent damage.
- Replacement kits are affordable: A full key cap and clip kit costs between $5 and $20 for most popular models.
- Seek help when needed: If the key switch itself is broken, professional repair may be the better option.
📑 Table of Contents
- Understanding Laptop Keyboards and Key Mechanisms
- Can You Replace Individual Keys On A Laptop Without Damage
- Tools You Will Need for Key Replacement
- Step-by-Step Guide to Replacing a Laptop Key
- Common Mistakes to Avoid When Replacing Laptop Keys
- When to Seek Professional Help
- Tips for Keeping Your Laptop Keyboard in Great Shape
- Key Takeaways
- Conclusion
Understanding Laptop Keyboards and Key Mechanisms
Before you try to replace a key, it helps to understand how your laptop keyboard actually works. Not all laptop keyboards are built the same way. The mechanism underneath each key determines how it attaches and how it should be removed.
Scissor-Switch Keyboards
Most modern laptops use what is called a scissor-switch mechanism. These keys have a flat profile and feel stable when you press them. Underneath each keycap, you will find two plastic pieces that cross each other like scissors. These pieces hold the key in place and give it a smooth, responsive feel.
Scissor-switch keys are the easiest to replace. The keycap simply snaps onto the scissor mechanism and pops off with a gentle pull. Because these are so common, replacement keycaps are widely available and inexpensive.
Butterfly-Switch Keyboards
Apple used butterfly-switch keyboards in several of their MacBook models from 2015 to 2019. These keys are thinner and have a different internal structure. The keycap sits on top of a flat butterfly mechanism that is more fragile than a scissor switch.
Butterfly keys are trickier to replace. They can be more prone to sticking and double-typing. If you have a laptop with this type of keyboard, you need to be extra gentle when removing and reattaching keys. Apple eventually moved away from butterfly switches due to reliability issues, which is one reason many people ask about replacing individual keys.
Rubber-Dome and Membrane Keyboards
Some older or budget laptops use rubber-dome or membrane keyboards. These rely on a rubber dome underneath each key to register a press. The keycap attaches directly to the rubber dome. These are less common in newer laptops but are still worth mentioning.
Replacing keys on a rubber-dome keyboard is straightforward. The keycap pulls off and snaps back on. However, if the rubber dome itself is damaged, you may need to replace the entire keyboard sheet rather than just the keycap.
Mechanical Keyboards vs Laptop Keyboards
You might hear people talk about mechanical keyboards. These are full-sized keyboards with individual switches under each key. They are different from laptop keyboards. Laptop keys use compact mechanisms designed to save space. If you are dealing with a laptop, the tips in this article apply to you. Mechanical keyboards have their own separate replacement process.
Can You Replace Individual Keys On A Laptop Without Damage
The short answer is yes. You can replace individual keys on a laptop without causing damage, as long as you are careful and follow the correct process. The keycap is designed to be removable. The clips and mechanisms underneath are built to handle regular key removal and reattachment.
However, “without damage” depends entirely on how you approach the task. Being rough or careless can break the clips, damage the scissor mechanism, or even harm the key switch underneath. Taking your time and using the right tools makes all the difference.
Here is what you need to know before you start. First, identify your laptop model. Different models use different keycap sizes and clip designs. Second, find a replacement key that matches your model exactly. Third, work on a clean, flat surface with good lighting. These simple steps will set you up for success.
If you have ever wondered, “Can you replace individual keys on a laptop?” and hesitated because you were worried about breaking something, this guide will ease your concerns. The process is simpler than most people think.
What Happens When a Key Gets Damaged
When a key gets damaged, it is usually one of two things that go wrong. Either the keycap itself is broken or cracked, or the mechanism underneath is damaged. A cracked keycap is purely cosmetic and easy to fix. A damaged mechanism can affect how the key types and may need more attention.
Sometimes a key just pops off because the clip wears out over time. This is very common with laptop keyboards that see daily use. The clip becomes loose and the key no longer stays in place. Replacing the keycap and clip solves this problem easily.
Is It Cheaper to Replace Individual Keys?
Absolutely. Replacing a single key costs almost nothing compared to replacing an entire keyboard. A replacement key kit typically costs between $5 and $20 online. A full laptop keyboard replacement, including parts and labor, can cost anywhere from $50 to $200 or more depending on your model.
So if only one or two keys are damaged, replacing them individually is the smart and economical choice. You save money and you keep your laptop in great shape.
Tools You Will Need for Key Replacement
Replacing a laptop key is not a complicated job. But you do need a few basic tools to do it right. Having everything ready before you start will make the process smooth and frustration-free.
- Key retractor tool: This is a small plastic tool that comes with most replacement key kits. It helps you lift the keycap off without damaging the clip underneath.
- Small flathead screwdriver: A tiny, thin screwdriver can help you pry off stubborn keycaps gently.
- Replacement key kit: Buy a kit that matches your exact laptop model. These kits include the keycap, clips, and sometimes the rubber dome.
- Tweezers: Fine-tipped tweezers help you handle small clips and pieces without dropping them.
- Soft cloth or microfiber towel: Use this to place parts on so nothing gets scratched or lost.
- Good lighting: You want to see the small parts clearly. A desk lamp works great.
You do not need expensive or specialized tools. Everything you need is affordable and easy to find online. A basic key replacement kit will cost you just a few dollars and comes with all the parts you need.
Where to Buy Replacement Key Kits
You can find replacement key kits on Amazon, eBay, and specialty electronics websites. Search for your laptop model number along with “replacement key kit.” Most kits are universal enough to work across similar models, but always double-check the compatibility before purchasing.
Some manufacturers also sell official replacement parts directly from their websites. Apple, for example, sells individual key replacement parts for supported MacBook models. These official parts tend to be higher quality but may cost a bit more.
Step-by-Step Guide to Replacing a Laptop Key
Now that you have your tools and your replacement parts, it is time to get to work. Follow these steps carefully and you will have that key replaced in no time.
Step 1: Power Off Your Laptop
Before you touch anything, shut down your laptop completely. Unplug it from the power source. This keeps you safe and prevents any accidental keypresses that could interrupt your work. It is a simple step but an important one.
Step 2: Remove the Damaged Keycap
Take your key retractor tool and slide it under the edges of the damaged keycap. Gently pull upward on both sides. The keycap should pop off easily. Do not force it. If it feels stuck, try wiggling it slightly from side to side while pulling up.
Place the removed keycap on your soft cloth. You will need it later if you are only replacing the cap and not the clip.
Step 3: Remove the Old Clip and Mechanism
Underneath the keycap, you will see the clip or scissor mechanism. This is what holds the key in place. Use your tweezers or a small flathead screwdriver to carefully lift the old clip out of the keyboard base.
Be very gentle here. The clips are small and can break if you pull too hard. If the clip feels glued in, do not force it. Some keyboards have clips that are secured with a small amount of adhesive. In that case, use a plastic spudger to gently pry it loose.
Step 4: Clean the Area
Before you install the new parts, take a moment to clean the area. Use a dry microfiber cloth to wipe away any dust or debris. If there is any sticky residue, lightly dampen the cloth with a tiny bit of isopropyl alcohol. Let it dry completely before moving on.
Keeping the area clean ensures a smooth fit and prevents any particles from interfering with the new key mechanism.
Step 5: Install the New Clip
Take the new clip from your replacement kit and place it into the keyboard base. Make sure it sits flat and is aligned properly. The metal or plastic pins on the clip should fit snugly into the holes on the keyboard base.
Press down gently on all four corners of the clip to make sure it is fully seated. You should feel it click into place. Give it a light tug to confirm it is secure.
Step 6: Attach the New Keycap
Now take the new keycap and align it over the clip. Press down evenly on all sides of the keycap. You should hear or feel a satisfying click when it snaps into place.
Test the key by pressing it a few times. It should feel firm and responsive. If it feels loose or wobbly, the clip may not be seated properly. Remove the keycap and recheck the clip before trying again.
Step 7: Repeat for Additional Keys
If you are replacing more than one key, repeat the same process for each one. Work one key at a time to avoid confusion. It is easy to mix up clips that look similar but are different sizes.
Lay out the parts in order so you can track which key goes where. Taking photos at each step can also help you remember the process if you need to pause and come back later.
Common Mistakes to Avoid When Replacing Laptop Keys
Replacing a laptop key is straightforward, but there are some mistakes that can cause problems. Knowing what to avoid will save you time, money, and frustration.
Forcing the Keycap Off
The biggest mistake people make is yanking the keycap off too hard. If the key does not come off easily, do not force it. Check if there is a small clip or retainer holding it in place. Use the proper removal tool and pull gently from both sides.
Losing the Small Clips
The clips and retainers are tiny. They are easy to lose if you are not careful. Work on a clean surface and keep a small bowl or tray nearby to place parts in. Losing a clip means you need to buy a whole new replacement kit, which is an unnecessary expense.
Using the Wrong Replacement Parts
Not all keycaps and clips are the same. A key from one laptop model may not fit another, even if they are the same brand. Always verify the model number before purchasing replacement parts. Using the wrong parts can lead to a poor fit or damage to the keyboard.
Applying Too Much Glue
Some people try to glue the clip back in place. While this can work, using too much glue is a common mistake. Excess glue can seep under the keycap and prevent it from sitting properly. If you need to use adhesive, use a very small amount and let it dry completely before reattaching the keycap.
Skipping the Cleaning Step
Dust and debris under the key mechanism can cause the key to feel sticky or unresponsive. Skipping the cleaning step is a small oversight that can lead to big problems. Always clean the area before installing new parts.
Not Testing the Key After Installation
Once you have replaced the key, test it immediately. Press it several times and check that it registers properly. If the key feels different from the keys around it, something may not be seated correctly. Catching issues early saves you from having to redo the work later.
When to Seek Professional Help
Replacing individual keys is a DIY-friendly task for most people. But there are situations where professional help is the better choice.
If the key switch itself is broken, replacing the keycap will not fix the problem. The switch is the part underneath that actually registers the keystroke. If the switch is damaged, you will need a more advanced repair. This is especially true for laptops with soldered switches, where the switch is permanently attached to the motherboard.
Also, if you are dealing with a laptop that has a very thin or fragile keyboard, like some ultrabooks, you may want to consult a professional. These keyboards have delicate internal structures that can be easily damaged during DIY repair.
If you have tried replacing the key and it still does not work properly, it is time to seek help. A professional technician can diagnose the issue and fix it without risking further damage to your laptop.
How Much Does Professional Key Repair Cost?
Professional keyboard repair costs vary. Simple keycap replacements may cost $20 to $50 at a repair shop. If the switch needs replacement, the cost can range from $50 to $150 depending on the laptop model. Full keyboard replacements typically cost $100 to $250. Always get a quote before authorizing any repair work.
Tips for Keeping Your Laptop Keyboard in Great Shape
Prevention is always better than repair. Here are some simple tips to keep your laptop keyboard working well for years to come.
- Keep food and drinks away from your laptop. Spills are one of the leading causes of keyboard damage. Even a small splash can cause keys to stick or stop working.
- Clean your keyboard regularly. Use compressed air to blow out dust and crumbs from between the keys. A soft brush can also help remove debris.
- Do not press too hard on the keys. Laptop keys are designed for light, gentle presses. Slamming down on them can wear out the clips over time.
- Use a keyboard cover. A thin silicone keyboard cover protects your keys from dust, spills, and wear. These are inexpensive and easy to find.
- Handle your laptop with care. Avoid dropping or bumping your laptop. Impacts can pop keys off or damage internal mechanisms.
Taking care of your keyboard means fewer trips to the repair shop and a longer life for your laptop. These small habits make a big difference over time.
Key Takeaways
- Individual laptop keys are replaceable: Most keycaps attach with clips that can be removed and reattached safely without damage.
- You need basic tools: A key retractor, small flathead screwdriver, and a replacement key kit are all you need.
- Know your keyboard type: Scissor-switch and butterfly-switch keyboards require different removal techniques.
- Avoid common mistakes: Forcing keys, losing clips, and using too much glue can cause permanent damage.
- Replacement kits are affordable: A full key cap and clip kit costs between $5 and $20 for most popular models.
- Seek help when needed: If the key switch itself is broken, professional repair may be the better option.
Conclusion
The answer to the question “Can you replace individual keys on a laptop without damage?” is a clear yes. With the right tools, the right replacement parts, and a little patience, you can fix a broken or missing key in minutes. The process is simple, affordable, and well within the reach of anyone willing to take their time.
Understanding how your laptop keyboard works is the first step. Knowing what tools to use and what mistakes to avoid is the second. And following a careful step-by-step process is what ties it all together.
Whether you have a cracked keycap, a loose clip, or a key that just stopped working, individual key replacement is a practical solution. It saves you money, it saves you time, and it keeps your laptop functioning exactly the way you need it to.
So the next time a key pops off or breaks, do not panic. Grab your replacement kit, follow the steps in this guide, and get back to typing. Your laptop will thank you for it.
Frequently Asked Questions
Can you replace individual keys on any laptop model?
Most laptops allow individual key replacement, but the process varies by model and keyboard type. Scissor-switch keyboards found in most modern laptops are the easiest to work with. Always check your laptop model and buy a compatible replacement kit before starting.
How much does it cost to replace a single key on a laptop?
A replacement keycap and clip kit typically costs between $5 and $20. If you choose professional repair, the cost may range from $20 to $50 for simple keycap replacement. The DIY route is always the most affordable option.
Do I need any special tools to replace a laptop key?
No special tools are needed. A key retractor tool, a small flathead screwdriver, and fine-tipped tweezers are all you need. These are inexpensive and widely available online or at electronics stores.
What if the key switch underneath is broken?
If the key switch is damaged, replacing the keycap alone will not fix the problem. You may need to replace the entire keyboard or seek professional repair. Key switches are internal components that cannot be replaced by simply swapping the keycap.
Can I use super glue to reattach a laptop key?
It is not recommended to use super glue or strong adhesives. Excess glue can seep under the keycap and interfere with its movement. If adhesive is needed, use a small amount of removable adhesive designed for electronics. Most laptop keys clip in without any glue at all.
How long does it take to replace a laptop key?
Replacing a single key takes about 5 to 10 minutes once you have the replacement parts and tools. If you are replacing multiple keys, budget about 15 to 20 minutes per key to ensure each one is installed correctly.