Can You Install Att Internet By Yourself at Home Now
Yes, you can install AT&T internet by yourself at home using the self-install kit. This guide walks you through every step, from unboxing equipment to activating your service. You will save time and money by avoiding a technician visit.
Setting up internet at a new place can feel overwhelming. You might wonder if you need to book a technician or handle it yourself. The good news is that you can install AT&T internet by yourself right at home. AT&T offers a self-install option that makes the process straightforward. This guide will show you exactly how to do it step by step.
Whether you are moving into a new apartment or switching providers, self-installation saves you time and money. You do not need to be a tech expert. With the right tools and a little patience, you can have your AT&T internet setup running in under an hour. Let us dive into everything you need to know.
Key Takeaways
- Self-installation is possible: AT&T offers a DIY kit that lets you set up internet without a technician.
- You save money: Skipping the professional install can save you installation fees.
- You need basic tools: A screwdriver, coax cable, and phone cord are all you need to get started.
- Activation is online: You can activate your AT&T internet service through the website or app.
- Fiber and DSL differ: The process varies depending on your AT&T internet plan type.
- Troubleshooting is manageable: Most common issues have simple fixes you can do yourself.
- Call a pro if stuck: AT&T offers technician support if self-install does not work.
📑 Table of Contents
- What Is AT&T Internet Self-Installation?
- What You Need Before Starting
- Step-by-Step AT&T Self-Install Process
- AT&T Fiber vs. DSL Self-Installation
- Common Problems and How to Fix Them
- When to Call an AT&T Technician Instead
- Tips for a Smooth AT&T Self-Install Experience
- How to Activate Your AT&T Internet Service After Installation
- AT&T Self-Install vs. Professional Installation: Which Is Right for You?
- Final Thoughts
What Is AT&T Internet Self-Installation?
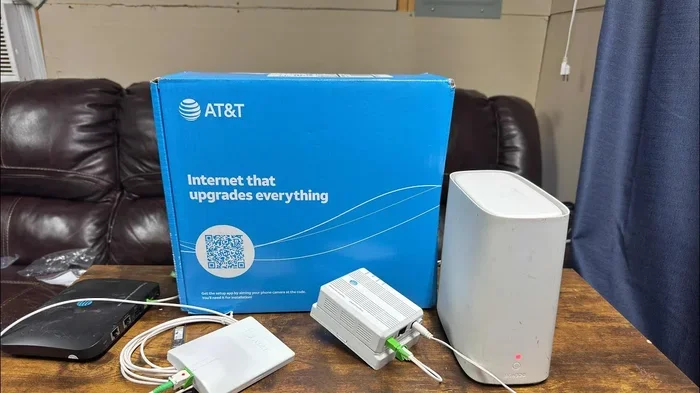
AT&T self-installation means you set up your internet service without a technician visiting your home. AT&T sends you a kit with all the equipment you need. You follow simple instructions to connect your devices and activate your service online. This option works for most AT&T internet plans, including DSL and fiber options.
The self-install kit includes a modem or gateway, cables, and a power adapter. Some kits also come with a router built into the gateway device. This is called an AT&T wireless gateway. It handles both your internet connection and Wi-Fi signal. You just need a phone jack, cable outlet, or fiber connection point in your home.
Many people choose self-install because it is convenient. You avoid scheduling a visit and waiting for a technician. You also skip any installation fees that AT&T charges for professional setup. It is a great option for anyone who feels comfortable following simple instructions.
Who Should Use the Self-Install Option?
The self-install option works well for most people. It is ideal if you have basic experience with electronics. You should be comfortable plugging in cables and following step-by-step instructions. If you have set up a Wi-Fi router before, you can handle this.
Self-install is also great for renters. You do not want to make holes in walls or run cables through your home. The standard setup uses existing outlets and connections. This keeps your space clean and your security deposit safe.
What You Need Before Starting
Before you begin your AT&T internet setup, gather a few things. Having everything ready makes the process smooth and fast. Here is what you need:
- AT&T self-install kit: This comes in the mail after you order service. It contains your modem, cables, and power adapter.
- A coaxial cable or phone jack: Depending on your service type, you need either a coax outlet or a phone line. DSL uses phone jacks. Fiber and cable use coax connections.
- A screwdriver: You may need it to secure cables or open the equipment box.
- A smartphone or computer: You need a device to activate your service and connect to Wi-Fi.
- Your AT&T account information: Have your account number and PIN ready for activation.
- Patience: Take your time. Rushing through setup can lead to mistakes.
Check your AT&T internet coverage before ordering. Make sure AT&T service is available at your address. You can verify this on the AT&T website or by calling customer service. This step prevents delays and frustration later.
Understanding Your AT&T Equipment
The equipment in your self-install kit may look intimidating at first. But it is simpler than it seems. The main device is the AT&T wireless gateway. This box combines your modem and router into one unit.
The gateway has several ports on the back. There is a power port, an Ethernet port, and a coaxial or phone port. The coaxial or phone port connects to your wall outlet. The Ethernet port connects to a computer if you need a wired connection. The power port plugs into your wall outlet.
You will also receive cables in the kit. These include a coaxial cable, a phone cord, or a fiber cable. Each cable has a specific purpose. The instructions in your kit will tell you which cable goes where. Do not mix them up.
Step-by-Step AT&T Self-Install Process
Now let us walk through the actual installation. Follow these steps carefully for the best results. The process is similar for both DSL and fiber connections, with small differences.
Step 1: Activate Your Service Online
Before you plug in anything, activate your service. Go to the AT&T website or open the AT&T app on your phone. Sign in to your account. Find the activation section and enter your account details. You will receive a confirmation that your service is ready.
This step is important. Without activation, your equipment will not connect to the AT&T network. It usually takes just a few minutes. Make sure you have your account PIN handy.
Step 2: Connect the Gateway to Your Wall Outlet
Locate your wall outlet. If you have cable or fiber internet, find the coaxial outlet. If you have DSL, find the phone jack. Take the appropriate cable from your kit and plug one end into the wall outlet.
Plug the other end into the gateway device. The port is usually labeled “Cable In” or “Phone In.” Make sure the connection is firm. A loose cable can cause connection problems later.
Step 3: Power On the Gateway
Plug the power adapter into the gateway. Then plug the adapter into a wall outlet. Wait for the lights on the gateway to stabilize. This can take two to five minutes.
You will see several lights blink during startup. The “Power” light should turn solid. The “Online” or “Internet” light should also become solid. If the lights keep blinking, do not worry. Give it a few more minutes. If the problem persists, check your connections.
Step 4: Connect Your Device
Once the gateway is ready, connect your device. You can use Wi-Fi or an Ethernet cable. For Wi-Fi, look for the network name on the bottom of the gateway. Connect using the default password listed there.
For a wired connection, plug an Ethernet cable from the gateway to your computer. The Ethernet port on the gateway is usually labeled “Ethernet 1.” This gives you a stable, fast connection for testing.
Step 5: Run an AT&T Internet Speed Test
After connecting, run a speed test. Go to a speed test website or use the AT&T app. This confirms your internet is working and at the right speed.
Your results should match your plan speed. If they are much lower, try moving the gateway closer to your device. Walls and distance can weaken your Wi-Fi signal. You can also restart the gateway and test again.
Step 6: Change Default Wi-Fi Name and Password
This is a crucial step many people skip. The default Wi-Fi name and password are on the gateway label. Change them for security. Open a browser and go to the gateway settings page.
Log in with the default credentials. Find the Wi-Fi settings. Enter a new network name and a strong password. Save your changes. This protects your AT&T internet service from unauthorized users.
AT&T Fiber vs. DSL Self-Installation
The self-install process differs slightly depending on your service type. Understanding these differences helps you prepare. Here is a quick comparison of AT&T fiber installation versus DSL setup.
| Feature | AT&T Fiber | AT&T DSL |
|---|---|---|
| Connection Type | Fiber optic cable | Phone line (copper) |
| Speed Range | Up to 5 Gbps | Up to 100 Mbps |
| Equipment Needed | Fiber gateway | DSL modem or gateway |
| Wall Outlet | Fiber jack (ONT) | Phone jack |
| Self-Install Available | Yes, in most areas | Yes |
| Setup Complexity | Moderate | Easy |
| Activation Method | Online or phone | Online or phone |
Fiber offers much faster speeds and more reliability. However, the fiber gateway is slightly larger and has more lights. DSL is simpler to set up but slower. Both options work well for self-installation.
If you are unsure which type you have, check your AT&T plan details. You can also look at the wall outlet. A fiber jack looks different from a phone jack. The kit you receive will match your service type.
Can You Upgrade Your Equipment During Self-Install?
Yes, you can upgrade your equipment during the self-install process. AT&T offers different gateway options. Some gateways support Wi-Fi 6, which provides faster wireless speeds.
If you need better coverage for a large home, consider a mesh system. You can add an AT&T smart home mesh router to extend your Wi-Fi. This eliminates dead zones in your home. Check compatibility with your plan before purchasing.
Common Problems and How to Fix Them
Sometimes things do not go smoothly during self-install. That is normal. Most issues have simple solutions. Here are the most common problems and how to fix them.
Gateway Lights Are Not Stabilizing
If your gateway lights keep blinking after five minutes, something is wrong. First, check all cable connections. Make sure the coaxial or phone cable is firmly plugged in. Loose connections are the most common cause.
Next, try unplugging the gateway. Wait 30 seconds. Plug it back in and wait again. This resets the connection. If the lights still do not stabilize, contact AT&T support.
No Internet Connection After Setup
If you cannot connect to the internet, try these steps. Restart your gateway by unplugging it for 30 seconds. Check that your device is connected to the correct Wi-Fi network.
Make sure you activated your service online. An unactivated account will not provide internet access. If all else fails, call AT&T customer service. They can walk you through the process over the phone.
Slow Internet Speeds
Slow speeds can ruin your experience. Try moving the gateway to a central location in your home. Walls, furniture, and appliances can block Wi-Fi signals.
Restart your gateway and run another speed test. If speeds are still low, check for background downloads or updates on your devices. Also, make sure your plan matches the speeds you are getting.
Wi-Fi Signal Is Weak in Some Rooms
Weak Wi-Fi signals are a common issue. The gateway may not reach every corner of your home. This is especially true in larger houses or apartments with thick walls.
Consider adding a Wi-Fi extender or mesh node. AT&T offers mesh options that work with their gateways. Placing the extender halfway between the gateway and the weak spot can boost coverage significantly.
When to Call an AT&T Technician Instead
Self-installation works for most people. But there are times when calling a technician makes sense. Know when to ask for help.
Situations That Require a Technician Visit
Call AT&T if you experience any of the following issues. A technician can handle complex problems that self-install cannot fix:
- No wall outlet exists: If your home lacks a coax or phone outlet, you need professional wiring.
- Fiber connection issues: Fiber requires precise alignment. A technician has the right tools and training.
- Multiple outlet setups: If you need internet in many rooms, a technician can set up a whole-home solution.
- Equipment failure: If your gateway is defective, a technician can replace it.
- Complex smart home integration: If you want advanced networking, a pro can set it up correctly.
AT&T offers technician visits for a fee. This fee is often waived if you have a promotion or bundle. Check your plan details before scheduling. Sometimes the self-install route saves enough to justify the visit cost.
How to Schedule an AT&T Technician Visit
If you decide to call a technician, the process is simple. Contact AT&T customer service through the app or website. Explain that your self-install did not work. They will schedule a visit at a convenient time.
Be available during the appointment window. The technician will arrive with all necessary equipment. They handle everything from wiring to activation. Most visits take one to two hours.
Tips for a Smooth AT&T Self-Install Experience
A few extra tips can make your self-install even easier. Keep these in mind as you go through the process.
- Read the entire instruction booklet first. Knowing the full process prevents surprises.
- Work in a well-lit area. You need to see cable ports and indicator lights clearly.
- Keep your phone nearby. You may need to call AT&T support if issues arise.
- Do not rush activation. Wait for all lights to stabilize before testing.
- Document your Wi-Fi password. Write it down and keep it in a safe place.
- Update your gateway firmware. Check for updates in the gateway settings after setup.
- Restart your gateway monthly. This keeps your connection fast and stable.
These small habits go a long way. They keep your AT&T internet service running smoothly for years. A little maintenance prevents most problems before they start.
How to Activate Your AT&T Internet Service After Installation
Activation is the final step in your self-install journey. Without it, your equipment will not connect to the AT&T network. Here is how to activate your service properly.
Go to att.net/activate on your browser. Sign in with your AT&T account credentials. Follow the on-screen prompts. You will need to enter the serial number from your gateway. This number is on the bottom or back of the device.
Once activated, your gateway connects to the AT&T network. The online light should turn solid within a few minutes. If it does not, double-check your cable connections. You can also try restarting the gateway and repeating the activation steps.
AT&T Self-Install vs. Professional Installation: Which Is Right for You?
Choosing between self-install and professional installation depends on your needs. Both options have clear advantages. Understanding them helps you make the right choice.
Self-install saves money. You avoid the installation fee entirely. It also gives you flexibility. You can set up your service on your schedule. No need to wait for a technician window.
Professional installation offers peace of mind. A technician handles everything correctly the first time. They can run cables, set up complex networks, and troubleshoot issues on the spot. This is ideal for large homes or multi-story buildings.
For most standard setups, self-install works perfectly. It is fast, free, and straightforward. If you are confident in your abilities, go for it. If you prefer hands-off setup, schedule a technician visit.
Final Thoughts
Installing AT&T internet by yourself is absolutely doable at home. The self-install kit makes the process simple and affordable. You save money, time, and the hassle of scheduling a technician. With the steps outlined in this guide, you can have your internet up and running quickly.
Remember to activate your service online before plugging in equipment. Follow each step carefully. If you run into trouble, AT&T support is just a phone call away. Do not hesitate to reach out for help.
Your AT&T internet setup is a one-time process. Once it is done, you can enjoy fast, reliable internet every day. Take your time, follow the instructions, and you will be browsing in no time. Happy installing!
Frequently Asked Questions
Can I really install AT&T internet by myself at home?
Yes, you absolutely can. AT&T provides a self-install kit with all the equipment and instructions you need. The process is designed to be simple enough for anyone to follow. You just need a wall outlet and about an hour of your time.
What is included in the AT&T self-install kit?
The kit includes a wireless gateway, power adapter, coaxial or phone cable, and an Ethernet cable. It also comes with an instruction booklet that walks you through every step. Everything you need is in the box.
How long does AT&T self-installation take?
Most people complete the setup in 30 to 60 minutes. Activation online takes just a few minutes. The physical setup, including connecting cables and powering on the gateway, takes the remaining time. If you run into issues, it may take a bit longer.
Is AT&T self-install free?
Yes, self-installation is free. AT&T charges a fee for professional installation visits. By choosing the DIY route, you save that fee. Always check for current promotions, as installation fees are sometimes waived entirely.
What should I do if my AT&T internet does not work after self-install?
First, restart your gateway by unplugging it for 30 seconds. Check all cable connections to make sure they are secure. Run a speed test to see if the connection is active. If the problem continues, contact AT&T customer service for troubleshooting help.
Can I switch from self-install to a technician visit later?
Yes, you can. If self-install does not work out, you can call AT&T and schedule a technician visit. Keep in mind that there may be a fee for the visit. Some plans or promotions include free technician support, so check your account details first.
=== CONCLUSION ===
Installing AT&T internet by yourself at home is a smart and easy choice for most people. You save money, avoid scheduling headaches, and gain a sense of accomplishment. The self-install kit comes with everything you need, and the process is designed to be beginner-friendly.
Follow the steps in this guide carefully. Activate your service first, connect your cables properly, and run a speed test at the end. If you hit a snag, AT&T support is there to help. Do not hesitate to reach out.
With your AT&T internet setup complete, you can enjoy fast, reliable internet right away. Take the leap and try self-installation today. You will be glad you did.