Can I Replace My Own Laptop Screen Without A Technician
Yes, you can replace your own laptop screen without a technician, and it is easier than most people think. With the right replacement part, a basic screwdriver set, and a little patience, you can swap out a broken or flickering display in under an hour. This guide covers everything from finding compatible parts to avoiding common mistakes that cause damage.
Have you ever stared at a cracked or flickering laptop screen and thought, “Can I Replace My Own Laptop Screen Without A Technician?” The short answer is yes, and thousands of people do it every single day. Replacing a broken laptop screen yourself can save you hundreds of dollars and keep your machine running without the hassle of a repair shop.
Whether your screen shattered after a drop or developed dead pixels overnight, this guide walks you through the entire process. You will learn what tools you need, how to find the right replacement part, and the exact steps to swap in a new display panel. By the end, you will feel confident enough to tackle the repair on your own.
Replacing a laptop screen is one of the most common DIY repair projects people attempt. It does not require advanced technical skills or expensive equipment. With a little patience and the right guidance, you can have your laptop looking and working like new in under an hour.
Key Takeaways
- You can absolutely do it yourself: Replacing a laptop screen is one of the most accessible DIY repair projects available.
- You will save significant money: Professional repairs can cost two to three times more than buying the part yourself.
- The right tools matter: A basic screwdriver set and a plastic spudger are all you really need.
- Compatibility is critical: Always verify your laptop model and display panel specifications before purchasing a replacement.
- Testing first prevents headaches: Always power on the new screen before fully reassembling the laptop.
- Know your limits: If there is internal damage beyond the screen, it may be smarter to seek professional help.
📑 Table of Contents
- Why People Choose to Replace Their Own Laptop Screen
- What You Need Before You Start
- Step-by-Step Guide to Replacing Your Laptop Screen
- Common Mistakes People Make During Screen Replacement
- When to Call a Professional Instead
- How Much Money Can You Save by Doing It Yourself
- Final Thoughts on Replacing Your Own Laptop Screen
Why People Choose to Replace Their Own Laptop Screen
More and more laptop users are turning to DIY repair instead of visiting a repair shop. There are several strong reasons behind this trend.
The Rising Cost of Professional Repairs
Professional laptop repair shops often charge between $150 and $400 for a screen replacement. That price includes labor, diagnostics, and overhead costs. For many people, that is simply not worth it for a single part swap. When you can buy a replacement LED screen or LCD display online for $40 to $100, the math makes doing it yourself an easy choice.
Also, repair shops sometimes upsell additional services you do not need. They might suggest replacing the bezel, the inverter, or other parts that are perfectly fine. When you handle the repair yourself, you only pay for what is actually broken.
The Satisfaction of Fixing Things Yourself
There is a real sense of accomplishment that comes from fixing your own gear. Completing a laptop disassembly successfully builds confidence and teaches you how your device works. Many people discover that they enjoy DIY repair so much that they start tackling other small fixes around their home.
Plus, you learn valuable troubleshooting skills. Understanding how your display assembly connects to the motherboard helps you diagnose future problems faster. That knowledge is worth more than the cost of the repair itself.
Avoiding Long Wait Times
When you take your laptop to a shop, you might wait days or even weeks for the repair. You are without your computer during that time. Doing the repair yourself means you can fix the issue in a single afternoon and get back to work immediately.
What You Need Before You Start
Preparation is the most important part of any laptop screen replacement. Rushing into the job without the right information or parts almost always leads to problems. Take the time to gather everything you need before you begin.
Finding the Right Replacement Screen
The first step is identifying your exact laptop model. Check the label on the bottom of your device or look in your system settings. Once you know the model number, search for a compatible screen model online.
You need to match several specifications when buying a replacement display panel:
- Screen size: Measured diagonally, usually 13.3, 14, 15.6, or 17.3 inches.
- Resolution: Common options include HD (1366×768), Full HD (1920×1080), and 4K.
- Panel type: LED or LCD, and whether it uses an LED backlight or older CCFL backlight technology.
- Connector type: The screen cable connector must match your laptop’s motherboard port.
- Mounting style: Some screens attach with screws, others use adhesive strips or clips.
Websites like Amazon, eBay, and specialized replacement parts stores carry screens for almost every popular laptop brand. Always read the product description carefully to confirm compatibility.
Tools and Materials Checklist
You do not need a professional workshop to replace a laptop screen. A few basic tools are all you need:
- A small screwdriver set with Phillips and flathead bits.
- A plastic spudger or guitar pick for prying open the bezel without scratching it.
- A soft, clean cloth to place parts on during the repair.
- A magnetic tray to keep tiny screws organized.
- A flashlight to check for hidden screws or clips.
That is it. You do not need an inverter replacement kit or any specialized laptop repair equipment for most modern laptops. The entire laptop screen replacement process is surprisingly simple.
Safety Precautions
Before you start, power off your laptop completely and unplug it from the wall. Remove the battery if it is removable. This prevents electrical damage and protects you from any residual charge in the screen cable or motherboard.
Work on a clean, flat surface with good lighting. Small screws and clips can be easy to lose, so keep a magnetic tray nearby. Avoid working on carpet or fabric surfaces where static electricity can build up and damage sensitive components.
Step-by-Step Guide to Replacing Your Laptop Screen
Now for the part you have been waiting for. Here is the complete process for replacing your own laptop screen without any professional help. Follow each step carefully and do not rush.
Step 1: Remove the Bezel
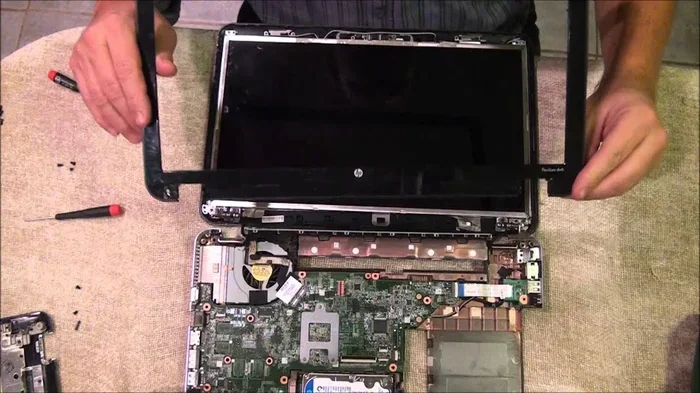
The bezel is the plastic frame that surrounds your screen. It holds the display in place and needs to be removed first. Start by locating any screws hidden under small rubber caps at the corners of the frame.
Use your screwdriver set to remove these screws. Then gently pry the bezel loose using a plastic spudger. Work slowly around the edges, releasing any clips as you go. Do not force anything. If a section feels stuck, stop and check for hidden screws or clips underneath.
Step 2: Detach the Old Screen
Once the bezel is off, you will see the display panel held in place by a few screws along the sides or back. Remove those screws carefully and set them aside.
Next, you need to disconnect the screen cable. This flat ribbon cable connects the back of the screen to the motherboard. Gently flip up the latch on the connector and pull the cable out. Do not yank it. The connection should release with light, steady pressure.
Some older laptops also have a separate inverter cable that powers the backlight. Disconnect this as well if you see one. On modern LED screens, this is usually not a separate component.
Step 3: Install the New Display Panel
Take your new replacement parts out of the packaging carefully. Hold the screen by the edges to avoid touching the display surface. Align the new panel with the mounting screws or brackets on the laptop frame.
Secure the new screen with the screws you removed earlier. Do not overtighten them. Hand-tight is usually sufficient. Then connect the screen cable by gently pressing it into the connector until it clicks into place. Make sure the latch is fully closed.
If your laptop has an inverter cable, reconnect that as well.
Step 4: Test Before Full Reassembly
This is the most important step in the entire process. Before you put the bezel back on, power on the laptop and check the new screen. Look for a clear, bright image with no flickering or discoloration.
Check for dead pixels by displaying a solid white and solid black image. If the screen looks perfect, power off the laptop again. If you notice any issues, power off immediately and double-check your cable connections.
Testing before reassembly saves you from having to undo your work later. It is a simple step that makes a huge difference.
Step 5: Reassemble the Bezel and Screws
Once you are confident the new screen works perfectly, it is time to put everything back together. Place the bezel back onto the frame and press it gently until all the clips snap into place. Replace the rubber screw caps and tighten the screws.
Reinsert the battery if you removed it. Plug in the power adapter and power on the laptop one final time. Congratulations, you have just completed a successful laptop screen replacement without any professional help.
Common Mistakes People Make During Screen Replacement
Even with a clear guide, mistakes can happen. Knowing what to avoid will help you complete the repair smoothly and protect your laptop from damage.
Forcing Parts During Removal
The most common error is using too much force. If a screw will not budge, do not press harder. If the bezel will not pop off, check for hidden clips. Forcing plastic parts can cause cracks and breaks that create new problems. Patience is your best tool during laptop disassembly.
Buying the Wrong Replacement Model
Not all screens are the same, even for the same laptop model. Some laptops have different screen options depending on the configuration you purchased. Always verify the part number on your old screen before ordering a replacement. A mismatch in connector type, resolution, or mounting style will cause frustration and wasted money.
Skipping the Testing Phase
Never fully reassemble your laptop without testing the new screen first. If there is a problem with the cable connection or a defective part, you want to catch it before the bezel is back on. Testing takes two minutes but can save you thirty minutes of rework.
Damaging the Screen Cable
The screen cable is delicate and can tear if you handle it roughly. Always grip the connector when disconnecting, not the cable itself. If the cable is torn or pinched during the repair, your new screen will not work, and you will need to replace the cable as well.
When to Call a Professional Instead
Doing it yourself is empowering, but there are situations where professional help is the better choice. Knowing when to stop and call an expert saves time, money, and frustration.
Damage Beyond the Screen
If your laptop was dropped and the damage goes beyond the display, a screen replacement alone may not fix the problem. Cracks in the motherboard, damaged hinge removal issues, or internal component failure require specialized tools and expertise. A professional laptop repair technician can assess the full extent of the damage and recommend the right solution.
Warranty Considerations
If your laptop is still under warranty, opening it up may void the coverage. Check your warranty terms before attempting any DIY repair. Some manufacturers allow user-replaceable parts, while others require authorized service centers. When in doubt, contact the manufacturer first.
Complex Display Assemblies
Some laptops have integrated display assemblies that are difficult to separate without specialized tools. Touchscreen laptops, 2-in-1 convertibles, and ultra-thin models often have screens bonded to the frame with adhesive. These require heat tools and careful technique that may be challenging for a first-time repairer.
How Much Money Can You Save by Doing It Yourself
Cost is one of the biggest motivators for DIY laptop screen replacement. Let us look at a realistic comparison between professional repair and doing it yourself.
| Factor | Professional Repair | DIY Replacement |
|---|---|---|
| Part Cost | $80 – $150 (includes markup) | $40 – $100 (direct purchase) |
| Labor Cost | $75 – $250 | $0 |
| Total Cost | $150 – $400 | $40 – $100 |
| Time Required | 2 – 7 business days | 30 – 90 minutes |
| Skill Level Needed | None (handed to you) | Basic hand skills |
| Risk of Additional Charges | Moderate | None |
As you can see, the savings are substantial. Even if you make a mistake and need to buy a second replacement part, you are still likely to spend less than half of what a repair shop would charge. The laptop repair DIY community is active and helpful, with forums and video tutorials available for nearly every laptop model.
Many people who start with a simple screen replacement go on to fix other issues like replacing keyboards, upgrading RAM, or swapping hard drives. Each successful repair builds your confidence and skills for the next project.
Final Thoughts on Replacing Your Own Laptop Screen
So, can you replace your own laptop screen without a technician? Absolutely. It is one of the most rewarding and straightforward DIY repair projects you can tackle. You save money, learn valuable skills, and get your laptop back up and running quickly.
The key is preparation. Take the time to find the right compatible screen model, gather your tools, and follow each step carefully. Do not rush, do not force parts, and always test before reassembly. If you approach the repair with patience and care, you will succeed.
Remember that every expert was once a beginner. Your first laptop screen replacement might feel intimidating, but it becomes easier with each repair you complete. The knowledge you gain is permanent, and it pays for itself many times over. Grab your screwdriver, order that replacement part, and get started today.
Frequently Asked Questions
How long does it take to replace a laptop screen by yourself?
Most people complete a laptop screen replacement in 30 to 90 minutes. The first time might take a little longer as you get familiar with the process, but subsequent repairs become much faster.
Do I need any special tools to replace my laptop screen?
No. A basic screwdriver set with Phillips and flathead bits, along with a plastic spudger, is all you need. You do not require any specialized laptop repair equipment for most models.
Will replacing my laptop screen void the warranty?
This depends on your warranty terms. Some manufacturers allow user-replaceable parts, while others consider any self-repair a warranty void action. Always check your warranty documentation before opening the laptop.
How do I know which replacement screen to buy?
Check your laptop model number and look for the exact specifications of your current display, including size, resolution, panel type, and connector style. Matching these details ensures you get the right replacement parts for your device.
What if my new screen does not work after installation?
First, double-check the screen cable connection. Make sure it is fully seated in the connector with the latch closed. If the connection is secure and the screen still does not work, the part may be defective and you should contact the seller for a replacement.
Can I replace a touchscreen laptop screen on my own?
Yes, but touchscreen display assemblies are more delicate and often bonded to the frame with adhesive. The process requires more care and sometimes a heat gun to separate the old screen. If you are comfortable with careful work, it is doable.