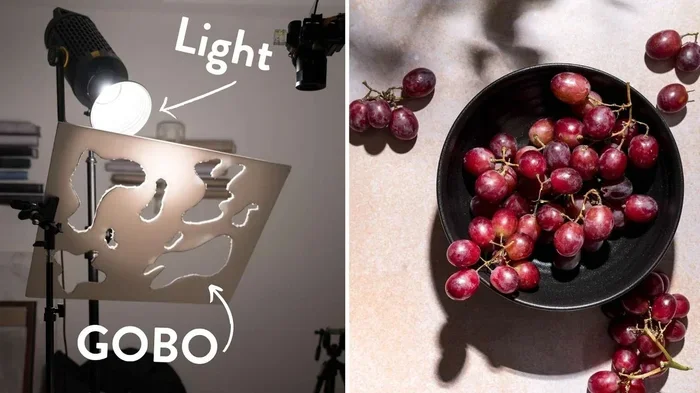
Can I Make My Own Gobo Lighting Without Breaking the Bank
Can I Make My Own Gobo lighting without spending a fortune? Absolutely yes! This guide shows you how to create stunning custom gobo patterns using simple tools and affordable materials. You will learn the step-by-step process, best materials, and expert tips for professional-quality gobo lighting effects at home.
Can I Make My Own Gobo lighting without spending a lot of money? The answer is a clear and exciting yes. With just a few basic materials and some creativity, you can craft stunning custom gobo patterns right from your home. This guide will show you exactly how to design, cut, and use your own DIY gobo for amazing gobo lighting effects. Whether you are a hobbyist or a beginner lighting designer, making your own gobo image is easier and more affordable than you might think.
You do not need expensive equipment or advanced skills to get started. Many gobo pattern ideas can be created using simple tools you already own. By the end of this article, you will have all the knowledge you need to produce beautiful gobo art on a tight budget. Let us dive into the world of homemade gobo making.
Can I Make My Own Gobo lighting at home? Absolutely. And it is more fun than you might expect.
Key Takeaways
- You can create DIY gobos with simple household materials: paper, cardboard, and steel blanks are all affordable options.
- Custom gobo design is easier than ever: free software and online tools let you craft unique patterns at no cost.
- Steel and glass gobos last longer: but paper gobos are perfect for one-time events and quick projects.
- Avoid common design mistakes: thin lines and small text can burn out or become unreadable in projections.
- Testing your gobo before final production saves time: always preview your pattern with a gobo projector first.
- Budget-friendly gobo making is totally doable: with the right approach, you can achieve stunning results for under $20.
- Advanced techniques like 3D printing open new doors: for those who want to explore gobo art further.
📑 Table of Contents
What Is a Gobo and Why Make Your Own?
Understanding Gobo Basics
A gobo is a stencil or template that sits inside a gobo projector or gobo lighting fixture. It blocks some light and lets other parts pass through. The result is a projected gobo pattern on walls, floors, or ceilings. People use gobos in weddings, concerts, restaurants, and home events. The word gobo comes from “go between” or “goes before optics.” It describes the small device that sits between the light source and the lens.
Traditional gobos are made by professional manufacturers. They use high-quality steel or glass. But the cost of a custom gobo template from a manufacturer can range from $50 to $300 or more. This is where DIY gobo making becomes a game changer. When you make your own gobo, you control the design, the material, and the cost.
Why People Choose DIY Gobo Projects
There are many reasons people choose to make their own gobo at home. First, it saves a lot of money. Second, it gives you complete creative control. Third, it is a fun and rewarding project. You can create personalized gobo pattern ideas for any occasion. Birthdays, holidays, weddings, and themed parties all benefit from custom gobo lighting effects.
DIY gobo making also lets you experiment. You can try different designs without worrying about wasting money. If a pattern does not work, you simply make another one. This freedom is what makes DIY gobo projects so appealing to beginners and experts alike.
Quick Tip
Start with a simple design. A single shape or letter is the easiest gobo stencil to create. Once you get comfortable, you can move on to more complex gobo art.
Types of Gobos You Can Create at Home
Steel vs Glass Gobos
When you explore custom gobo options, you will quickly encounter two main types: steel and glass. Each has its own strengths and weaknesses. Understanding these differences helps you choose the right material for your project.
Steel gobos are the most popular choice for DIY gobo projects. They are durable, affordable, and easy to work with. You can cut steel blanks with basic tools. Steel gobos handle high heat well, so they work great with gobo projector lamps. They last for many uses and can be stored for future events.
Glass gobos offer the highest quality and sharpest detail. They produce crisp, clean gobo projections with beautiful gradients. However, glass gobos require specialized equipment to create. They are not practical for most home projects. Glass gobos are best left to professional manufacturers.
Paper and Cardboard Gobos
Paper and cardboard gobos are the most budget-friendly option. You can create them with a printer and a pair of scissors. They work well for one-time events or casual use. The downside is that paper gobos burn out quickly under intense heat. They are best used with low-wattage LED gobo projectors or in cool-running fixtures.
3D-Printed Gobos
If you have access to a 3D printer, you can create incredible custom gobo designs. 3D-printed gobos allow for complex shapes and layered patterns. You can even create 3D gobo art that adds depth to your projections. This is an advanced technique that produces professional results at home.
Gobo Material Comparison
| Material | Durability | Cost | Best For |
|---|---|---|---|
| Steel | High | $$ | Long-term use and repeated events |
| Glass | Very High | $$$ | Professional events and fine detail |
| Paper/Cardboard | Low | $ | One-time events and quick projects |
| Acrylic | Medium | $ | Medium-term use and indoor lighting |
| 3D-Printed Plastic | Medium-High | $$ | Complex designs and layered patterns |
Expert Insight
Professional lighting designers often recommend starting with steel blanks for your first DIY gobo project. They are forgiving to work with and produce reliable results. As you gain experience, you can explore glass and 3D-printed options for more advanced gobo pattern ideas.
Materials and Tools You Need
Essential Tools for Gobo Making
To make your own gobo, you need a few basic tools. You do not need a professional workshop. Most of these items are affordable and easy to find.
- Gobo blank or stencil material: Steel blanks, cardboard, or acrylic sheets
- Gobo cutter or precision knife: A small cutting tool for detailed work
- Printer and transparency film: For paper gobo designs
- Ruler and pencil: For measuring and marking your design
- Sandpaper or fine file: To smooth cut edges on steel gobos
- Gobo holder or frame: To secure your gobo inside the projector
- Design software: Free options like Canva, GIMP, or Inkscape
Budget-Friendly Material Options
You do not need to spend a lot on materials. Here are some affordable options for DIY gobo creation:
- Steel blanks: You can buy them online for $5 to $15 each. They are thin sheets of specialty steel designed for gobo cutting.
- Cardboard or cardstock: Almost free. Use thick cardstock for better durability.
- Acrylic sheets: Available at craft stores for a few dollars. They cut easily and last longer than paper.
- Transparency film: About $10 for a pack. Essential for printing paper gobos.
- Repurposed materials: Old baking sheets or tin can lids can work as steel gobo blanks in a pinch.
Quick Tip
Buy a pack of steel blanks instead of single pieces. This saves money if you plan to create multiple custom gobo designs for different events.
Step-by-Step Guide to Making Your Own Gobo
Designing Your Gobo Pattern
The first step in making your own gobo is designing the pattern. Start by choosing a simple image or shape. Think about what you want to project. Popular choices include monograms, logos, nature silhouettes, and geometric patterns. You can also create text-based gobo patterns with names or dates for events.
Use gobo design software to create your image. Many free tools are available online. Canva and Inkscape are great options for beginners. Keep your design simple. Avoid thin lines and very small text. These details can clog or disappear when projected. Aim for bold, clean shapes that will read clearly in a gobo projection.
When your design is ready, print it onto transparency film if you are using a paper gobo. If you are using a steel blank, print the design and tape it to the metal as a guide. This gobo template helps you know exactly where to cut.
Cutting and Assembling Your Gobo
Now comes the hands-on part. If you are working with a steel blank, secure it with tape or a clamp. Use a gobo cutter or precision knife to carefully cut along your design lines. Go slow and steady. Small mistakes can ruin the pattern, so take your time.
For paper gobos, simply cut out the black areas of your printed design. The black parts block the light. The white or clear areas let light pass through. This creates your gobo silhouette when projected.
Once you have cut your design, smooth any rough edges with fine sandpaper. This is especially important for steel gobos. Rough edges can catch on the gobo holder or affect the projection quality.
Expert Insight
Professional gobo makers recommend leaving small bridges in your design. These are thin connections that hold parts of your pattern in place. Without bridges, small cut-out shapes can fall out. Think of them like the middle part of the letter “O” or “A” that keeps the shape intact.
Testing Your Gobo in a Projector
After you finish cutting, it is time to test your DIY gobo. Place your gobo into the gobo holder inside your gobo projector. Turn on the projector and check the projection. Look for areas where light leaks through unwanted spots. Check that the design is clear and readable.
If the projection looks blurry or faded, check a few things. Make sure the gobo is positioned correctly in the holder. Ensure the projector lens is focused. If you are using a paper gobo, it may be too close to the lamp and burning. Move it further back or switch to a cooler material.
Testing before your event is crucial. It gives you time to fix any issues and refine your custom gobo design. Do not wait until the last minute to try your gobo lighting effects.
Quick Tip
Take a photo of your test projection with your phone. This helps you spot problems more easily and compare different versions of your gobo pattern ideas.
Common Mistakes to Avoid
Design Mistakes
The biggest mistake beginners make is overcomplicating the design. When you try to pack too much detail into a small gobo stencil, the projection becomes muddy and hard to read. Keep your designs simple and bold. Use thick lines and large text for the best results.
Another common error is ignoring the direction of light. Your gobo design needs to be reversed if you are projecting text. A printed “R” will project as a backward “R” unless you flip the image before cutting. Always preview your gobo image reversed to avoid this mistake.
Material Mistakes
Using the wrong material is another pitfall. Paper gobos will burn if placed too close to a hot lamp in a traditional gobo lighting fixture. Always check the heat rating of your material before use. Steel and glass can handle high temperatures, but paper and thin plastics cannot.
Some people try to use regular printer paper without a transparency layer. This will not work well. The paper will warp and burn quickly. Always use proper transparency film or dedicated gobo materials for reliable results.
Common Mistakes to Avoid
- Using designs with too much detail: Fine lines disappear in projection.
- Forgetting to reverse text: Your words will appear backward on the wall.
- Using flammable materials near hot lamps: This is a fire hazard.
- Skipping the test phase: Always test before your event.
- Ignoring bridge supports: Small cut-out shapes will fall out without them.
- Using dull cutting tools: This creates jagged edges that ruin the projection.
Expert Tips for Stunning Gobo Results
Lighting Effects and Placement
The way you position your gobo projector makes a huge difference in the final result. Place the projector at a slight angle for the best gobo lighting effects. A straight-on projection can look flat. An angled projection adds depth and dimension to your gobo art.
Distance also matters. Move the projector closer for a smaller, sharper image. Move it further away for a larger, softer projection. Experiment with different distances to find the perfect look for your space. The size of the room and the brightness of the lamp both play a role in how your gobo pattern appears.
Consider using a gobo wheel if you have multiple designs. A gobo wheel holds several gobos and lets you rotate between them. This is great for events where you want to change the atmosphere throughout the evening.
Advanced Gobo Techniques
Once you master the basics, you can explore advanced gobo maker techniques. Layered gobos use multiple stencils stacked together. This creates a sense of depth that single-layer gobos cannot achieve. You can also combine colored gobo transparency sheets with your cutouts to add color to your projections.
Another advanced technique is using a gobo projector lamp with a dimmer. Lowering the brightness can create softer, more atmospheric gobo lighting effects. This works especially well for romantic events like weddings and dinners.
For those with 3D printers, creating layered 3D gobo designs opens up entirely new possibilities. You can print multiple layers and stack them to create stunning depth and detail in your gobo projections. This is one of the most exciting frontiers in DIY gobo creation.
Expert Insight
Many professional event planners keep a collection of custom gobo designs on hand. They create these months in advance using gobo design software. Having a library of ready-to-use gobos saves time and ensures consistency across events. Start building your own collection today.
Key Takeaways
- You can create DIY gobos with simple household materials: paper, cardboard, and steel blanks are all affordable options.
- Custom gobo design is easier than ever: free software and online tools let you craft unique patterns at no cost.
- Steel and glass gobos last longer: but paper gobos are perfect for one-time events and quick projects.
- Avoid common design mistakes: thin lines and small text can burn out or become unreadable in projections.
- Testing your gobo before final production saves time: always preview your pattern with a gobo projector first.
- Budget-friendly gobo making is totally doable: with the right approach, you can achieve stunning results for under $20.
- Advanced techniques like 3D printing open new doors: for those who want to explore gobo art further.
Frequently Asked Questions
Is it hard to make your own gobo at home?
No, making your own gobo is quite simple once you have the right materials. Start with a paper gobo if you are a complete beginner. It requires only a printer, transparency film, and scissors. Steel gobos take a bit more effort but are still very doable with a precision cutter and patience. Most people create their first successful gobo within an hour of trying.
What materials work best for DIY gobos?
Steel blanks are the best all-around choice for homemade gobos. They are durable, heat-resistant, and produce clean projections. For budget-friendly one-time events, paper or cardboard gobos work well with LED projectors. 3D-printed gobos offer the most creative freedom for complex designs. Each material has its place depending on your needs and skill level.
Can I use a regular projector to display gobos?
Yes, you can use a standard home projector to display gobos. You simply place your cutout stencil in front of the projector lens. The image will project onto any surface. However, dedicated gobo projectors produce brighter and sharper results. They are designed with the right heat management and focus for gobo use. A regular projector works great for casual use and experimentation.
How much does it cost to make your own gobo?
The cost of making your own gobo is surprisingly low. A steel blank costs about $5 to $15. A pack of transparency film runs around $10. Design software like Inkscape is completely free. Even with a gobo cutter and holder, your total investment stays well under $30. Compare this to the $50 to $300 you would pay a manufacturer for a single custom gobo.
Can I create colored gobos at home?
Yes, you can create colored gobos using tinted transparency film or colored acetate sheets. Place the colored sheet behind your cutout design to add color to your projection. Some people also use colored LED projectors to change the hue of their gobo patterns. Experiment with different color combinations to create unique gobo lighting effects for your events.
How long do homemade gobos last?
The lifespan of a homemade gobo depends on the material you use. Steel gobos can last for years with proper storage. Paper gobos are best used for a single event since they degrade quickly under heat. Acrylic gobos fall in between, lasting several events before showing wear. Always store your gobos in a protective case to extend their life.
Conclusion
Can I Make My Own Gobo lighting without breaking the bank? The answer is a resounding yes. You now have all the tools, techniques, and knowledge to create beautiful custom gobo designs from the comfort of your home. From choosing the right material to designing your pattern and testing the final projection, every step is within your reach.
Making your own gobo art is a rewarding skill that opens up creative possibilities for any event or space. You save money, express your personal style, and gain a deeper understanding of lighting design. Whether you are projecting a monogram at a wedding, creating a festive atmosphere for a holiday party, or exploring gobo lighting effects as a hobby, the journey of DIY gobo making is well worth the effort.
Start small, experiment often, and do not be afraid to make mistakes. Every gobo you create teaches you something new. Soon, you will have a collection of stunning gobo patterns that impress everyone who sees them. So gather your materials, fire up your projector, and start making your own gobo today. The results will surprise and delight you.