Can I Use Sata Ssd With Usb To Build A Portable Drive
The short answer to Can I Use Sata Ssd With Usb is a resounding yes. You can easily build a portable drive using a SATA SSD and a USB enclosure. This setup gives you lightning-fast speeds and reliable storage that fits in your pocket.
Have you ever wondered if you can repurpose an old internal drive into a handy external one? The answer is yes, and it is simpler than you think. Many people have a spare SATA SSD lying around and want to turn it into a portable drive. So, can I use a SATA SSD with USB? Absolutely. This guide will show you exactly how to build a portable external SSD that you can carry anywhere. You will learn what you need, how to set it up, and how to avoid common pitfalls.
Building your own external storage is a smart move. It saves money, reduces e-waste, and gives you a custom external SSD tailored to your needs. Whether you need a backup drive, a travel companion, or a way to move large files, a SATA SSD with USB does the job beautifully. Let us dive in and explore how to make it happen.
Key Takeaways
- SATA SSDs work perfectly with USB: You can connect any 2.5-inch SATA SSD to your computer using a simple USB enclosure or adapter.
- USB enclosures are the easiest path: Just slide the drive in, plug it in, and you have an instant external SSD.
- USB 3.0 and USB-C deliver fast speeds: You can achieve up to 5 Gbps or even 10 Gbps transfer rates.
- Portable drives are ideal for backups and travel: They are compact, durable, and much faster than old hard drives.
- Match the enclosure to your SSD: Check the SATA interface and form factor to avoid compatibility issues.
- Always format the drive first: Format the new external drive to work seamlessly with your operating system.
📑 Table of Contents
Can I Use Sata Ssd With Usb? The Simple Answer
Yes, you can. A SATA SSD uses a standard interface that connects easily to a USB bridge. This bridge converts the SATA signal into a USB signal your computer understands. The result is a plug-and-play external drive that works on almost any device. You do not need special drivers or technical skills. Just pick the right enclosure or adapter, and you are good to go.
Here are the main ways to connect a SATA SSD to USB:
- USB enclosure: A protective case that holds the SSD and has a USB cable built in.
- SATA-to-USB adapter: A cable or dock that connects the SSD directly to a USB port.
- Hard drive dock: A station that holds the SSD and connects via USB, often supporting multiple drives.
Each method works well. The choice depends on how permanent you want the setup to be and how portable you need the drive to be.
Understanding SATA SSDs
A SATA SSD is a solid-state drive that uses the SATA interface. It is the most common type of 2.5-inch drive you will find. These drives are small, thin, and fast. They use flash memory instead of spinning disks, so they have no moving parts. This makes them durable and quiet. SATA SSDs come in two heights: 7mm and 9.5mm. Most modern laptops use the 7mm version. Always check the thickness before buying an enclosure.
The SATA interface has been around for many years. It is reliable and widely supported. A SATA SSD can deliver read speeds of 500 MB/s or more. When you add a USB 3.0 connection, you can transfer a full movie in seconds. This makes a portable SSD a great choice for data transfer speed enthusiasts.
The USB Connection
USB is the universal connector for external devices. It comes in several versions, but USB 3.0 and USB-C are the most common today. USB 3.0 offers a maximum speed of 5 Gbps, which is more than enough for a SATA SSD. USB-C is newer and can support even faster speeds, up to 10 Gbps with USB 3.1 Gen 2. Using a USB enclosure with the right port ensures you get the full speed of your SSD performance.
When you connect a SATA SSD to USB, the drive appears as a removable disk. You can drag and drop files just like with a regular external hard drive. The difference is speed and durability. A portable SSD is much faster and more shock-resistant than a traditional HDD.
How to Connect a SATA SSD to USB
There are two main ways to connect a SATA SSD to a USB port. You can use a USB enclosure or a SATA-to-USB adapter. Both methods are simple and effective. Let us look at each one in detail.
Using an External Enclosure
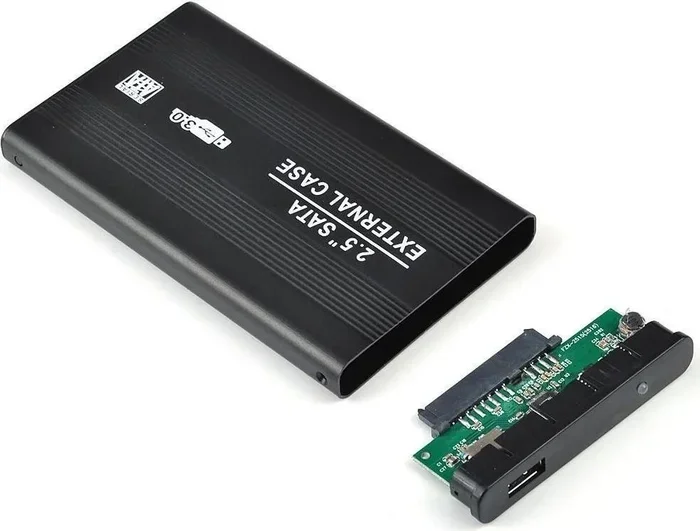
An SSD enclosure is a small case designed to hold a 2.5-inch drive. It has a USB cable and a circuit board that converts SATA to USB. You open the enclosure, place the SSD inside, close it, and plug in the cable. It is the easiest way to build a portable drive. Enclosures come in different materials, shapes, and colors. Some are aluminum for better cooling, while others are plastic and very light.
Here are the steps to use an enclosure:
- Buy a SATA SSD enclosure that matches your drive size (2.5-inch) and thickness (7mm or 9.5mm).
- Open the enclosure by removing the screws or sliding the cover.
- Carefully place the SSD inside, aligning the SATA connector with the board.
- Secure the drive with the included screw or bracket.
- Close the enclosure and plug the USB cable into your computer.
Most enclosures are plug-and-play. Your operating system will recognize the drive instantly. You can then format it to work with Windows, macOS, or Linux.
Using a SATA-to-USB Adapter
A SATA-to-USB adapter is a cable or small dock that connects directly to the SSD. You do not need a permanent case. This method is great if you want to use the SSD both inside a computer and as an external drive. You simply plug the SATA side into the SSD and the USB side into your computer. It is a quick and cheap solution for occasional use.
However, adapters leave the SSD exposed. They do not offer protection from drops or dust. If you need a rugged portable storage solution, an enclosure is a better choice. Adapters are ideal for temporary file transfers or as a diagnostic tool.
Comparison: Enclosure vs Adapter
| Feature | USB Enclosure | SATA-to-USB Adapter |
|---|---|---|
| Protection | Full case protects the SSD | No protection, exposed drive |
| Permanence | Semi-permanent build | Temporary connection |
| Portability | Very portable, compact | Less portable, extra cable |
| Cost | $10 to $30 | $5 to $15 |
| Ease of Use | Slide in and plug | Plug and play, no assembly |
| Cooling | Metal cases offer better cooling | No cooling, relies on air |
For most people building a portable drive, an enclosure is the best option. It protects the SSD and looks professional. An adapter is a good spare tool to keep in your bag.
Benefits of Building a Portable Drive
Turning a SATA SSD into a USB drive brings many advantages. You get a fast, reliable, and compact storage solution. Here are the key benefits.
Speed and Performance
A SATA SSD is much faster than a traditional hard drive. When you connect it via USB 3.0, you can expect real-world speeds of 400 to 500 MB/s. This means you can copy a 50 GB file in under two minutes. A standard external hard drive might take ten times longer. The data transfer speed makes a huge difference when you work with large videos, photos, or backups.
SSD performance stays consistent even when the drive is nearly full. HDDs slow down as they fill up, but SSDs do not. This makes a portable SSD a joy to use for everyday tasks and heavy workloads alike.
Portability and Convenience
A portable drive built from a SATA SSD is incredibly light and thin. You can slip it into a pocket or laptop bag. It does not need an external power source because USB provides enough power for a 2.5-inch drive. You just carry it anywhere and plug it into any computer. It is the perfect backup drive for travelers, students, and professionals.
Because there are no moving parts, a portable SSD is not scared of bumps or drops. You can toss it into a backpack without worrying about damage. This durability gives you peace of mind when you are on the go.
Versatility
You can use a SATA SSD with USB for many purposes. Use it as a time machine backup for your Mac. Use it to store your game library. Use it to transfer files between different computers. You can even boot your operating system from it with the right setup. The possibilities are endless with a portable storage device you built yourself.
Quick Tip: Always keep a small cloth and a microfiber pouch for your portable drive. It keeps the enclosure clean and prevents scratches in your bag.
Choosing the Right Enclosure or Adapter
Not all enclosures and adapters are the same. Choosing the right one ensures you get the best performance and compatibility. Here is what to look for.
USB 3.0 vs USB-C
USB 3.0 (also called USB 3.2 Gen 1) is the most common standard. It offers speeds up to 5 Gbps. This is more than enough for a SATA SSD, which maxes out around 550 MB/s. USB-C is a connector shape, not a speed standard. However, USB-C ports often support faster protocols like USB 3.1 Gen 2 (10 Gbps) or USB 3.2 Gen 2×2 (20 Gbps). For a SATA SSD, USB-C with USB 3.0 or 3.1 is perfect. You will not notice a difference in speed, but the reversible connector is much more convenient.
When buying an SSD enclosure, look for one with a USB-C port if your computer supports it. Many enclosures come with both USB-C and USB-A cables, giving you flexibility.
Enclosure Features to Consider
- Material: Aluminum enclosures dissipate heat better than plastic. A SATA SSD can get warm during heavy transfers. Good cooling helps maintain SSD performance.
- Size: Make sure the enclosure supports 2.5-inch drives and the correct thickness (7mm is the most common).
- Connector type: Some enclosures use a SATA III connector, which is the standard. Ensure it is not an older SATA I or II version, which would limit speed.
- Cable length: A longer USB cable gives you more freedom when using the drive on a desk.
- Brand reputation: Stick with known brands like Sabrent, UGREEN, or SSK for reliability.
Expert Insight: A metal enclosure with a built-in heat sink is the best choice for long-term use. It keeps the drive cool and extends its lifespan, especially if you run large backups overnight.
Step-by-Step Guide to Building Your Portable Drive
Now that you have your SSD and enclosure, let us build the drive. Follow these steps carefully to get the best results.
Preparing the SSD
Before you install the SSD in the enclosure, make sure it is clean and undamaged. If the drive is new, it will need formatting later. If it is a used drive, you may want to wipe it clean. Use a tool like Disk Management on Windows or Disk Utility on macOS to erase the drive. This ensures a fresh start and avoids old data conflicts.
Handle the SSD by its edges. Avoid touching the gold connectors on the bottom. Static electricity can damage the drive, even if you do not feel a shock. Working on a wooden table or wearing an anti-static wrist strap is a good habit.
Assembling the Enclosure
- Open the enclosure by removing the screws or sliding the cover panel.
- Locate the SATA connector on the circuit board inside the enclosure.
- Align the SSD so the SATA connector faces down toward the board.
- Gently press the SSD into the connector until it clicks into place.
- If there is a screw, secure the SSD to the enclosure frame.
- Close the enclosure and ensure the cover sits flush.
Once closed, plug the USB cable into the enclosure and into your computer. You should hear a chime or see a notification that a new device has been connected.
Formatting and Setup
The drive will likely be unformatted when you first connect it. You need to format it to make it usable. The format you choose depends on your needs.
- NTFS: Best for Windows only. Supports large files and has journaling for safety.
- exFAT: Works on both Windows and macOS. Great for a portable drive you share between computers.
- APFS: Best for macOS only. Offers strong encryption and fast performance.
To format, open Disk Management (Windows) or Disk Utility (macOS). Select the new drive, choose the format, and click erase. The process takes just a few seconds. After formatting, your portable external SSD is ready to use.
Quick Tip: If you plan to use the drive with both Windows and Mac, choose exFAT. It is the most compatible format for a portable storage device that moves between different systems.
Common Mistakes and Expert Tips
Even though building a portable drive is simple, some mistakes can cause frustration. Here is what to avoid and how to get the best results.
Common Mistakes to Avoid
- Buying the wrong enclosure size: A 3.5-inch enclosure will not fit a 2.5-inch SATA SSD. Always check the drive dimensions.
- Using a USB 2.0 enclosure: USB 2.0 is much slower than USB 3.0. It will bottleneck your SATA SSD and give you terrible speeds. Always choose USB 3.0 or newer.
- Forgetting to format: An unformatted drive will not show up properly on your desktop. Always format before use.
- Removing the drive without ejecting: This can corrupt data. Always use the safely remove hardware option before unplugging.
- Overheating the drive: Running a SATA SSD inside a closed metal enclosure for hours can cause thermal throttling. Give it a break during long transfers.
Expert Tips for Optimal Performance
- Keep your SSD enclosure firmware updated. Some manufacturers release updates that improve compatibility and speed.
- Use a high-quality USB cable. Cheap cables can cause connection drops and slow transfer speeds.
- If you use the drive for backups, enable TRIM on your operating system. This helps the SSD maintain its speed over time.
- Store the drive in a protective sleeve when not in use. A small neoprene pouch prevents scratches and minor impacts.
- Label your drive. If you have multiple portable drives, a simple label helps you grab the right one quickly.
Expert Insight: A SATA SSD with USB is not a replacement for cloud storage. It is a local backup solution. Use both for a complete data protection strategy. Keep one copy at home and one in a safe offsite location, like a bank vault or a trusted friend’s house.
Conclusion
The answer to Can I Use Sata Ssd With Usb is a clear and enthusiastic yes. You can turn any spare SATA SSD into a powerful portable drive with just a simple enclosure or adapter. This gives you fast, reliable, and durable storage that you can carry anywhere. Whether you need a backup drive for your photos, a travel companion for your work files, or a high-speed transfer tool, a portable external SSD built from a SATA drive delivers amazing value.
Follow the steps in this guide to choose the right enclosure, assemble your drive, and format it properly. Avoid the common mistakes, and your portable storage will serve you well for years. The process is straightforward, the cost is low, and the result is a custom external SSD that outperforms any store-bought solution. Build your drive today and enjoy the freedom of fast, portable storage.
Frequently Asked Questions
Can I Use Sata Ssd With Usb 3.0?
Yes, absolutely. USB 3.0 is the perfect match for a SATA SSD. It provides enough bandwidth to reach the drive’s full speed, giving you transfer rates up to 500 MB/s or more.
Do I Need to Install Drivers for a SATA SSD over USB?
No, you do not need special drivers. Modern operating systems like Windows, macOS, and Linux recognize a SATA SSD with USB as a standard removable disk. It is truly plug-and-play.
Can I Use a 9.5mm SATA SSD in a 7mm Enclosure?
No, you cannot. A 9.5mm drive is too thick for a 7mm enclosure. Always match the enclosure height to your SSD’s height. You can check the drive’s specifications or measure it with a ruler.
Is It Safe to Leave a SATA SSD in a USB Enclosure All the Time?
Yes, it is safe. Enclosures are designed for continuous use. However, if the drive gets very hot during long transfers, give it a short break to cool down. This helps maintain long-term SSD performance.
Can I Boot My Operating System from a USB SATA SSD?
Yes, you can. You need to format the drive correctly and set your BIOS to boot from USB. This works best with an enclosure that supports USB 3.0 or higher. It is a great way to carry your entire operating system with you.
What Is the Difference Between a SATA SSD and an NVMe SSD for USB Use?
A SATA SSD uses the older SATA interface and maxes out at about 550 MB/s. An NVMe SSD uses the faster PCIe interface and can reach speeds over 3000 MB/s. However, NVMe SSDs require a different type of enclosure called an NVMe USB enclosure. A standard SATA SSD with USB setup is simpler and more affordable.