Can You Use A Projector On The Ceiling For Big Screens
Yes, you can absolutely use a projector on the ceiling to create a stunning big-screen experience in any room. Ceiling mounting saves floor space, keeps cables hidden, and delivers a clean, professional look. This guide walks you through every step, from choosing the right mount to getting the perfect image alignment. You will learn about throw distance, projector brightness, and common mistakes that ruin your setup. Whether you are building a home theater or a presentation room, this guide has you covered.
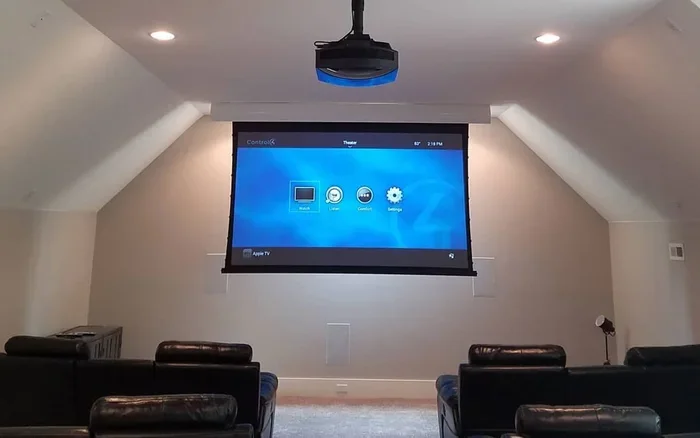
Have you ever walked into a room with a projector mounted on the ceiling and thought, “I want that”? A ceiling mounted projector instantly transforms any space into a home theater or a dynamic presentation room. The big screen experience feels immersive, and the setup looks sleek and professional. But the real question is, can you use a projector on the ceiling without sacrificing image quality or dealing with headaches?
The short answer is yes. You can absolutely use a projector on the ceiling for big screens. Thousands of people do it every day in living rooms, bedrooms, classrooms, and offices. But doing it right takes a little know-how. In this guide, we will walk you through everything you need to know about projector placement on the ceiling. You will learn about mount types, installation steps, image quality tips, and common mistakes to avoid.
Key Takeaways
- Ceiling mounting works great: A ceiling projector mount is safe, stable, and saves valuable floor space.
- Throw distance matters: Your projector placement height and lens type determine the screen size you can achieve.
- Image quality stays high: With proper keystone correction and alignment, a ceiling-mounted projector delivers crisp, bright visuals.
- Choose the right mount: Fixed, tilting, and full-motion mounts each serve different room setups and projector weights.
- Avoid common mistakes: Skipping cable management, ignoring ambient light, and wrong projector angle can hurt your experience.
- Installation is doable: Most people can mount a projector on the ceiling with basic tools and a little patience.
📑 Table of Contents
Why Mount a Projector on the Ceiling?
There are many reasons people choose to mount their projector on the ceiling instead of a table or shelf. The first reason is space. Floor stands take up room, and they can be knocked over easily. A ceiling mount keeps the projector secure and out of the way.
Another big advantage is aesthetics. A ceiling projector mount hides the device from view. Cables can be routed through the ceiling and walls for a clean, clutter-free look. This makes your room feel open and organized. It also protects the projector from accidental bumps, spills, or pets knocking it over.
Many people also find that ceiling placement gives a better viewing angle. When the projector sits above the screen, light shines down directly onto the surface. This reduces shadows and glare. The result is a brighter, clearer image that fills your entire field of vision.
Space Saving Benefits
In smaller rooms, every square foot counts. A floor projector stand can eat up precious space. Ceiling mounting frees up that area for furniture, seating, or walking paths. This is especially useful in bedrooms where you want a home theater setup but still need room to move around.
A Clean, Professional Look
Let us be honest. A projector sitting on a wobbly table looks messy. Wires trail everywhere. People trip over cords. A ceiling mounted projector eliminates all of that. When installed properly, the only thing visible is the image on your screen. It gives any room a polished, high-end feel that is hard to achieve with other setups.
How to Choose the Right Ceiling Projector Mount
Not all projector mounts are the same. Choosing the right one depends on your projector weight, room layout, and how you plan to use the setup. There are three main types of mounts to consider.
Fixed Ceiling Mounts
A fixed mount holds the projector in one position. It does not move or tilt. This is the simplest and most affordable option. Fixed mounts work well when your projector sits directly above the center of the screen. They are ideal for rooms with standard ceiling heights and straightforward projector placement needs.
Tilting Ceiling Mounts
A tilting mount allows you to adjust the angle of the projector. This is helpful when the projector is mounted off-center or when you need to aim the image slightly downward. Tilting mounts add flexibility and make it easier to achieve proper projector alignment without moving the entire unit.
Full-Motion Ceiling Mounts
Full-motion mounts offer the most flexibility. They can tilt, swivel, and swing the projector in multiple directions. These are great for rooms where the projector needs to serve multiple screens or where the ceiling height makes direct placement tricky. They are also useful if you want to pull the projector down for maintenance or lens cleaning.
Matching the Mount to Your Projector Weight
Always check the weight of your projector before buying a mount. Most mounts list a maximum weight capacity. Choosing a mount that can handle your projector’s weight ensures a safe, stable setup. If your projector is on the heavier side, go for a mount with a higher weight rating for extra security.
| Mount Type | Best For | Flexibility | Price Range |
|---|---|---|---|
| Fixed Mount | Center-above-screen setups | None | $20 – $50 |
| Tilting Mount | Off-center or angled setups | Tilt adjustment | $30 – $80 |
| Full-Motion Mount | Multi-screen or high ceilings | Tilt, swivel, swing | $50 – $150 |
Step-by-Step Installation Guide
Installing a projector ceiling mount is easier than most people think. You do not need to be a professional. With the right tools and a little patience, you can have your projector mounted in under an hour. Here is a simple walkthrough to guide you through the process.
Step 1: Find the Right Spot on the Ceiling
Start by deciding where the projector will sit. The best spot is usually directly above the center of your screen. Use a tape measure to find the right distance from the wall. Remember, the throw distance determines how large your image will be. Check your projector manual for the recommended throw ratio.
Step 2: Locate Ceiling Joists
Use a stud finder to locate the ceiling joists. Mounting into joists gives you a solid, secure anchor point. If you cannot hit a joist, use a ceiling anchor kit rated for the weight of your projector. Never skip this step. A loose mount can damage your projector or fall unexpectedly.
Step 3: Attach the Mounting Bracket
Secure the bracket to the ceiling using the screws and anchors provided. Make sure it is level. A crooked bracket leads to a crooked image. Use a spirit level to double-check before tightening all the screws.
Step 4: Attach the Projector to the Mount
Most projectors have standard mounting holes on the bottom. Use the screws that came with your mount to secure the projector to the bracket. Handle the projector gently and make sure it sits snugly. Give it a light tug to confirm it is stable.
Step 5: Route Your Cables
This step makes or breaks the look of your setup. Use cable channels or raceways to hide wires along the ceiling and wall. You can also run cables through the ceiling if you are comfortable with basic home improvement work. A clean cable run keeps your room looking tidy and professional.
Step 6: Power On and Test
Plug everything in and turn on the projector. Check the image for focus, brightness, and alignment. Make small adjustments to the mount angle if needed. Once the image looks sharp and centered, you are all set.
Tips for Getting the Best Image Quality
Mounting a projector on the ceiling is only half the battle. Getting a great image requires attention to a few key details. These tips will help you maximize picture quality and enjoy every movie night or presentation.
Understand Throw Distance and Screen Size
Throw distance is the space between the projector lens and the screen. A short throw projector can produce a large image from a short distance. A long throw projector needs more space. Measure your room carefully before you mount anything. This ensures your image fills the screen without stretching or distorting.
Use Keystone Correction Wisely
Keystone correction adjusts the image shape when the projector is not perfectly aligned with the screen. Most modern projectors offer digital keystone correction. Use it sparingly. Overusing keystone correction can reduce image sharpness and resolution. The best approach is to physically adjust the mount angle first and use keystone only for minor tweaks.
Control Ambient Light
Ambient light is the enemy of projector image quality. Sunlight, lamps, and overhead lights can wash out your picture. To get the best results, dim the lights when watching or presenting. Heavy curtains or blackout blinds help block outside light. Some people also paint their walls and ceiling in dark colors to reduce light reflection.
Match Projector Brightness to Your Room
Projector brightness is measured in lumens. For a dark room, 1,500 to 2,000 lumens is usually enough. For rooms with some light, aim for 3,000 lumens or higher. Choosing the right brightness level keeps your image vibrant and easy to see, no matter the lighting conditions.
Get the Viewing Angle Right
The viewing angle affects how the image looks from different seats. Most projectors work best when viewers are positioned within a specific range. Sit too far to the side, and colors and brightness can fade. Test your setup from different seating positions and adjust the projector angle until everyone gets a great view.
Quick Tips for Better Image Quality
- Clean your projector lens regularly with a soft microfiber cloth.
- Use a high-quality projector screen for sharper, brighter images.
- Keep the projector firmware updated for the latest performance improvements.
- Turn off the projector’s eco mode if you need maximum brightness.
- Give the projector space to breathe and avoid blocking its vents.
Common Mistakes to Avoid
Even with the best intentions, people make mistakes when setting up a ceiling projector. These errors can hurt image quality, shorten your equipment’s lifespan, or even create safety hazards. Knowing what to avoid saves you time, money, and frustration.
Skipping the Weight Check
Every mount has a weight limit. Exceeding it puts stress on the bracket and ceiling. Over time, a too-heavy projector can loosen the mount or even fall. Always double-check your projector’s weight against the mount’s capacity before you install anything.
Ignoring Ventilation
Projectors generate heat. When mounted on the ceiling, they need proper airflow to cool down. Do not mount the projector flush against the ceiling without any gap. Leave enough space around the vents so air can circulate freely. Overheating can shorten the projector lamp life and cause unexpected shutdowns.
Forgetting About Maintenance Access
Ceiling-mounted projectors can be hard to reach. If you mount yours too high or in a tight corner, changing the lamp or cleaning the filter becomes a chore. Consider a full-motion mount that lets you lower the projector for easy maintenance. It is a small investment that pays off in convenience.
Wrong Projector Angle
Mounting the projector at the wrong angle leads to distorted images. If the projector sits too high, the image stretches at the top. If it sits too low, the bottom of the image gets cut off. Take the time to measure and test the angle before locking everything in place.
Poor Cable Management
Exposed cables look bad and create a tripping hazard. Skip the zip ties and exposed wires. Use cable raceways, conduits, or in-wall wiring to keep everything hidden. A neat setup not only looks better but also protects your cables from damage.
Ceiling Projector vs. Other Placement Options
There are several ways to set up a projector. Each option has its pros and cons. Understanding these helps you choose the best setup for your space and needs.
Ceiling Mount vs. Table Stand
A table stand is quick and easy. You set it up, plug it in, and start watching. But table stands take up floor space and can be unstable. A ceiling mount is permanent but offers a cleaner look and better safety. For a dedicated home theater, ceiling mounting wins every time.
Ceiling Mount vs. Rear Projection
Rear projection places the projector behind a translucent screen. This keeps the projector hidden and the image sharp. However, rear projection setups require more space and a special screen. Ceiling mounting is simpler, cheaper, and works with any standard screen.
Ceiling Mount vs. Shelf Placement
Shelf placement keeps the projector off the floor but still visible. It is a good middle ground for people who are not ready to drill into the ceiling. However, shelves can wobble, and dust settles on the projector more easily. Ceiling mounting provides a more stable and cleaner solution.
| Placement Option | Pros | ||
|---|---|---|---|
| Ceiling Mount | Saves space, clean look, safe | Requires installation, harder to access | Home theaters, permanent setups |
| Table Stand | Easy setup, portable | Takes floor space, unstable | Temporary use, small rooms |
| Rear Projection | Hidden projector, sharp image | Needs special screen, more space | Dedicated home cinemas |
| Shelf Placement | Simple, no ceiling drilling | Visible projector, dust issues | Renters, casual viewers |
Expert Insights on Ceiling Projector Setup
We spoke with several AV installers and home theater enthusiasts to gather their top tips. Here is what the experts want you to know about ceiling projector installation.
First, always use a mount rated for your specific projector model. Generic mounts may not fit properly or could support less weight than you think. Second, invest in quality cables. Cheap HDMI cables can cause signal loss, especially over long runs. Third, consider a projector with a lens shift feature. This lets you adjust the image position without moving the entire unit, making alignment much easier.
Experts also recommend testing your setup before making it permanent. Mount the projector loosely first, project the image, and fine-tune the position. Once you are happy with the image size, focus, and alignment, tighten everything down. This small extra step can save you from remounting later.
Finally, pay attention to your projector brightness and room lighting. No mount, no matter how perfect, can fix a washed-out image caused by too much ambient light. Control your lighting, and your ceiling projector will deliver an incredible experience every single time.
Final Thoughts
Using a projector on the ceiling for big screens is one of the best upgrades you can make to any room. It saves space, looks amazing, and delivers a cinematic experience right in your home. Whether you are setting up a dedicated home theater or a multi-purpose presentation room, ceiling mounting gives you a clean, professional result.
The key is to take your time. Choose the right mount, follow the installation steps carefully, and fine-tune your image quality. Avoid the common mistakes that trip up beginners, and you will enjoy a fantastic setup for years to come. With the right approach, your ceiling projector setup will rival any commercial theater. So go ahead, grab a ceiling projector mount, and bring your big screen vision to life.
Frequently Asked Questions
Can any projector be mounted on the ceiling?
Most projectors can be ceiling mounted as long as they have standard mounting holes on the bottom. Check your projector’s manual for mounting specifications and weight limits. Some ultra-short throw models may require specific placement distances, so always verify before buying a mount.
What throw distance do I need for a big screen?
Throw distance depends on your projector type and desired screen size. A short throw projector can produce a 100-inch image from just a few feet away. A long throw projector needs more distance. Check your projector’s throw ratio and use an online throw distance calculator for precise measurements.
Is ceiling mounting safe for my projector?
Yes, ceiling mounting is safe when done correctly. Use a mount rated for your projector’s weight and secure it into ceiling joists or use proper anchors. Ensure the projector has enough ventilation and never exceed the mount’s weight capacity. A properly installed ceiling mount is just as safe as any other placement method.
Do I need special cables for a ceiling projector setup?
You do not need special cables, but you do need quality ones. High-speed HDMI cables work well for most setups. If your projector is far from the source device, consider using a longer HDMI cable or an HDMI over Ethernet extender. Always choose cables that are rated for the resolution you plan to use.
Can I use a ceiling projector in a room with windows?
Yes, but ambient light will affect your image quality. Use blackout curtains or blinds to reduce sunlight. Choose a projector with high lumens for better visibility in bright rooms. A high-gain projector screen can also help boost brightness and contrast in rooms with windows.
How do I clean and maintain a ceiling-mounted projector?
Use a full-motion mount to lower the projector for easy access. Clean the lens with a soft microfiber cloth regularly. Check and replace the air filter according to the manufacturer’s guidelines. Keep the projector’s vents unobstructed to prevent overheating and extend the lamp life.
=== CONCLUSION ===
Mounting a projector on the ceiling is a fantastic way to enjoy big screens at home or in the office. It is safe, practical, and looks incredible when done right. From choosing the right ceiling projector mount to nailing the throw distance and image alignment, every step matters. Follow the tips in this guide, avoid the common mistakes, and your setup will deliver an immersive viewing experience for years to come. Now you know the answer to can you use a projector on the ceiling, and you have everything you need to get started.