How Do I Pixelate An Image Using Microsoft Paint Guide
Want to learn how to pixelate an image using Microsoft Paint? This guide walks you through every simple step, from opening your image to creating stunning pixel art effects. You do not need expensive software or advanced skills. Microsoft Paint is a free tool built into Windows that makes pixelation quick and fun. Follow along and you will have a pixelated image in minutes.
Have you ever wanted to make an image look retro or blocky? Pixelation gives pictures that cool, old-school video game look. And the best part? You can do it right inside Microsoft Paint. No downloads needed. No subscriptions. Just a free tool that is already on your computer.
Many people think you need fancy photo editing software to pixelate an image. That is not true at all. Microsoft Paint has been around for decades, and it can do more than most people realize. In this guide, I will show you exactly how to pixelate an image using Microsoft Paint in just a few easy steps.
Whether you want to make pixel art, create a privacy blur effect, or just have fun with your photos, this tutorial covers everything. I kept it simple on purpose. You do not need to be a tech expert. Anyone can follow along and get great results.
Key Takeaways
- Microsoft Paint can pixelate images using the built-in resize and stretch features — no extra tools needed.
- Pixelation works by enlarging pixels when you stretch an image beyond its original size.
- Grid view helps you see individual pixels more clearly while editing.
- Step-by-step method is simple and takes only a few minutes to complete.
- Common mistakes include skipping the resize step or using the wrong settings.
- Creative uses include pixel art, privacy effects, and fun social media posts.
📑 Table of Contents
- What Is Pixelation and Why Do People Use It?
- Getting Ready: What You Need Before You Start
- Step-by-Step Guide: How to Pixelate an Image in Microsoft Paint
- Tips for Getting the Best Pixelation Results
- Common Mistakes People Make When Pixelating Images
- Creative Ways to Use Pixelated Images
- Can You Do More Than Just Pixelate in Microsoft Paint?
- Final Thoughts on Pixelating Images with Microsoft Paint
What Is Pixelation and Why Do People Use It?
Understanding What Pixelation Actually Means
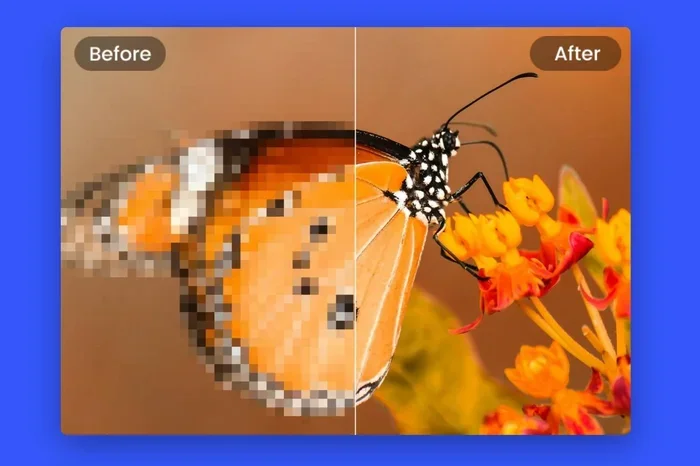
Pixelation happens when you make individual pixels visible in a digital image. Pixels are tiny squares of color that make up every picture on your screen. When an image is small or stretched out, those squares become big enough to see with the naked eye.
Think of it like a mosaic or a LEGO picture. Each little block is a single color. Put them together and you get an image. That is basically what pixelation does. It takes a smooth photo and turns it into a blocky, retro-style design.
People use pixelation effects for many reasons. Some want a vintage or nostalgic look. Others use it for privacy masking to hide faces or license plates. Game designers and digital artists love the pixel art style too. Whatever your reason, Microsoft Paint can help you get there.
Why Microsoft Paint Is Great for This Task
Microsoft Paint comes free with every Windows computer. You do not need to install anything. It is lightweight and opens fast. Unlike heavy editing programs, Paint does not slow down your computer.
Here is why Paint works well for pixelating images:
- It is already installed on your Windows PC.
- No learning curve — the tools are very basic and easy to use.
- It supports common image formats like JPEG, PNG, and BMP.
- You can undo mistakes easily with the Ctrl+Z shortcut.
- It has a grid view option that helps you see individual pixels.
Now that you understand the basics, let us get into the actual steps. You will be surprised how easy this is.
Getting Ready: What You Need Before You Start
Open Microsoft Paint on Your Computer
First, you need to open Microsoft Paint. Click the Start menu and type “Paint” in the search bar. Click the Paint app when it appears. The window will open with a blank canvas.
Make sure you are using a recent version of Windows. The Paint app in Windows 10 and 11 has more features than the old classic version. But even the basic version will work for pixelating your image.
Choose the Image You Want to Pixelate
Pick an image file on your computer that you want to work with. It can be a photo, a screenshot, or any picture file. The bigger the original image, the better your pixelation result will be. Here is why: when you stretch a large image, the pixels become more visible and the effect looks cleaner.
Some good choices for pixel art projects include:
- Portrait photos where you want to hide the face
- Landscape images for a retro-style edit
- Screenshots you want to turn into a mosaic effect
- Any image you plan to use for social media or digital art
Important Tip Before You Begin
Save a copy of your original image before you start editing. That way, you always have the unedited version if something goes wrong. You can do this by right-clicking the file and selecting “Copy,” then pasting it in the same folder with a new name.
Step-by-Step Guide: How to Pixelate an Image in Microsoft Paint
Step 1: Open Your Image in Paint
In Paint, click the “File” menu at the top left. Then click “Open.” Browse to where your image is saved and click on it. Then click “Open” again. Your image will appear on the canvas.
Alternatively, you can right-click your image file, hover over “Open with,” and select “Paint.” This is a quick shortcut that saves time.
Step 2: Turn On Grid View
To see individual pixels more clearly, turn on the grid view. Go to the “View” menu at the top and check the box that says “Gridlines.” This puts a grid over your image so you can see where each pixel sits.
The grid view is very helpful when you are working on pixel art designs. It gives you a visual guide and makes the editing process much easier. You can turn it off later if you want a cleaner look at your image.
Step 3: Select the Entire Image
Click on the “Select” tool in the toolbar at the top. It looks like a dashed rectangle. Then click and drag to select the entire image. Or even faster, go to the “Select” menu and click “Select All.”
You will see dotted lines around the edges of your image. This means the whole picture is selected and ready for the next step.
Step 4: Resize the Image to Pixelate It
This is the most important step. Click on the “Resize” button in the toolbar. A dialog box will pop up with options for horizontal and vertical sizing.
Here is the key: increase the percentage significantly. Set both horizontal and vertical to a high number, like 500% or even 1000%. Make sure the “Maintain aspect ratio” checkbox is checked so your image does not get stretched weirdly.
Click “OK.” Your image will now look huge and blocky. That blocky look is the pixelation effect! The bigger you make it, the more pixelated it becomes.
Step 5: Shrink the Image Back Down
Now here is the trick that makes pixelation work. You need to shrink the image back to its original size or close to it. Click “Resize” again and set the percentage back down, like 10% or 20%.
When you shrink it back, Paint does not smooth out the pixels. Instead, it keeps those big blocks of color. This creates the pixelated mosaic effect that you are looking for.
Your image is now pixelated! You can save it by clicking “File” and then “Save As.” Choose a format like PNG to keep the quality.
Step 6: Fine-Tune Your Pixelation Level
If the pixelation is too strong or too weak, you can redo the resize steps. Just undo with Ctrl+Z and try a different percentage. Experiment with different values until you get the look you want.
Some people like a light pixelation where the image is still recognizable. Others want a heavy pixelation where details are completely hidden. Both looks are easy to achieve with this method.
Tips for Getting the Best Pixelation Results
Start with a High-Resolution Image
The quality of your pixelated image depends on the original. High-resolution images give you more pixels to work with. This means the pixelation effect looks cleaner and more detailed.
If your original image is small, the pixelation might look rough or jagged. Try to use images that are at least 1000 pixels wide for the best results.
Use the Right Resize Percentages
Not all resize percentages work the same for every image. Here is a quick guide:
- Light pixelation: Resize up to 200%, then shrink back to 50%
- Medium pixelation: Resize up to 500%, then shrink back to 20%
- Heavy pixelation: Resize up to 1000%, then shrink back to 10%
These are starting points. Feel free to adjust based on your image size and the effect you want.
Keep the Aspect Ratio Locked
Always make sure “Maintain aspect ratio” is checked when you resize. If you do not, your image will stretch or squish. The pixelation will still work, but the image will look distorted in an ugly way.
Save in the Right Format
When you save your pixelated image, use PNG format. PNG keeps the sharp edges of each pixel block. JPEG can sometimes blur the pixel edges slightly, which takes away from the effect.
Common Mistakes People Make When Pixelating Images
Skipping the Shrink Step
The most common mistake is only resizing the image bigger and saving it that way. This just makes a blurry, enlarged image — it does not create real pixelation. You must shrink it back down for the blocky pixel effect to appear.
Using Images That Are Too Small
If your original image is tiny, pixelating it will not look good. There are just not enough pixels to create a clean effect. Always try to work with images that are at least 800 pixels wide.
Forgetting to Save a Copy of the Original
Once you resize an image in Paint, the changes are permanent. If you want to try different settings, you need the original file. Always keep a backup copy before you start editing.
Not Using Grid View
Many people skip the grid view and wonder why they cannot see individual pixels. Grid view is a helpful tool that makes the editing process much easier. Turn it on and keep it on while you work.
Creative Ways to Use Pixelated Images
Make Fun Pixel Art
Pixel art is a popular digital art style. You can use the pixelation technique to turn regular photos into retro-style artwork. Try it with portraits, animals, or landscapes for fun results.
Some people even create entire pixel art characters from their photos. The Microsoft Paint pixelation method is a great starting point for this creative hobby.
Protect Privacy in Photos
Do you need to share a photo but hide someone’s face? Pixelation is a great privacy tool. It blurs out details in a way that cannot easily be reversed. This works well for hiding faces, license plates, or addresses in photos you plan to share online.
Create Retro Social Media Posts
Pixelated images have a cool nostalgic vibe that works great on social media. Use pixelation effects on your posts to stand out. The retro look grabs attention and makes your content feel unique.
Design Game Assets and Thumbnails
If you make indie games or YouTube videos, pixelated thumbnails and assets can give your content a distinctive look. Microsoft Paint is a simple tool for creating these assets without needing expensive software.
Can You Do More Than Just Pixelate in Microsoft Paint?
Microsoft Paint is more powerful than many people think. Beyond pixelation, you can use it for basic image editing tasks like cropping, drawing, adding text, and adjusting colors. It is a great simple editing tool for quick projects.
For more advanced photo editing, you might want to explore other free tools. But for pixelation and many everyday tasks, Paint does the job perfectly. It is fast, easy, and already on your computer.
Final Thoughts on Pixelating Images with Microsoft Paint
Pixelating an image using Microsoft Paint is easier than most people think. You do not need expensive software or years of experience. Just follow the steps, experiment with different resize percentages, and have fun with it.
The key to great results is starting with a good-quality image and using the right resize settings. Remember to always shrink the image back down after enlarging it. That is the secret that creates the pixelation effect.
Whether you want to make pixel art, protect someone’s privacy, or just create a fun retro-style photo, Microsoft Paint has you covered. It is a simple tool that delivers surprisingly good results for image editing tasks like this.
Now that you know how to pixelate an image using Microsoft Paint, go ahead and try it yourself. Open up Paint, pick an image, and follow the steps in this guide. You will be amazed at how easy and satisfying the process is. Happy editing!
Frequently Asked Questions
Can I pixelate an image in Microsoft Paint without resizing?
No, resizing is the core technique for pixelation in Paint. You must enlarge the image first and then shrink it back down. This stretch-and-shrink method creates the visible pixel blocks that give the pixelation effect. There is no single-click “pixelate” button in Paint, but the resize method works just as well.
What image formats work best for pixelation in Paint?
PNG and BMP formats work best because they do not compress the image and lose detail. JPEG files can also be used, but they may lose some quality when you save after editing. For the crispest pixelated result, start with a PNG or BMP file and save your final image as a PNG.
Can I pixelate only part of an image in Microsoft Paint?
Yes, you can. Use the Select tool to choose just the area you want to pixelate before you resize. After resizing and shrinking, only that selected area will have the pixelation effect. This is great for privacy masking where you want to blur just a face or a specific detail.
Is Microsoft Paint available on all Windows versions?
Yes, Microsoft Paint comes free with Windows 10 and Windows 11. It has been a built-in Windows tool for many years. In Windows 11, Paint has been updated with a modern look and more features, but the basic pixelation method works the same across all versions.
How do I undo a mistake while pixelating an image?
Simply press Ctrl+Z on your keyboard to undo your last action. You can press it multiple times to go back several steps. This makes it easy to experiment with different resize percentages without worrying about ruining your image.
Can I use the same method to create pixel art from scratch?
The resize method works best for pixelating existing photos. For creating pixel art from scratch, you would use Paint’s drawing tools to place individual colored pixels. You can enable grid view to help you place each pixel accurately. Both approaches use Paint, but they serve different creative purposes.
=== CONCLUSION ===
How do I pixelate an image using Microsoft Paint? Now you know the answer. The process is simple, fast, and completely free. You just need to open your image, use the resize tool to stretch and shrink it, and your pixelation effect is ready.
Remember to start with a high-quality image, use the grid view for better control, and experiment with different resize percentages. The more you practice, the better your results will become. Microsoft Paint is a surprisingly capable tool for image editing and pixel art creation.
Try this method today and see how easy it is to transform your photos with a retro pixelation effect. Share your creations with friends or use them for creative projects. The possibilities are endless when you know how to use the tools you already have.