How Do I Create A Gradient Fill In Photoshop Step By Step
Creating a gradient fill in Photoshop is easier than you think. This step-by-step guide walks you through every method, from basic linear gradients to advanced gradient maps. You will learn to use the Gradient Tool, Gradient Editor, and layer styles like a pro.
Have you ever looked at a stunning digital design and wondered how they made those smooth color transitions? That effect is called a gradient fill, and it is one of the most powerful tools in Adobe Photoshop. Whether you are designing a logo, a website banner, or a social media post, gradients add depth and visual interest that flat colors simply cannot match.
So how do I create a gradient fill in Photoshop? The good news is that it is not as complicated as it looks. Photoshop offers several ways to apply gradients, and once you learn the basics, you will be amazed at how quickly you can create beautiful effects. This guide will take you through every method step by step, from the simplest approach to more advanced techniques.
By the end of this article, you will know how to use the Gradient Tool, customize gradient colors, work with different gradient types, and apply gradients using layer styles. You will also learn pro tips that designers use every day to make their gradients look polished and professional. Let us dive right in.
Key Takeaways
- Gradient Fill Basics: Understand what a gradient fill is and why it is essential for design work in Photoshop.
- Multiple Methods: Learn several ways to create gradients, including gradient fill layers, gradient overlays, and gradient maps.
- Gradient Types: Explore linear, radial, angle, reflected, and diamond gradients for different creative effects.
- Gradient Editor Mastery: Customize color stops, opacity stops, and transparency settings to build unique gradients.
- Non-Destructive Workflow: Use adjustment layers and smart objects to keep your edits flexible and editable.
- Pro Tips: Avoid common mistakes and follow expert advice for cleaner, more professional results.
📑 Table of Contents
- What Is a Gradient Fill in Photoshop?
- How Do I Create A Gradient Fill In Photoshop Using the Gradient Tool
- Creating a Gradient Fill Layer for Non-Destructive Editing
- Customizing Gradients with the Gradient Editor
- Using Gradient Overlay in Layer Styles
- Gradient Maps: A Powerful Design Tool
- Common Mistakes to Avoid When Creating Gradients
- Pro Tips for Creating Stunning Gradients
- Quick Tips for Faster Workflow
- Conclusion
What Is a Gradient Fill in Photoshop?
A gradient fill is a gradual blend between two or more colors. Instead of a solid block of one color, you get a smooth transition that moves from one shade to another. Photoshop supports several gradient types, and each one creates a different visual effect.
Gradients are used everywhere in digital design. They appear in backgrounds, buttons, text effects, and even photo adjustments. Understanding how they work gives you a huge creative advantage. The best part is that Photoshop makes it very easy to create and customize them.
Types of Gradients You Can Create
Photoshop offers five main gradient types. Each one serves a different purpose and creates a unique look. Here is a quick overview of what each type does:
- Linear Gradient: Colors blend in a straight line. You choose the direction and angle.
- Radial Gradient: Colors radiate outward from a central point, like a circle.
- Angle Gradient: Colors sweep around a central point in a counterclockwise direction.
- Reflected Gradient: Colors mirror on both sides of a starting line, creating symmetry.
- Diamond Gradient: Colors blend outward in a diamond shape from the starting point.
Each of these gradient types can be customized using the Gradient Editor. You can change colors, adjust transparency, and save your own presets. The flexibility is one of the reasons gradients are so popular in design work.
How Do I Create A Gradient Fill In Photoshop Using the Gradient Tool
The Gradient Tool is the most direct way to apply a gradient in Photoshop. It works on any layer and gives you immediate control over the look and direction of your gradient. Let us walk through the process step by step.
Step 1: Open Your Document
Start by opening Photoshop and creating a new document or opening an existing one. For practice, create a blank canvas. A size of 1920 by 1080 pixels works well for most design projects. Make sure your background layer is unlocked by double-clicking it in the Layers panel.
Step 2: Select the Gradient Tool
Find the Gradient Tool in the toolbar on the left side of your screen. It is hidden behind the Paint Bucket Tool. Click and hold on the Paint Bucket icon to reveal it. The keyboard shortcut is G. Once selected, check the top options bar for gradient settings.
Step 3: Choose Your Gradient Type
In the options bar at the top, you will see a dropdown menu for gradient types. Click on it to see the five gradient options we discussed earlier. Linear gradient is the default and the most commonly used. For this tutorial, select Linear Gradient.
Step 4: Set Your Colors
Look at the color swatches in the toolbar. The front color is the starting color of your gradient, and the background color is the ending color. Click on either swatch to open the Color Picker. Choose the colors you want to blend together. For a sunset effect, try orange as the front color and deep blue as the background color.
Step 5: Apply the Gradient
Click on your canvas where you want the gradient to start. Hold down the mouse button and drag in the direction you want the gradient to go. The farther you drag, the more gradual the transition will be. Release the mouse button, and Photoshop will fill the area with your gradient. You can undo and try again anytime by pressing Ctrl+Z.
Creating a Gradient Fill Layer for Non-Destructive Editing
Using the Gradient Tool directly on a pixel layer is quick, but it is not always the best approach. A gradient fill layer is a smarter way to work because it is non-destructive. This means you can change or remove the gradient at any time without harming your original artwork.
Why Use Gradient Fill Layers?
Non-destructive editing is one of the most important habits in Photoshop. When you use a gradient fill layer, the gradient lives on its own layer. You can adjust the colors, change the direction, or delete it entirely without affecting anything else on your canvas. This gives you much more flexibility as you design.
Step-by-Step: Creating a Gradient Fill Layer
- Open your document in Photoshop.
- Go to the Layers panel and click the Create New Fill or Adjustment Layer icon at the bottom.
- Select Gradient from the dropdown menu.
- A Gradient Fill dialog box will appear. You can choose from preset gradients or click the gradient bar to open the Gradient Editor.
- Customize your colors by clicking on the color stops in the gradient bar.
- Adjust the style using the dropdown menu in the dialog box. Choose from Linear, Radial, Angle, Reflected, or Diamond.
- Use the Angle slider or drag the angle indicator in the preview to set the direction.
- Click OK to apply the gradient fill layer to your document.
Once the gradient fill layer is created, you can always double-click on it in the Layers panel to reopen the Gradient Fill dialog and make changes. This is what makes it such a powerful and flexible tool.
Customizing Gradients with the Gradient Editor
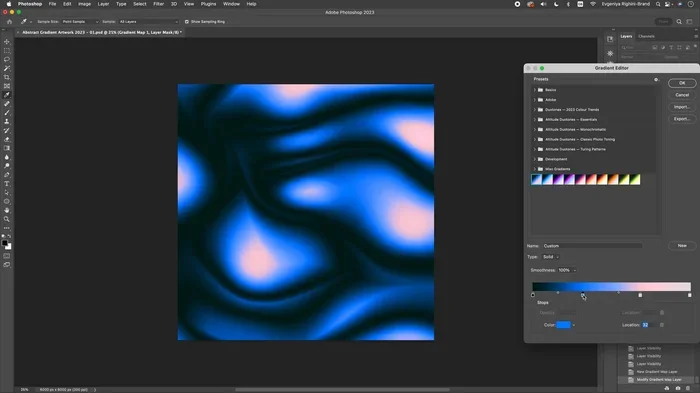
The Gradient Editor is where the real magic happens. It allows you to create completely custom gradients with precise control over colors and transparency. If you want to move beyond the preset options, the Gradient Editor is your best friend.
Opening the Gradient Editor
You can access the Gradient Editor in two ways. First, click on the gradient preview bar in the options bar while the Gradient Tool is selected. Second, double-click on a gradient fill layer in the Layers panel. Both methods open the same Gradient Editor window.
Understanding Color Stops
The gradient bar at the bottom of the editor shows a strip of colors. The small squares underneath it are called color stops. Each color stop controls a point in the gradient where a specific color appears. By default, there are two color stops at the ends of the bar.
To add a new color stop, click anywhere below the gradient bar. A new stop will appear. Click on it, and then click the color swatch below to choose a new color. To remove a color stop, drag it off the gradient bar. You can also drag color stops left or right to adjust where the transition happens.
Working with Opacity Stops
Below the color stops, you will see a white bar with small diamonds. These are opacity stops. They control how transparent or opaque each part of the gradient is. By default, the gradient is fully opaque. But you can add opacity stops to create fade-out effects.
For example, if you want a gradient that starts solid and fades to nothing, add an opacity stop at the far right and set its opacity to zero. This creates a smooth fade from solid color to transparent. This technique is incredibly useful for creating soft overlays and subtle effects.
Saving Your Custom Gradient
Once you have perfected your custom gradient, you can save it for future use. Click the Save button at the bottom of the Gradient Editor. Give your gradient a descriptive name. It will now appear in your gradient presets list, ready to use anytime. This saves a lot of time when you need to reuse the same gradient across multiple projects.
Using Gradient Overlay in Layer Styles
Another popular way to apply a gradient is through Layer Styles. The Gradient Overlay effect lets you add a gradient to any existing layer, such as text, shapes, or images. This method is especially useful when you want to apply a gradient to a specific element without affecting the rest of your design.
How to Add a Gradient Overlay
Start by selecting the layer you want to apply the gradient to in the Layers panel. Right-click on the layer and choose Blending Options. In the Layer Style dialog box, click on Gradient Overlay in the list on the left. You will see a preview of the gradient on your layer.
Use the gradient dropdown to choose a preset or click the bar to open the Gradient Editor for custom colors. You can also adjust the Style, Angle, Scale, and Opacity settings. The Blend Mode dropdown lets you change how the gradient interacts with the layer below. When you are happy with the result, click OK.
When to Use Gradient Overlay vs. Gradient Fill Layer
Both methods have their strengths. A Gradient Fill Layer is best when you want a separate layer dedicated to the gradient. It is easy to move, adjust, and mask. Gradient Overlay is better when you want the gradient to be part of a layer’s style, such as adding a gradient to text or a shape. Gradient Overlay stays linked to the layer, so if you move or transform the layer, the gradient moves with it.
| Feature | Gradient Fill Layer | Gradient Overlay |
|---|---|---|
| Non-Destructive | Yes | Yes |
| Separate Layer | Yes | No |
| Applies to Text | No (unless rasterized) | Yes |
| Easy to Adjust | Very Easy | Easy |
| Can Be Masked | Yes | Yes |
| Linked to Layer | No | Yes |
Gradient Maps: A Powerful Design Tool
A gradient map is different from a regular gradient fill. Instead of adding a gradient as a background or overlay, a gradient map replaces the tonal values of an image or layer with colors from a gradient. Dark areas get the starting color, light areas get the ending color, and midtones get the colors in between.
How to Apply a Gradient Map
To apply a gradient map, go to the Layers panel and click the Create New Fill or Adjustment Layer icon. Select Gradient Map from the list. Your image or layer will instantly be recolored based on the gradient. You can choose from preset gradients or create a custom one using the Gradient Editor.
Gradient maps are incredibly popular for color grading photos and creating artistic effects. They work especially well on portraits and landscape images. You can also use gradient maps on solid color layers to create stylized graphic designs.
Adjusting the Gradient Map
After applying a gradient map, you can fine-tune the result by adjusting the gradient itself. Double-click the gradient map layer thumbnail to open the Gradient Editor. Try using complementary colors for a bold look, or use a subtle monochromatic gradient for a more refined effect. The flexibility of gradient maps makes them a favorite tool among professional designers.
Common Mistakes to Avoid When Creating Gradients
Even experienced designers sometimes make mistakes with gradients. Knowing what to avoid will save you time and frustration. Here are the most common pitfalls and how to steer clear of them.
- Using Too Many Colors: A gradient with too many colors can look muddy and confusing. Stick to two or three colors for a clean, professional look.
- Ignoring Color Harmony: Random color combinations can clash. Use a color wheel or online tools to choose colors that work well together.
- Hard Transitions: If your gradient looks banded or has visible steps, try adding more color stops or smoothing the transitions in the Gradient Editor.
- Forgetting About Resolution: Gradients can look different on screen versus in print. Always check your gradient at the final output size.
- Not Using Non-Destructive Methods: Applying gradients directly to pixels limits your ability to edit later. Always prefer gradient fill layers or layer styles.
Pro Tips for Creating Stunning Gradients
Now that you know the basics, here are some expert tips that will take your gradient skills to the next level. These are techniques that professional designers use to create polished, eye-catching work.
- Use the Eyedropper Tool to Pick Colors: Find a color palette from a photograph or another design. Use the Eyedropper Tool to sample colors, then build your gradient from those sampled colors.
- Experiment with Blend Modes: Changing the blend mode of your gradient layer can create entirely different effects. Try Overlay, Soft Light, or Screen for interesting results.
- Add Noise for Texture: A subtle noise layer over your gradient can add depth and a tactile feel. Go to Filter > Noise > Add Noise and keep it subtle.
- Use Gradient Masks for Fades: Apply a gradient to a layer mask to create smooth fade transitions between elements on your canvas.
- Save and Organize Presets: Create a folder of your favorite custom gradients. Organize them by project type or color scheme for quick access in future work.
- Combine Gradient Types: Use a linear gradient as a background and a radial gradient as an overlay for added dimension and visual interest.
Quick Tips for Faster Workflow
- Shortcut for the Gradient Tool: Press G on your keyboard to quickly select the Gradient Tool.
- Reverse the Gradient: Check the Reverse box in the Gradient Editor or options bar to swap the start and end colors.
- Dither for Smoothness: Enable the Dither checkbox in the Gradient Editor to reduce banding in your gradients.
- Drag from the Center Outward: For radial gradients, start your drag from the center point and drag outward for the most control.
- Use the Shift Key: Hold Shift while dragging to constrain the gradient to a perfectly horizontal, vertical, or 45-degree angle.
Conclusion
Creating a gradient fill in Photoshop is a fundamental skill that every designer should master. Whether you use the Gradient Tool for quick fills, gradient fill layers for non-destructive editing, layer styles for text and shapes, or gradient maps for creative color grading, Photoshop gives you all the tools you need. The key is to practice, experiment, and develop your own style.
Start with the basic methods we covered and gradually work your way up to more advanced techniques. Customize your gradients in the Gradient Editor, save your presets, and explore different gradient types. With time and practice, you will be creating beautiful gradients effortlessly.
Remember, the best designs often come from simple techniques used with creativity. So open Photoshop, pick your colors, and start experimenting with gradients today. You will be surprised at how much life and depth a simple color transition can add to your work. Happy designing!
Frequently Asked Questions
What is the keyboard shortcut for the Gradient Tool in Photoshop?
The keyboard shortcut for the Gradient Tool is the letter G. If it is not visible in your toolbar, press G to select it, or click and hold on the Paint Bucket Tool to reveal it. You can also cycle through hidden tools by pressing Shift+G.
Can I create a gradient on text in Photoshop?
Yes, you can. The easiest way is to use the Gradient Overlay layer style. Select your text layer, right-click and choose Blending Options, then select Gradient Overlay. You can also create a gradient fill layer and clip it to the text layer for more control.
How do I make my gradient smoother and avoid banding?
Banding happens when there are not enough color steps in your gradient. To fix this, enable the Dither checkbox in the Gradient Editor. You can also add a small amount of noise through Filter > Noise > Add Noise. Working in 16-bit mode instead of 8-bit can also reduce banding significantly.
What is the difference between a gradient fill layer and a gradient overlay?
A gradient fill layer creates a separate layer filled with a gradient, giving you independent control. A gradient overlay is a layer style applied directly to an existing layer, such as text or a shape. Gradient fill layers are better for backgrounds, while gradient overlays are ideal for styling specific elements.
Can I animate a gradient in Photoshop?
Yes, you can animate gradients using Timeline and keyframes in Photoshop. Create a gradient fill layer, open the Timeline panel, and create a video timeline. Use keyframes to animate the gradient colors, position, or angle over time. This works great for animated social media content.
How do I save my custom gradient for later use?
Open the Gradient Editor by clicking the gradient bar in the options bar or double-clicking a gradient fill layer. Once you have customized your gradient, click the Save button at the bottom of the editor. Name your gradient, and it will be saved in your preset library for future use.