Can You Make Your Own Laptop Stickers And Stand Out
Can you make your own laptop stickers? Absolutely yes! Creating custom laptop stickers at home is easier than most people think. With a few simple materials, a printer, and your own creativity, you can design personalized laptop decals that reflect your unique style. This guide walks you through every step, from choosing the right materials to printing and applying your designs perfectly.
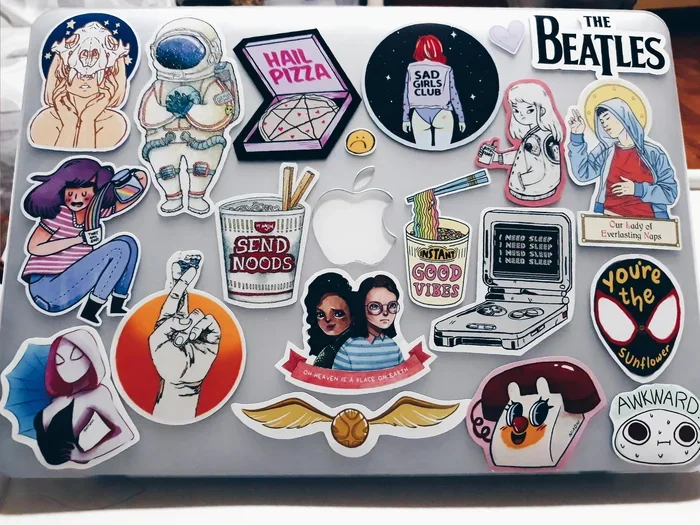
Have you ever looked at a laptop covered in cool custom laptop stickers and thought, “I wish I could make something like that”? Well, you absolutely can. The truth is, making your own laptop stickers is one of the most satisfying DIY projects you can try. It costs very little, takes less time than you think, and the results look incredibly professional. People love personalized laptop accessories because they instantly make a generic device feel like it belongs to them.
Can you make your own laptop stickers and stand out? Yes, and that is exactly what this guide is all about. Whether you want to decorate your own laptop, create gifts for friends, or even start a small business selling laptop decals, this article covers everything you need. We will walk through materials, design tools, step-by-step instructions, and pro tips that will take your laptop sticker ideas from concept to finished product. Let us get started.
Key Takeaways
- DIY laptop stickers are affordable and fun: You can create professional-looking designs without spending a lot of money.
- Vinyl and printable sticker paper are the best materials: They offer durability and a clean finish for your laptop accessories.
- Free design tools make sticker creation easy: Canva, GIMP, and other software let anyone design beautiful laptop decal artwork.
- Proper application matters: Cleaning the surface and using the right technique ensures your laptop skin lasts for years.
- Waterproof and weather-resistant options exist: You can make stickers that survive daily wear, spills, and outdoor conditions.
- Selling custom stickers is a real business opportunity: Many people turn their laptop sticker ideas into profitable side hustles.
📑 Table of Contents
- Why Custom Laptop Stickers Are So Popular
- Materials You Need to Make Laptop Stickers
- Step-by-Step Guide to Creating Your Own Stickers
- Best Tools and Software for Sticker Design
- Tips for Making Stickers That Last
- Common Mistakes to Avoid When Making Laptop Stickers
- Where to Print and Apply Your Stickers
- Expert Insights on Laptop Sticker Design
- Turning Your Hobby Into a Business
- Conclusion
Why Custom Laptop Stickers Are So Popular
Laptop stickers have become a huge part of personal expression. Your laptop is with you everywhere. It goes to coffee shops, classrooms, offices, and travel trips. A plain laptop feels boring to many people. That is where laptop decoration comes in. Stickers transform a dull device into something that tells your story.
The rise of social media has fueled this trend even more. People share photos of their laptop aesthetic online. A well-designed set of laptop decals can spark conversations and help you connect with others who share your interests. Laptop branding with stickers has also become a thing for businesses and influencers who want to promote their identity.
More Than Just Decoration
Custom laptop stickers serve many purposes beyond looking good. Some people use them to cover scratches or worn spots on their device. Others use laptop skins as a way to protect the surface from minor damage. Companies hand out branded stickers at events as a marketing tool. The possibilities with laptop personalization are truly endless.
Another big reason people love DIY laptop stickers is cost. Buying pre-made stickers from a store can add up quickly. Making your own lets you control the quality, the design, and the price. You also get the satisfaction of saying, “I made this myself.” That feeling is priceless.
Materials You Need to Make Laptop Stickers
Before you start designing, you need the right materials. The good news is you do not need a lot of expensive equipment. A few basic supplies are all it takes to create beautiful custom laptop stickers at home.
Sticker Paper and Vinyl
The most important material is your sticker paper. You have two main options here. The first is printable sticker paper, which you can buy at any office supply store. It comes in matte and glossy finishes. The second option is adhesive vinyl, which is more durable and waterproof. Vinyl stickers last longer and look more professional, but they require a cutting machine or more careful hand-cutting.
For beginners, printable sticker paper is the easiest route. It works with most home inkjet printers. You print your design, let it dry, and peel off the backing. For a more professional finish, clear sticker paper gives your designs a polished look without a white border.
Printers and Ink
Most home printers work fine for making DIY laptop stickers. An inkjet printer gives you vibrant colors and smooth gradients. Laser printers are faster and produce waterproof results, but they can be more expensive upfront. If you want your laptop decal to last through spills and rain, consider using a laser printer or waterproof ink.
Quick tip: Always test your printer settings on a scrap piece first. This saves you from wasting expensive sticker paper and helps you get the colors just right.
Cutting Tools
You need something to cut your laptop stickers into shape. Scissors work fine for simple shapes. For more intricate designs, a craft knife and cutting mat give you more precision. If you plan to make laptop stickers regularly, a cutting machine like a Cricut or Silhouette is a worthwhile investment. These machines cut complex shapes automatically and save a ton of time.
Step-by-Step Guide to Creating Your Own Stickers
Now comes the fun part. Making your own custom laptop stickers is a straightforward process once you know the steps. Follow this guide, and you will have beautiful stickers in no time.
Step 1: Choose Your Design
Start by deciding what your laptop sticker will look like. Do you want a funny quote? A piece of digital art? Your own logo? Think about your laptop aesthetic and what represents you. Some popular laptop sticker ideas include minimalist line art, cartoon characters, nature scenes, and inspirational words.
Keep in mind that laptop surfaces are not very large. Your design should be simple enough to read and recognize at a small size. Avoid too much tiny detail, or it will get lost on the sticker.
Step 2: Create Your Design Digitally
Once you have an idea, it is time to bring it to life on your computer. There are many free and paid tools for sticker design. Canva is one of the most popular options because it is beginner-friendly and has thousands of templates. You can also use GIMP, which is free and powerful. For more advanced users, Adobe Illustrator and Procreate offer professional-grade features.
Set your canvas size to match your desired sticker dimensions. A common size for laptop decals is between 3 and 5 inches wide. Make sure your design has a transparent background if you want a clean look. Export your file as a PNG for the best results with printable sticker paper.
Step 3: Print Your Sticker
Load your sticker paper into the printer, design side down. Check your print settings and choose the highest quality option. Print a test copy on regular paper first to check the size and colors. Once you are happy, print on the actual sticker paper.
Let the ink dry completely before handling the printed sheet. This usually takes about 10 to 15 minutes. Rushing this step can smudge your beautiful laptop skin design.
Step 4: Cut and Apply
Now comes the satisfying part. Use your scissors or craft knife to carefully cut around your design. Leave a small border if you want a clean edge, or cut right up to the design for a seamless look. If you are using adhesive vinyl, you may want to weed out the excess material before applying.
To apply your custom laptop sticker, clean the laptop surface with rubbing alcohol first. This removes oils and dust that could affect adhesion. Place the sticker carefully, then press it down firmly from the center outward to avoid air bubbles. Smooth out any wrinkles gently with your fingers or a credit card.
Best Tools and Software for Sticker Design
Choosing the right design tool makes a big difference in the quality of your laptop stickers. Here are some of the best options available for creating custom laptop stickers at any skill level.
Canva (Beginner-Friendly)
Canva is perfect for anyone who is new to graphic design. It offers drag-and-drop editing, thousands of free templates, and a huge library of images and fonts. You can design your laptop decal right in your browser without downloading any software. Canva’s free version gives you plenty of tools to create stunning laptop sticker ideas.
GIMP (Free and Powerful)
GIMP is a free alternative to Photoshop. It offers advanced features like layer management, color correction, and transparency support. If you want full control over your sticker design without spending money, GIMP is an excellent choice. It has a steeper learning curve than Canva, but the results are worth the effort.
Procreate (For iPad Users)
If you have an iPad and an Apple Pencil, Procreate is a fantastic option for hand-drawing your laptop stickers. It offers a natural drawing experience with brushes that feel like real art tools. Many artists create beautiful, unique laptop aesthetics using Procreate and then export their designs for printing.
Adobe Illustrator (Professional Grade)
For those who want the best of the best, Adobe Illustrator is the industry standard for vector design. It creates clean, scalable artwork that looks sharp at any size. If you plan to sell your DIY laptop stickers or create a brand, learning Illustrator is a valuable investment.
Tips for Making Stickers That Last
Nobody wants their custom laptop stickers to peel off or fade after a few weeks. Follow these tips to make sure your laptop decoration stays looking great for a long time.
Use Waterproof Materials
Standard sticker paper works fine for indoor use, but if your laptop goes out into the world, you need something tougher. Waterproof stickers made from vinyl or laminate-coated paper resist moisture, heat, and UV rays. This is especially important if you carry your laptop to different environments throughout the day.
Apply Even Pressure
Air bubbles are the enemy of a clean laptop skin look. Take your time when applying your sticker. Use a squeegee or even a gift card wrapped in a soft cloth to press out trapped air. Work slowly from one edge to the other for the smoothest finish.
Avoid Direct Sunlight
Prolonged exposure to direct sunlight can cause laptop decals to fade and curl over time. If your laptop sits near a window often, consider using UV-resistant sticker paper or placing your stickers on the laptop lid rather than the keyboard area where heat builds up.
Seal Your Stickers
For extra durability, apply a clear laminate or sealant over your printed sticker. This adds a protective layer that guards against scratches, moisture, and everyday wear. Many sticker paper brands sell their own laminate sheets that work perfectly with printed designs.
Common Mistakes to Avoid When Making Laptop Stickers
Even with the best intentions, mistakes happen. Here are some common pitfalls to watch out for when creating your DIY laptop stickers.
- Using low-resolution images: A blurry photo or pixelated design will look terrible on a sticker. Always use high-resolution files for your laptop decal artwork.
- Ignoring the color profile: Colors on your screen may not match what prints out. Calibrate your monitor or do test prints to get accurate colors.
- Cutting too close to the design: Leave a small margin to avoid tearing. You can always trim more later, but you cannot add material back.
- Skipping the surface cleaning step: Dust and oils prevent adhesive from bonding properly. Always clean the laptop surface before application.
- Using the wrong type of paper: Regular printer paper will not work for stickers. Always use proper sticker paper or adhesive vinyl designed for printing.
Where to Print and Apply Your Stickers
If you do not want to print at home, several options can handle your laptop sticker ideas professionally. Many local print shops offer sticker printing services at reasonable prices. Online services like Sticker Mule, Redbubble, and Vistaprint specialize in custom laptop decals and deliver high-quality results.
For those who want to sell their creations, platforms like Etsy and Amazon Handmade are great places to reach customers who love laptop personalization. The market for custom laptop stickers is growing, and many independent designers have built successful businesses around this niche.
When applying your stickers, remember that less is often more. A few well-placed laptop decals look much better than a cluttered mess. Think of your laptop as a canvas. You want each sticker to shine, not compete with others. Space them out thoughtfully and create a layout that feels balanced and intentional.
Can you make your own laptop stickers and stand out? Without a doubt. The combination of affordable materials, powerful design tools, and a little creativity gives you everything you need. Your laptop becomes a reflection of who you are, and that is something no store-bought sticker can fully replicate.
Expert Insights on Laptop Sticker Design
Professional designers who specialize in laptop skin and decal creation share a few insights that can elevate your work.
First, they emphasize the importance of consistent style. If you mix too many different art styles, your laptop aesthetic will look chaotic. Pick a theme and stick with it. Whether it is minimalist, retro, anime, or abstract, consistency makes your laptop stickers look intentional and polished.
Second, experienced sticker makers recommend always designing with the laptop surface in mind. Consider where the logo, trackpad, and hinges are. You do not want your beautiful laptop decal to wrap awkwardly around a curved edge or cover an important part of your device. Plan your layout before you print anything.
Finally, experts suggest experimenting with different finishes. Matte stickers look sleek and modern. Glossy stickers pop with color and vibrancy. Holographic and metallic finishes add a unique touch that turns heads. Trying different options helps you discover what truly matches your laptop personalization vision.
Turning Your Hobby Into a Business
If you discover a real passion for creating custom laptop stickers, you might consider turning it into a side business. The barrier to entry is low. You need a computer, a printer or a local print partner, and an online store presence. Many successful sticker sellers started with just a few designs and grew from there.
Start by creating a small collection of laptop sticker ideas that appeal to a specific audience. Niche markets often perform better than generic designs. Think about hobbies, professions, or interests that you can target with your laptop decals. Build a brand around your style and share your work on social media to attract customers.
The laptop sticker market is competitive, but there is always room for originality. If your designs are unique, high-quality, and meaningful to a specific group of people, you can carve out a loyal customer base. Many people love supporting independent creators who put genuine effort into their laptop accessories.
Conclusion
Can you make your own laptop stickers and truly stand out? Yes, you can. With the right materials, a bit of creativity, and the steps outlined in this guide, you have everything you need to create custom laptop stickers that are uniquely yours. From choosing the best sticker paper and adhesive vinyl to designing with free tools and applying your work carefully, each step is simple and rewarding.
Remember that laptop personalization is about expressing yourself. Your laptop stickers tell a story about who you are, what you love, and how you see the world. Whether you decorate your own device or share your creations with others, the satisfaction of making something with your own hands is unbeatable. Start experimenting today, and watch your laptop aesthetic come to life with every sticker you create.
Frequently Asked Questions
What materials do I need to make my own laptop stickers?
You need sticker paper or adhesive vinyl, a printer (inkjet works best for color), a cutting tool like scissors or a craft knife, and a design software such as Canva or GIMP. These supplies are affordable and easy to find at any craft or office supply store.
Can I use regular printer paper for laptop stickers?
Regular printer paper will not work well for stickers because it lacks adhesive backing and does not hold up to handling or moisture. Always use dedicated sticker paper or adhesive vinyl designed for printing to get the best results for your custom laptop stickers.
How long do homemade laptop stickers last?
With proper materials and application, homemade laptop stickers can last anywhere from six months to several years. Using waterproof vinyl, applying even pressure, and avoiding direct sunlight all help extend the life of your laptop decals significantly.
Is it hard to design laptop stickers if I am not an artist?
Not at all. Tools like Canva and GIMP offer templates and easy-to-use interfaces that make sticker design accessible to beginners. You do not need drawing skills to create beautiful laptop stickers. Many successful designs use simple shapes, bold text, and clean layouts that anyone can put together.
Can I sell the laptop stickers I make at home?
Yes, many people sell custom laptop stickers they create at home. Platforms like Etsy, Redbubble, and Amazon Handmade make it easy to set up an online shop. As long as your designs are original and you use quality materials, you can build a profitable sticker business from home.
How do I remove laptop stickers without damaging the surface?
To remove a laptop sticker safely, warm it up with a hair dryer on low heat for about 30 seconds. This softens the adhesive and makes peeling easier. Remove the sticker slowly at a low angle. If any residue remains, gently rub it off with rubbing alcohol or a mild adhesive remover on a soft cloth.