How Do I Draw Diagrams With Photoshop Step By Step
You can create stunning diagrams directly in Photoshop with the right tools and techniques. This guide shows you how to draw diagrams with Photoshop step by step, covering shapes, lines, text, and export options. Follow along to build clear, professional diagrams for presentations, websites, or print.
Did you know you can draw diagrams with Photoshop just as easily as you edit photos? Photoshop is not just for retouching. It has vector and shape tools for flowcharts, org charts, and mind maps. If you already use Photoshop, you can skip extra diagramming software.
Learning how to draw diagrams with Photoshop step by step is simpler than you think. You only need shapes, lines, text, and layers. This guide walks you through each step, from setting up your canvas to exporting the final image.
Whether you are a beginner or a pro, you will find practical tips here. I will show you how to align shapes, add connectors, and export in the right format. By the end, you will create professional diagrams without leaving Photoshop.
Key Takeaways
- Use Photoshop’s Shape Tools: Rectangles, ellipses, polygons, and custom shapes form the building blocks of any diagram.
- Master the Line and Arrow Tools: Connect shapes with straight or curved lines and add arrowheads for clarity.
- Leverage Layers and Smart Objects: Keep your diagram organized and editable by using layers and converting shapes to smart objects.
- Add Text Easily: Use text boxes and paragraph styles to label shapes and connectors without cluttering the canvas.
- Apply Consistent Styling: Stick to a color palette and alignment guides to create a polished, professional look.
- Export in Multiple Formats: Save your diagram as PNG, JPG, PDF, or SVG for web, print, or sharing.
- Follow a Step-by-Step Workflow to Draw Diagrams with Photoshop: Plan your layout, build shapes, connect them, add text, and refine styling for the best results.
📑 Table of Contents
Setting Up Your Photoshop Workspace for Diagrams
Before you start drawing, set up your workspace. A clean environment helps you focus. You will work with vectors and shapes, so a few settings make a big difference.
Why Photoshop Works for Diagrams
Photoshop offers full control over every pixel and vector path. You can use the same software for photo editing and diagram creation. This saves time and keeps your design consistent. Many people do not realize that Photoshop has powerful diagramming capabilities.
You get access to grid systems, alignment tools, and layer management. These features are essential for clean diagrams. You can also use smart objects to reuse elements. This makes editing faster later on.
Setting Up Guides and Grids
Guides and grids keep your shapes aligned. To turn them on, go to View > Show > Grid. Then set Gridline Every to 100 pixels and Subdivisions to 5. This gives you a helpful reference while you work.
You can also add manual guides. Drag from the ruler on the left or top edge. Guides snap to shape edges when you enable Snap to Document Bounds. This simple step prevents misaligned boxes.
Quick Tip
- Use a large canvas, like 3000 x 3000 pixels, so you have room to grow.
- Save a workspace preset with panels like Layers, Properties, and Shape opened.
- Zoom in to 100% or higher when placing shapes for precision.
Common Mistakes
- Skipping grid setup leads to crooked diagrams and uneven spacing.
- Using too many colors or fonts makes the diagram hard to read.
- Forgetting to name layers causes confusion when editing later.
Expert Insight
Photoshop’s vector capabilities are often overlooked. Many designers reach for Illustrator first, but Photoshop handles most diagramming needs with ease. The key is to use shape layers and smart objects from the start.
Essential Tools for Drawing Diagram Shapes
Photoshop provides several built-in tools for creating diagram shapes. Each tool serves a specific purpose. Learning them all helps you choose the right one for each element.
The Shape Tool Menu
The toolbar houses the Shape tools. You will find Rectangle, Ellipse, Polygon, Line, and Custom Shape. Click and hold the rectangle icon to see the full menu. Each tool creates a vector shape layer by default.
Vector shapes remain crisp at any size. You can change their fill color, stroke, and corner radius later. This non-destructive editing is a huge advantage over raster drawing.
| Tool | Best For | Shortcut | Example Use |
|---|---|---|---|
| Rectangle Tool | Boxes, process steps | U | Creating flowchart nodes |
| Ellipse Tool | Circles, start/end points | U | Terminator shapes in flowcharts |
| Polygon Tool | Hexagons, custom polygons | U | Decision diamonds (use 4 sides) |
| Line Tool | Straight connectors | U | Connecting shapes with arrows |
| Custom Shape Tool | Predefined icons and shapes | U | Adding arrows, speech bubbles |
Using the Pen Tool for Custom Shapes
The Pen Tool lets you draw freeform paths. It is perfect for unique connector lines or custom shapes. Click to add anchor points, and drag to curve the line.
To close a path, click the first anchor point. You can then right-click and choose Fill Path or Stroke Path. This gives you total control over complex diagram elements.
Quick Tip: Use Path Operations
Path operations let you combine or subtract shapes. In the Properties panel, you will see options like Unite, Subtract, Intersect, and Exclude. Use Unite to merge two rectangles into an L-shape. This is handy for creating custom diagram icons without extra steps.
Key Takeaway
The Shape tools and Pen Tool form the foundation of diagram drawing in Photoshop. Master them, and you can build any diagram type.
Step-by-Step: Building a Flowchart from Scratch
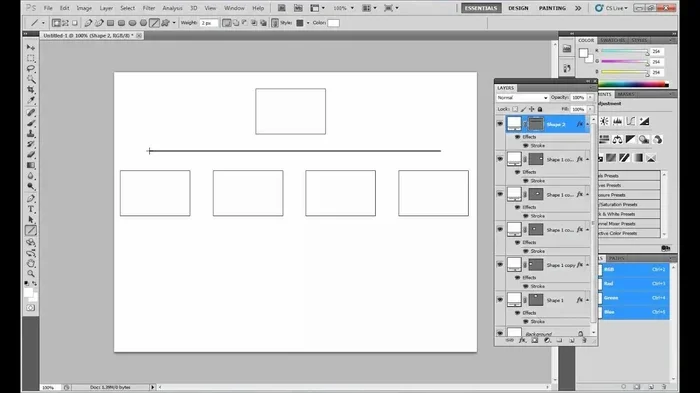
Now let’s build a simple flowchart together. This hands-on example shows the entire process. You will create boxes, connect them, and add labels.
Planning Your Diagram Layout
First, sketch your flowchart on paper. Decide how many steps you need. A basic flowchart has a start, process steps, decisions, and an end. Keep the layout top-to-bottom or left-to-right for clarity.
For this example, we will build a three-step process: Start, Action, End. Use a landscape canvas so you have horizontal room. Set your background to white or a light gray.
Drawing the First Shapes
Select the Rectangle Tool (U). Set the fill to a blue color and the stroke to none. Draw a rectangle about 200 pixels wide and 60 pixels tall. Center it on the canvas.
Next, double-click the shape layer to open Layer Style. Add a subtle drop shadow for depth. Then duplicate the rectangle (Ctrl+J) and move the copy down. Change its fill color to green for the Action step.
For the Start and End, switch to the Ellipse Tool (U). Draw two circles above and below the rectangles. Use a different color, like orange, to distinguish them.
Connecting Shapes with Lines and Arrows
Select the Line Tool (U). Set the stroke width to 2 pixels and check the Arrowhead option in the top bar. Draw a line from the Start circle down to the first rectangle.
Repeat for the other connections. Use the Move tool to nudge lines into place. Enable Smart Guides (View > Show > Smart Guides) so lines snap to shape edges automatically.
If you need a curved connector, switch to the Custom Shape Tool and choose a curved arrow from the shape picker. This adds a professional touch to your flowchart.
Quick Tip
- Use the Align tools to center shapes horizontally and vertically.
- Hold Shift while drawing to constrain proportions for perfect circles and squares.
- Name each layer (Start, Process 1, Arrow 1) to stay organized.
Adding Text, Labels, and Connectors
Text makes your diagram understandable. Without labels, shapes are just empty boxes. Photoshop offers flexible text tools that work perfectly inside diagrams.
Inserting Text Boxes
Select the Text Tool (T). Click inside a shape and type your label. Photoshop automatically wraps text inside the shape boundary. You can resize the shape, and the text adjusts.
Choose a clean sans-serif font like Arial or Helvetica. Set the size between 12 and 14 points for readability. Keep the text color dark gray or black for contrast against colored shapes.
Styling Text for Readability
Use paragraph styles to keep text consistent. Open the Paragraph panel and set alignment to Center. This centers text inside your shape boxes automatically.
For connector labels, create a small text box near the line. Use a smaller font size, like 10 points, and a lighter color. This prevents the label from competing with the main shapes.
Using the Line Tool for Connectors
Connectors link shapes and show the flow. The Line Tool creates straight connectors. For angled connectors, use the Pen Tool to draw a path with a corner point.
To add a label to a connector, create a text box and place it on the line. Add a white background rectangle behind the text to keep it readable over the line. Group the line and label layer together for easy moving.
Common Mistakes
- Using too many fonts makes diagrams look messy. Stick to one or two.
- Placing text outside shapes breaks the visual connection.
- Forgetting to rasterize text before applying certain filters can cause quality loss.
Styling Your Diagram for a Professional Look
A good diagram looks clean and organized. Styling is what separates a rough sketch from a polished design. Follow these principles for a professional result.
Choosing a Color Palette
Limit your palette to three or four colors. Use one color for start/end shapes, another for process steps, and a neutral for connectors. This creates visual hierarchy and keeps the diagram easy to scan.
Pick colors that work well together. Use a free tool like Coolors.co to generate a palette. Apply the same colors to similar shape types throughout the diagram.
Aligning and Distributing Shapes
Misaligned shapes make diagrams look amateur. Photoshop has powerful alignment and distribution tools.
Select multiple shape layers by holding Ctrl and clicking them. Then use the Align buttons in the top options bar. Choose Align Horizontal Centers or Align Vertical Centers. For even spacing, use Distribute Horizontal Centers to space shapes equally.
Using Layers and Smart Objects
Keep related layers in a group folder. Name the folder “Flowchart Shapes” or “Connectors.” This makes it easy to hide or lock parts of the diagram while you work on other areas.
Convert frequently used shapes into Smart Objects. Right-click a shape layer and choose Convert to Smart Object. Now you can scale, rotate, and reuse it without losing quality. If you edit the Smart Object, all instances update automatically.
Expert Insight
Professional diagrammers often use a 120-pixel grid for spacing. This ensures consistent gaps between shapes. You can set this in Edit > Preferences > Guides, Grid & Slices. A little planning upfront saves hours of rearranging later.
Quick Tip
- Use the Move tool’s auto-select feature to click directly on shapes.
- Add a subtle border (1 pixel, light gray) to shapes for a modern look.
- Use the Eyedropper tool to pick exact colors from your logo or brand guide.
Exporting and Sharing Your Diagram
Once your diagram is complete, you need to export it correctly. The right format ensures your diagram looks sharp everywhere, whether on a website or in a printed report.
Best File Formats for Diagrams
PNG is the best choice for most diagrams. It supports transparency and preserves sharp edges. Use PNG-24 for the highest quality. If your diagram has no transparent areas, JPG works well for smaller file sizes.
For print, export as PDF. This keeps all vectors crisp at any zoom level. SVG is ideal for web use because it scales perfectly. Photoshop can export slices as SVG through the Export As dialog.
Export Settings for Web and Print
Go to File > Export > Export As. Choose PNG and set the scale to 2x for retina displays. Check the Transparency box if you want a clear background.
For PDF, choose File > Save As > Photoshop PDF. In the options, select Maximum Compatibility. This ensures the PDF opens correctly in any viewer, including Adobe Acrobat and web browsers.
Key Takeaway
Always export a high-resolution PNG for digital use and a PDF for print. Keep your original PSD file so you can make edits later.
Conclusion
Drawing diagrams with Photoshop is a valuable skill that saves time and money. You now know how to set up your workspace, use shape tools, build a flowchart, add text, style your diagram, and export it correctly. The process is straightforward once you practice the steps.
Start with simple diagrams and gradually try more complex layouts. Experiment with colors, fonts, and connector styles. Photoshop gives you the flexibility to create exactly the diagram you need. So open Photoshop, follow these steps, and start drawing your own professional diagrams today.
Frequently Asked Questions
Can Photoshop be used for diagramming?
Yes, Photoshop has all the tools you need for diagramming. You can use shapes, lines, text, and layers to create flowcharts, mind maps, and organizational charts. It is a fully capable diagramming tool.
What tools do I need to draw diagrams in Photoshop?
The main tools are the Shape tools, Line tool, Pen tool, and Text tool. The Shape tools create boxes and circles, the Line tool draws connectors, the Pen tool allows custom paths, and the Text tool adds labels.
How do I align shapes precisely in Photoshop?
Select multiple shape layers and use the Align options in the top bar. You can align centers, edges, and distribute spacing evenly. Enable Smart Guides and Snap to Document Bounds for extra precision.
What file format is best for diagrams?
PNG is best for digital use because it keeps edges sharp and supports transparency. PDF is ideal for printing, and SVG is great for web graphics that need to scale. Keep your original PSD for future edits.
Can I edit a diagram after exporting it?
Yes, as long as you save the original PSD file. You can reopen it and edit any shape, text, or layer. If you only have the exported PNG or PDF, you will need to recreate the changes manually.
Is Photoshop better than dedicated diagramming software?
Photoshop offers more design freedom and integrates with photo and web projects. Dedicated tools like Visio focus only on diagrams. If you already own Photoshop, you can handle most diagramming needs without extra software.