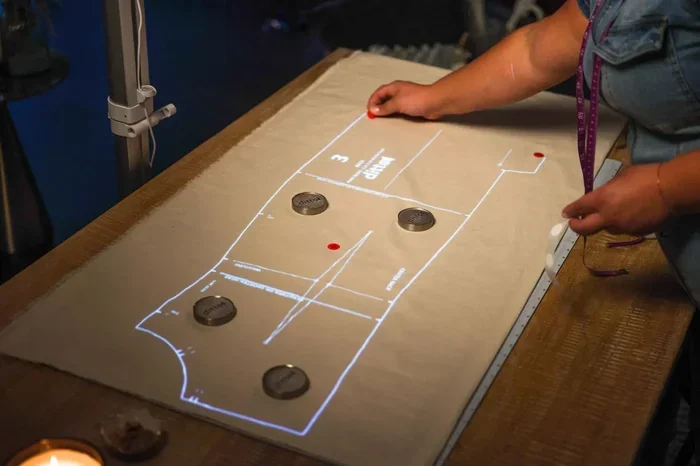
Can You Use Any Projector For Sewing Patterns Today
Yes, you can use many types of projectors for sewing patterns, but not all projectors are created equal. The right projector transforms how you trace and cut fabric, saving time and reducing errors. LED projectors with high brightness and good resolution work best for sewing rooms with normal lighting.
Have you ever wondered if you can use any projector for sewing patterns? The short answer is yes, but there is a lot more to it than just plugging in a machine and hitting play. Not every projector delivers the clarity, brightness, or accuracy you need for tracing patterns onto fabric. In this guide, we will walk through everything you need to know about choosing and using a projector for your sewing projects.
Projecting sewing patterns has changed the way many crafters work. Instead of printing giant sheets of paper or tracing by hand, you can display a digital pattern directly onto your fabric. This method saves time, reduces waste, and opens up a world of possibilities. But the experience depends heavily on the type of projector you choose and how you set it up.
Key Takeaways
- Not every projector works well: brightness, resolution, and throw distance matter for sewing patterns.
- LED projectors are the top choice: they run cool, last long, and deliver sharp images on fabric.
- Resolution of at least 1080p is ideal: it keeps pattern lines crisp and easy to trace.
- Keystone correction and lens shift help: they fix distorted projections on uneven surfaces.
- Portable projectors offer flexibility: you can move them between rooms or take them to craft groups.
- Ambient light is your biggest enemy: a brighter projector overcomes this in most sewing spaces.
- Setup and alignment take practice: a little trial and error goes a long way for perfect projection.
📑 Table of Contents
- Why Use a Projector for Sewing Patterns?
- Types of Projectors That Work for Sewing
- Key Features to Look For
- Setting Up Your Projector for Sewing
- Common Mistakes to Avoid
- Quick Tips for Best Results
- Comparison Table: Projector Types for Sewing
- Expert Insights on Projecting Sewing Patterns
- Can You Use Any Projector For Sewing Patterns? The Final Word
Why Use a Projector for Sewing Patterns?
More and more sewists are turning to digital pattern projection. It is not just a tech trend. It solves real problems that every sewer faces at some point. Here is why this method is gaining so much popularity.
Saves Time and Paper
Printing full-size sewing patterns uses a lot of paper. Some patterns span several sheets that you need to tape together. A projector skips all of that. You display the pattern on the wall or a screen and trace it directly. This alone can save you hours of prep work.
Improves Accuracy
When you tape paper sheets together, seams can shift. Lines can become blurry. A projected pattern stays sharp and aligned. You get precise lines every time, which is especially helpful for complex designs like quilting patterns or garments with many pieces.
Easy to Adjust Sizes
Need to scale a pattern up or down? With a projector, you just adjust the size on your screen. No need to redraw or find a different size. This is a game changer for custom sizing and digital pattern drafting.
Great for Group Classes
If you teach sewing or run craft groups, a projector lets everyone see the pattern clearly. You can walk around the room and help students while the pattern stays visible on a large surface.
Types of Projectors That Work for Sewing
Not all projectors are suitable for sewing patterns. Some work beautifully, while others will frustrate you. Let us break down the main types and what you need to know about each one.
LED Projectors
LED projectors are the most popular choice among sewists. They use light-emitting diodes instead of traditional bulbs. This gives them several advantages:
- Longer lifespan: LED lights last up to 20,000 hours or more.
- Cool operation: They do not heat up your sewing room.
- Energy efficient: They use less power than lamp-based models.
- Consistent brightness: The light output stays steady over time.
For most sewing rooms, an LED projector with at least 2,000 lumens is a solid starting point. Brands like Anker, Wimius, and Apeman make affordable options that work well for this purpose.
Laser Projectors
Laser projectors are the premium option. They offer excellent brightness and color accuracy. They also last a very long time. However, they come at a higher price point. If you sew frequently or plan to use the projector for other purposes like movie nights, a laser model is worth considering.
DLP vs. LCD Technology
You will often hear about DLP and LCD when shopping for projectors. Here is a simple breakdown:
- DLP (Digital Light Processing): Uses tiny mirrors to create the image. It tends to be more portable and has sharp contrast. Great for craft projection in smaller rooms.
- LCD (Liquid Crystal Display): Uses three separate LCD panels for red, green, and blue. It often produces brighter and more vivid images, which can help in rooms with some ambient light.
Both technologies work for sewing patterns. Your choice may come down to budget and room conditions.
Pico and Pocket Projectors
Pico projectors are tiny and portable. They are fun to use, but they usually lack the brightness needed for sewing. Unless your sewing room is very dark, a pico projector may not give you a clear enough image. They work best as a secondary or travel option.
Key Features to Look For
When shopping for a projector for sewing patterns, certain features matter more than others. Here is what to prioritize.
Brightness (Lumens)
Brightness is measured in lumens. The higher the number, the clearer the image in brighter rooms. For sewing, aim for at least 2,000 lumens. If your room has windows or overhead lights, go for 3,000 lumens or more. A dim projection makes tracing frustrating and inaccurate.
Resolution
Resolution determines how sharp the projected image looks. For sewing patterns, you want at least 1080p (Full HD). This ensures that pattern lines, notches, and markings remain crisp and easy to follow. Lower resolutions like 720p can work for simple projects, but fine details may blur.
Throw Distance
Throw distance is how far the projector needs to be from the wall or screen to produce a clear image. Short throw projectors can create a large image from a short distance. This is helpful if your sewing room is not very long. Ultra-short throw models can project from just a few inches away, but they tend to be more expensive.
Keystone Correction
Keystone correction adjusts the image shape when the projector is not perfectly aligned with the wall. If you set your projector at an angle, the image might look like a trapezoid instead of a rectangle. Keystone correction fixes this digitally. However, it can slightly reduce image quality, so try to position the projector as straight as possible.
Portability
If you move your sewing setup around or travel to craft fairs, a portable projector is a great investment. Look for lightweight models that come with a carrying case. Some even run on battery power, which adds convenience for outdoor or off-site sewing sessions.
Setting Up Your Projector for Sewing
Getting the right setup makes all the difference. Even the best projector will frustrate you if it is not positioned correctly. Here is how to set things up for the best experience.
Choose the Right Surface
A flat, white wall works well for most sewists. A pull-down screen or a white bedsheet stretched tight also works. Avoid textured or colored surfaces, as they can distort the pattern and make tracing harder. The goal is a smooth, light-colored surface that shows the image clearly.
Position the Projector Correctly
Place the projector at the right distance to fill your desired area. Most projectors come with a throw ratio chart in the manual. Use this to calculate the distance needed for your wall size. Center the projector as much as possible to minimize keystone distortion.
Focus and Align
Turn on the projector and adjust the focus until the image is sharp. Then use the keystone correction or physical lens shift to make the image rectangular. Take your time with this step. A few extra minutes of alignment saves you from uneven pattern lines later.
Connect Your Device
Most modern projectors connect to laptops, tablets, or phones via HDMI, USB, or wireless casting. Make sure your digital pattern file is in a compatible format. PDF files work well for most setups. If you use a tablet, an HDMI adapter cable often gives the most stable connection.
Test Before You Trace
Always do a test run before you start cutting fabric. Project the pattern onto a scrap piece of fabric or paper. Check that all lines are visible and the scale is correct. This simple step can prevent costly mistakes.
Common Mistakes to Avoid
Even experienced sewists can run into trouble when they first start using a projector for patterns. Here are some common mistakes and how to avoid them.
Using a Projector That Is Too Dim
This is the number one mistake. A low-brightness projector produces a faint image that is hard to trace, especially in a room with any light. Always check the lumen rating before buying. If in doubt, choose brighter over dimmer.
Ignoring Room Lighting
Projectors struggle in bright environments. If possible, close curtains or blinds when projecting patterns. Dim the overhead lights if you can. A darker room gives you a sharper, more visible projection.
Skipping Calibration
Every projector behaves slightly differently on different surfaces and at different distances. Skipping calibration means your pattern may be slightly off in size. Always measure a known dimension on the projected image to confirm the scale is correct.
Using the Wrong File Format
Not all digital pattern files display well on a projector. Very large PDF files may lag or stutter. JPG or PNG image files often project more smoothly. If your pattern comes in a format that causes issues, try converting it to a high-resolution image file.
Forgetting to Turn Off Auto-Off Features
Some projectors shut off after a period of inactivity. This can be annoying mid-tracing session. Check your projector settings and disable any auto-off or sleep timers before you start a long project.
Quick Tips for Best Results
Here are some practical tips that experienced sewists swear by:
- Use a tripod or stable stand for your projector. Even a slight shift during tracing can throw off your pattern.
- Mark registration points on your fabric before projecting. These reference points help you align pattern pieces accurately.
- Use a fine-tip marker or chalk pencil for tracing. The sharper the tool, the more precise your lines will be.
- Project one pattern piece at a time if your wall space is limited. Trace it, move to the next, and repeat.
- Keep a spare bulb or check warranty if you are using a lamp-based projector. Having a backup saves you from unexpected downtime.
- Clean the projector lens regularly. Dust on the lens can blur the image and make tracing harder than it needs to be.
Comparison Table: Projector Types for Sewing
| Projector Type | Brightness Range | Best For | Price Range |
|---|---|---|---|
| LED Home Projector | 2,000 – 4,000 lumens | Most sewing rooms | $150 – $500 |
| Laser Projector | 3,000 – 5,000+ lumens | Bright rooms and frequent use | $500 – $2,000+ |
| Pico Projector | 50 – 300 lumens | Dark rooms and travel | $50 – $200 |
| Short Throw Projector | 2,500 – 4,000 lumens | Small sewing rooms | $300 – $1,000 |
| Ultra-Short Throw Projector | 3,000 – 5,000 lumens | Wall-mounted setups | $800 – $3,000+ |
As you can see, there is a projector for every budget and sewing room setup. The key is matching the projector features to your specific needs and environment.
Expert Insights on Projecting Sewing Patterns
Many professional pattern designers now offer their files in digital format specifically for projection. This trend has grown rapidly since 2020. Designers like those at Seamwork and BurdaStyle have embraced digital delivery because it gives sewists more flexibility.
One thing experts emphasize is the importance of color contrast. If your fabric is dark, a white or light-colored projection works best. Some projectors allow you to invert colors or switch to a high-contrast mode. This simple trick can make tracing much easier on dark or patterned fabrics.
Another expert tip is to use a dedicated device for projection. Running your pattern file on a tablet or laptop that is not cluttered with other apps reduces distractions and prevents accidental interruptions during tracing sessions.
Can You Use Any Projector For Sewing Patterns? The Final Word
So, can you use any projector for sewing patterns? The honest answer is that most projectors can work, but not all projectors will give you a good experience. The right projector makes tracing patterns feel effortless and precise. The wrong one can turn a simple project into a frustrating ordeal.
Focus on brightness, resolution, and throw distance. Choose an LED or laser model for reliability and longevity. Set up your projector carefully and always test the projection before you start cutting. With the right setup, projecting sewing patterns becomes one of the most enjoyable parts of your sewing routine.
Whether you are a beginner just exploring digital patterns or an experienced sewist looking to streamline your workflow, a good projector is a worthwhile investment. It brings convenience, accuracy, and a modern touch to your craft. Start with a reliable model, practice your setup, and enjoy the freedom of digital pattern projection in your sewing room.
The world of sewing is evolving fast, and digital pattern projection is at the forefront of that change. Embrace it, experiment with it, and find what works best for your space and style. Happy sewing!
Frequently Asked Questions
Can I use a home theater projector for sewing patterns?
Yes, most home theater projectors work well for sewing patterns because they offer high brightness and good resolution. Just make sure the projector has at least 2,000 lumens and a 1080p resolution for the best results. Home theater models often come with strong color accuracy, which helps you see pattern lines clearly on fabric.
Do I need a special screen to project sewing patterns?
No, you do not need a special screen. A flat white wall, a white bedsheet, or a pull-down screen all work fine. The key is to use a smooth, light-colored surface that gives you a clear and even projection. Avoid textured or dark surfaces, as they can distort the pattern image.
What is the best brightness for a sewing projector?
Aim for at least 2,000 lumens if your sewing room has normal lighting. If your room gets a lot of natural light or has bright overhead fixtures, look for 3,000 lumens or more. Brighter projectors give you sharper images and make tracing much easier and more comfortable.
Can I use a projector outdoors for sewing projects?
You can, but it is challenging. Outdoor light makes projections hard to see clearly. If you want to sew outdoors, choose a very bright projector and set up in a shaded area. Some sewists use pop-up canopies or tents to create a darker environment for better projection visibility.
How do I know if my digital pattern file will work with a projector?
Most digital patterns come as PDF files, which project well. For the best results, convert your pattern to a high-resolution image format like JPG or PNG if you experience any lag. Always test the file on your projector first to confirm the image is clear and the scale matches your expected size.
Is a short throw projector better than a standard projector for sewing?
A short throw projector can be better if you have a small sewing room. It projects a large image from a short distance, which saves space and reduces the risk of shadows from the sewer blocking the beam. However, short throw models can be more expensive, so consider your room size and budget before deciding.
=== CONCLUSION ===
Using a projector for sewing patterns is a practical and exciting way to modernize your craft. Not every projector will do the job, but with the right choice, you can transform your sewing experience. Focus on brightness, resolution, and setup quality. Avoid common mistakes like using a dim projector or skipping calibration. With the tips and insights in this guide, you are well on your way to projecting sewing patterns with confidence and precision. Start small, experiment with your setup, and enjoy the process of bringing digital patterns to life on your fabric.