Can You Fix A Laptop Charger Before Buying a New One
Yes, you can often fix a laptop charger at home and save money before buying a new one. Whether your charger has a frayed cable, a broken tip, or a dead adapter, this guide walks you through every repair option step by step. We cover simple fixes, intermediate repairs, and when it is time to call it quits and invest in a replacement.
Key Takeaways
- Most common charger issues are fixable: frayed cables, loose tips, and blown fuses are easy repairs you can do at home.
- Always unplug and disconnect your charger before attempting any repair for safety.
- A multimeter is your best friend when diagnosing charger problems and testing voltage output.
- Know when to stop: damaged internal wiring or a fried motherboard charging circuit may require professional help.
- Replacement tips and cables are affordable and can extend your charger life by years.
- Check your warranty first because opening the charger may void it.
- Prevention is simple: proper storage and gentle handling prevent most charger damage.
📑 Table of Contents
- Can You Fix A Laptop Charger Before Buying a New One?
- How to Diagnose Your Charger Problem
- Easy Fixes You Can Do at Home
- When Repairing Makes Sense vs. When to Replace
- Using a Universal Charger as a Temporary Solution
- Preventing Future Charger Damage
- When to Seek Professional Help
- Frequently Asked Questions About Laptop Charger Repair
- Conclusion
Can You Fix A Laptop Charger Before Buying a New One?
Your laptop charger just stopped working. You plug it in, and nothing happens. Your first thought might be, “I need a new one.” But wait. Before you spend $50, $80, or even $100 on a replacement, let us talk about whether you can actually fix a laptop charger yourself.
The answer is yes, more often than you think. Most laptop charger problems are simple and fixable. A frayed cable, a loose tip, or a blown fuse can all be repaired without advanced skills. Even some internal adapter issues are within reach of a handy DIYer.
This guide covers everything you need to know. We will walk through the most common charger problems, show you how to diagnose them, and give you step by step repair instructions. By the end, you will know exactly whether your charger is worth saving or if it is time to buy a new one.
Let us dive in and save you some money.
Why Do Laptop Chargers Stop Working?
Understanding the root cause is the first step in any repair. Laptop chargers fail for a variety of reasons, and most of them are not mysterious. Here are the most common culprits behind a dead laptop power adapter.
Frayed or Damaged Cable. This is the number one reason chargers fail. Over time, the cable gets bent, twisted, and stepped on. The outer insulation wears through, and the inner wires start to fray. Sometimes you can see the damage. Other times, it is hidden inside the jacket.
Worn Out Tip Connector. The tip is the part that plugs into your laptop. It gets inserted and removed hundreds of times. The metal wears down, the springs weaken, and eventually the connection becomes unreliable or stops working altogether.
Blown Fuse Inside the Adapter. Many chargers have a small internal fuse. A power surge or short circuit can blow it. When this happens, the adapter stops producing any output, even though it looks perfectly fine from the outside.
Overheating Damage. Chargers generate heat during normal use. But if a charger is used in a hot environment, blocked by fabric, or overloaded, the internal components can degrade. Heat weakens solder joints and damages electronic parts over time.
Motherboard Charging Circuit Failure. Sometimes the problem is not the charger itself but the laptop. A damaged charging circuit on the motherboard can prevent the laptop from receiving power, even with a perfectly good charger. This is an important distinction we will cover later.
Age and General Wear. Everything has a lifespan. A charger that is five or more years old may simply be at the end of its useful life. Components degrade, and performance drops gradually until it stops working entirely.
How to Diagnose Your Charger Problem
Before you start fixing anything, you need to know what is wrong. Diagnosing the problem saves you time and prevents unnecessary repairs. Here is how to figure out what is going on with your AC adapter troubleshooting.
Step 1: Visual Inspection
Unplug the charger from both the wall and the laptop. Look at the entire length of the cable. Check for any visible damage like cuts, kinks, exposed wires, or burn marks. Inspect the tip connector carefully. Look for bent pins, corrosion, or discoloration.
Also check the adapter brick itself. Is it cracked? Is it unusually hot to the touch? Does it smell like burning? Any of these signs point to serious internal damage that may not be worth repairing.
Step 2: Check the Wall Outlet
This sounds obvious, but it is often overlooked. Plug something else into the same outlet. Does it work? Try a different outlet entirely. A dead outlet can mimic a dead charger, and you do not want to waste time on repairs that are not needed.
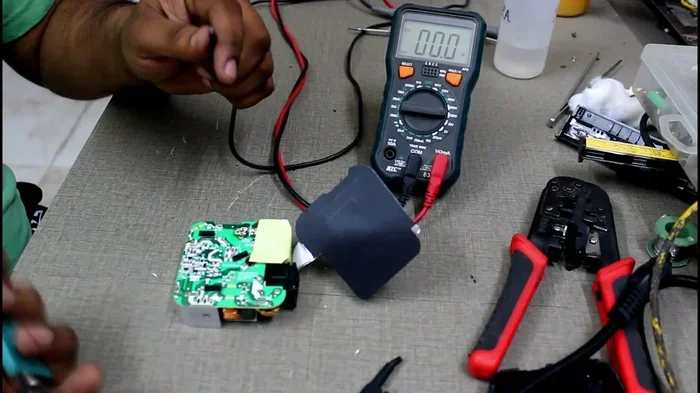
Step 3: Test with a Multimeter
A multimeter is an inexpensive tool that measures voltage and current. Set it to DC voltage. Touch the red probe to the center pin of the charger tip and the black probe to the outer sleeve. Compare the reading to the voltage printed on the adapter.
If the reading is close to the rated voltage, your charger is outputting power and the problem might be with the laptop. If the reading is zero or very low, the charger itself has failed. This test is crucial for knowing whether you are dealing with a broken charger cable or something deeper.
Step 4: Wiggle Test
Plug the charger into the laptop and gently wiggle the tip at the connection point. Does the charging light flicker? Does the laptop recognize the charger sometimes but not others? This points to a worn tip or a loose connection inside the laptop port.
Easy Fixes You Can Do at Home
Now that you know what is wrong, let us fix it. These are the repairs that require minimal tools and basic skills. Most people can complete them in under 30 minutes.
Fix 1: Repairing a Frayed Charger Cable
A frayed cable is the most common issue, and it is also the easiest to fix. If the damage is near the end of the cable, you have a few options.
Option A: Electrical Tape. For minor fraying where the inner wires are still intact, wrap the area tightly with electrical tape. This is a temporary fix, but it works in a pinch. Just make sure the tape covers all exposed metal.
Option B: Heat Shrink Tubing. This is a better and more durable fix. Slide a piece of heat shrink tubing over the damaged area. Use a heat gun or a lighter to shrink it tightly around the cable. It creates a snug, protective seal that looks professional.
Option C: Cable Repair Sleeve. You can buy braided cable sleeves designed specifically for this purpose. Slide the sleeve over the damaged section and it reinforces the entire area. This is the most long lasting DIY fix for a frayed charger cable.
Option D: Cut and Resolder. If the damage is severe, you can cut the damaged section off and reattach the connector. This requires a soldering iron and some basic soldering skills. We will cover this in more detail below.
Quick Tip: Always unplug the charger before working on it. Never attempt cable repairs while the charger is connected to power.
Fix 2: Replacing a Worn Tip Connector
The tip connector is the small plug that goes into your laptop. Tips are specific to each laptop brand and model, but replacement tips are widely available and inexpensive. You can find them online for $5 to $15.
To replace a tip, you simply unsolder the old tip from the cable and solder the new one in place. Make sure you match the polarity and the tip size exactly. Using the wrong tip can damage your laptop.
If soldering is not your thing, you can also buy replacement tips that slide over the existing connector and clamp into place. These are not as secure as a soldered connection, but they work well for light use.
Fix 3: Replacing a Blown Internal Fuse
Many laptop adapters have a small glass or ceramic fuse inside the brick. If this fuse blows, the adapter stops working even though the rest of the components are fine.
To access the fuse, you need to open the adapter housing. Most bricks are held together with screws or snap-fit clips. Carefully open the case and locate the fuse. It is usually a small cylindrical component near the input side of the circuit board.
Replace the fuse with one of the same rating. The rating is printed on the old fuse. Using the wrong fuse rating can be dangerous and may cause further damage or even a fire hazard.
After replacing the fuse, reassemble the adapter and test it with your multimeter. If it outputs the correct voltage, you have successfully brought your charger back to life.
Fix 4: Resoldering a Loose Connection
Over time, solder joints inside the adapter can crack, especially if the charger has been dropped or subjected to vibration. A cracked joint creates an intermittent connection that causes the charger to work sometimes and fail other times.
Open the adapter and inspect the solder joints on the circuit board. Look for any joints that appear cracked, dull, or disconnected. Apply fresh solder to these joints using a soldering iron. A good solder joint should be smooth and shiny.
This fix requires a basic soldering iron, some solder, and a steady hand. If you have never soldered before, practice on some scrap wire first. There are many great video tutorials online that can walk you through the basics in minutes.
When Repairing Makes Sense vs. When to Replace
Not every charger problem is worth fixing. Sometimes the cost and effort of repair outweigh the benefits. Here is a simple framework to help you decide.
When Repairing Makes Sense
- The charger is less than three years old.
- The damage is external, like a frayed cable or worn tip.
- The adapter brick is physically intact with no burn marks.
- You have the right tools and basic repair skills.
- The replacement cost is high relative to your laptop value.
- You are environmentally conscious and want to reduce e-waste.
When You Should Buy a New Charger
- The adapter brick is cracked, swollen, or shows burn damage.
- The internal wiring is damaged beyond the repairable section.
- The charger is more than five years old and has other issues.
- The repair cost approaches the price of a new charger.
- The laptop is under warranty and a replacement is free.
- The charger outputs incorrect voltage even after repair.
As a general rule, if the adapter brick itself is damaged, it is usually not safe to repair. Internal components handle high voltage, and improper repairs can create serious safety risks including electric shock or fire.
Using a Universal Charger as a Temporary Solution
If your charger is beyond repair and you need your laptop working right away, a universal charger can be a great stopgap solution. Universal chargers come with interchangeable tips that fit most laptop brands.
They typically cost between $20 and $40, which is much less than an OEM charger from the manufacturer. You simply select the correct tip for your laptop model, set the voltage, and you are good to go.
However, universal chargers are not ideal for long term use. They may not provide the exact voltage and amperage your laptop needs, which can affect battery health over time. Use a universal charger as a temporary fix while you source the proper replacement.
Always check the voltage and amperage ratings before using any charger with your laptop. Using the wrong charger can damage your battery, your motherboard, or both.
Preventing Future Charger Damage
Once you have fixed your charger, you will want to keep it working as long as possible. Prevention is always better than repair, and a few simple habits can dramatically extend the life of your laptop charger.
- Avoid bending the cable sharply. Do not wrap the cable too tightly or create sharp bends. This stresses the internal wires and leads to breaks over time.
- Do not yank the cable from the wall or laptop. Always pull from the plug, not the cable. Yanking puts stress on the connection points.
- Store the charger properly. When not in use, coil the cable loosely and store it in a cool, dry place. Avoid leaving it in hot cars or direct sunlight.
- Use a cable management clip. These small clips keep the cable organized and prevent it from being stepped on or pinched.
- Unplug during storms. Power surges during thunderstorms can fry your charger. Unplug it when a storm is approaching.
- Do not use the laptop while it is charging heavily. This generates extra heat, which degrades both the battery and the charger over time.
When to Seek Professional Help
Some repairs are simply not worth attempting on your own. If you are uncomfortable with any of the steps described above, it is perfectly fine to seek professional help. A qualified electronics repair technician can diagnose and fix complex charger issues safely.
You should definitely seek professional help if:
- The adapter brick is physically damaged or swollen.
- You smell burning or see scorch marks on the charger.
- The problem involves the laptop charging circuit rather than the charger itself.
- You do not have the tools or confidence to open and repair the adapter.
- The laptop is still under warranty and opening the charger may void it.
Many local repair shops offer charger diagnostics for a small fee. They can quickly determine whether the charger or the laptop is the problem, saving you from buying something you do not need.
Also, if your laptop is relatively new, check your warranty before paying for any repairs. Many manufacturers cover charger defects for one to two years. Contacting customer support might get you a free replacement without any effort on your part.
Frequently Asked Questions About Laptop Charger Repair
Can You Fix A Laptop Charger If the Cable Is Cut Completely?
Yes, you can fix a completely cut cable if the damage is not near the connector ends. Cut off the damaged section, strip the wires, and reconnect them. You will need a soldering iron and heat shrink tubing for a clean repair. If the cut is near the tip or the brick, replacing the entire cable or the tip may be easier and safer.
Is It Safe to Use a Repaired Laptop Charger?
A properly repaired charger is generally safe to use. Make sure all connections are secure, the insulation is intact, and the charger outputs the correct voltage. However, if the adapter brick was cracked or swollen, do not use it. Damaged bricks can overheat and pose a fire risk.
How Much Does It Cost to Fix a Laptop Charger?
Most DIY repairs cost under $10. Replacement tips run $5 to $15, fuses cost a couple of dollars, and cable repair kits are under $5. Professional repair services typically charge $20 to $50 depending on the issue. Compare this to a new OEM charger that can cost $40 to $100 or more.
Can a Broken Tip Be Fixed Without Replacing It?
A slightly bent tip can sometimes be carefully straightened, but this is a temporary fix at best. A worn tip with poor electrical contact should be replaced. Replacement tips are cheap and widely available online for most laptop models.
Why Does My Laptop Say Plugged In Not Charging Even with a Working Charger?
This message usually means the problem is not the charger but the laptop. Possible causes include a degraded battery, a faulty charging circuit on the motherboard, or a software issue. Try removing the battery and running on power only. If that does not help, the issue is likely internal to the laptop.
Can I Use Any Charger With My Laptop?
No, you should only use a charger that matches your laptop voltage and amperage requirements. The voltage must match exactly. The amperage can be equal to or higher than the original rating, but never lower. Using the wrong charger can damage your laptop or cause poor performance.
Conclusion
Can you fix a laptop charger before buying a new one? Absolutely. Most charger problems are simple, affordable, and well within the reach of a patient DIYer. Whether you need to repair a frayed cable, replace a worn tip, swap a blown fuse, or resolder a loose connection, the fixes are straightforward and satisfying.
Start by diagnosing the problem carefully. Use the visual inspection, multimeter testing, and wiggle test to pinpoint the issue. Then match your fix to the problem. Easy repairs like cable sleeves and tip replacements can be done in minutes. More involved fixes like fuse replacement and resoldering take a little more care but are still very achievable.
Know when to stop, though. If the adapter brick is damaged or the repair feels unsafe, do not push it. Buy a new charger or seek professional help. Your safety always comes first.
With the right approach, you can fix a laptop charger, keep your device running, and avoid the unnecessary expense of a replacement. Grab your tools, follow the steps in this guide, and give your charger a second life.