Can I Connect Wii To Tv With Hdmi Everything You Need
Yes, you can connect your Wii to a TV using HDMI with the right adapter. This guide walks you through every step, from choosing the best Wii to HDMI adapter to troubleshooting common issues. You will learn about different Wii models, connection methods, and pro tips for sharper screen quality. Whether you own a standard Wii, Wii Mini, or are exploring retro gaming setups, this article has you covered.
Key Takeaways
- A Wii to HDMI adapter is essential: The Nintendo Wii does not have a built-in HDMI port, so you need a special adapter to get digital output.
- All Wii models can work with HDMI: This includes the original Wii, Wii Mini, and even older revisions with composite or component cables.
- Setup is simple and fast: With the right adapter, connecting your Wii console to an HDMI-ready TV takes just a few minutes.
- Picture quality improves significantly: HDMI delivers cleaner video than traditional AV cables, making retro gaming look much better on modern displays.
- Common mistakes can cause problems: Using the wrong adapter or skipping display settings can lead to no signal or poor image quality.
- Audio works through HDMI too: You get both video and audio through a single cable, simplifying your setup.
📑 Table of Contents
- Understanding Your Wii Console and HDMI Options
- What You Need to Connect Wii to TV with HDMI
- Step-by-Step Guide to Connecting Wii to TV with HDMI
- Comparing Connection Methods: HDMI vs AV Cables
- Common Problems and How to Fix Them
- Expert Tips for Better Picture and Sound Quality
- Final Thoughts and Setup Checklist
Understanding Your Wii Console and HDMI Options
If you have been asking yourself, can I connect Wii to TV with HDMI, you are not alone. Many gamers want to use their Nintendo Wii with modern TVs that only have HDMI ports. The good news is that it is absolutely possible. You just need the right adapter and a little guidance.
The Nintendo Wii was released in 2006 and became one of the most popular gaming consoles ever made. It uses traditional AV cables by default, which include red, white, and yellow RCA connectors. These cables work fine on older TVs. But most modern flat-screen TVs do not have those old-style inputs anymore. That is where HDMI comes in.
Using an HDMI connection gives you a much cleaner signal. The video output becomes sharper and more stable. You also get audio through the same cable, which cuts down on clutter. For anyone into retro gaming, this is a game-changer. Your favorite Wii games will look and sound better than ever before.
What Kind of Wii Do You Have?
Not all Wii consoles are exactly the same. There are a few different models you might own. Each one connects to HDMI in a similar way, but there are small differences worth knowing about.
The standard Nintendo Wii is the original model. It came with composite AV cables in the box. The Wii Mini is a smaller, budget-friendly version released later. It has fewer ports but still works with HDMI adapters. The Wii U is a different console entirely. It has its own HDMI port built in, so you do not need an adapter for it. Make sure you know which model you have before buying any cables or adapters.
Why HDMI Makes a Difference
Traditional AV cables carry an analog signal. Over time, these cables can pick up interference. The result is a fuzzy or blurry picture. HDMI carries a digital signal. This means a cleaner, more reliable connection. Your screen quality improves right away.
Modern TVs are designed for HDMI. They often have better display settings when receiving a digital input. Colors look more vibrant. Text is easier to read. Motion in games feels smoother. If you have invested in a nice 1080p or 4K TV, you deserve to see your gaming console content the way it was meant to look.
What You Need to Connect Wii to TV with HDMI
Now that you understand why HDMI is better, let us talk about what you actually need. The setup is simple, but you do need the right equipment. Here is a full list of everything required for a successful connection.
The Right Adapter for Your Setup
The most important piece of equipment is a Wii to HDMI adapter. This small device plugs into the back of your Wii console where the AV cables normally go. It then outputs a clean HDMI signal. You can then plug a standard HDMI cable from the adapter into your TV.
There are many adapters on the market. Some are cheap and work well. Others are overpriced and do not deliver good results. Look for adapters that are specifically designed for the Wii. Avoid generic converters that claim to work with everything. They often produce lag or poor image quality. A quality Wii to HDMI adapter usually costs between 15 and 30 dollars. That is a small price for a big improvement.
Other Essential Items
Besides the adapter, you need a few other things. A standard HDMI cable is the most obvious one. Most people already have one lying around. If not, they are very affordable. You also need your original Wii power cable and the Wii remote with its sensor bar. The sensor bar helps the remote connect to the console during gameplay.
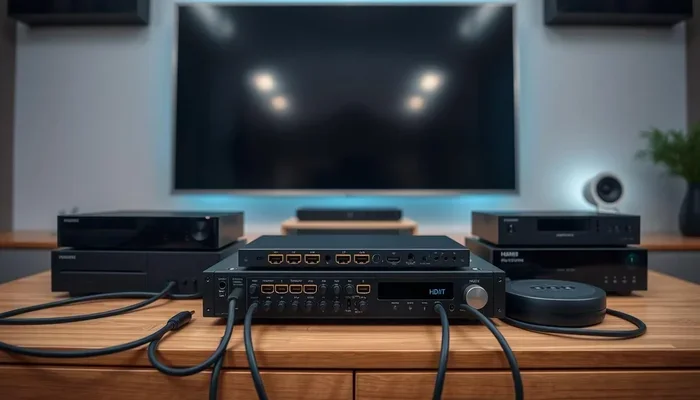
Make sure your TV has at least one free HDMI port. Most modern TVs have three or four. If all your ports are taken, consider using an HDMI switch. This small device lets you plug in multiple devices and switch between them easily.
Quick Tips
- Buy a Wii to HDMI adapter from a reputable brand to avoid signal issues.
- Keep your original AV cables. You may need them if you ever play on an older TV.
- Label your HDMI cables so you always know which one goes to the Wii.
- Have a flashlight handy. The ports on the back of the Wii can be hard to see.
Step-by-Step Guide to Connecting Wii to TV with HDMI
Setting up your Wii console with HDMI is easier than you might think. Follow these steps carefully and you will be playing in no time. No technical expertise is required.
Preparing Your Equipment
Start by gathering everything you need. You need your Wii console, the Wii to HDMI adapter, an HDMI cable, and your TV remote. Place your Wii on a flat, well-ventilated surface near your TV. Make sure the console is unplugged before you start connecting anything.
Check that your Wii remote is working. Replace the batteries if needed. You will also want your sensor bar nearby. Having everything ready before you start makes the process smooth and frustration-free.
Making the Physical Connections
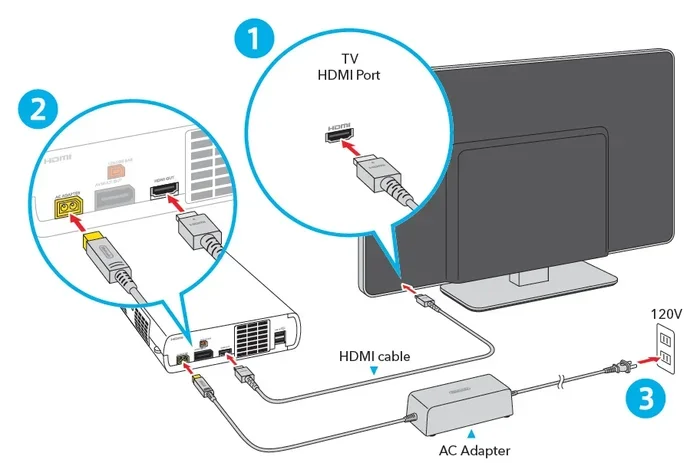
First, remove the existing AV cables from the back of your Wii. They plug into the colored ports on the rear. Gently pull them out and set them aside. Next, plug the Wii to HDMI adapter into the AV port where the yellow, red, and white cables were attached. It should fit snugly.
Now, take your HDMI cable. Plug one end into the adapter. Plug the other end into an available HDMI port on your TV. Make sure both connections are firm. Loose cables are one of the most common causes of connection problems.
Finally, plug your Wii power cable back in. Turn on your TV and switch it to the correct HDMI input. Use your TV remote to select the right port. You should see the Wii menu appear on screen.
Configuring Display Settings
Once you see the Wii menu, go to the settings. Select the “Wii” button in the bottom left corner. Choose “Settings.” Then go to “Screen” and adjust the display settings. You can change the TV resolution and screen format here.
For most modern TVs, selecting 480p or 480i works best. Choose the widescreen option if your TV is a flat screen. This will fill the screen properly and eliminate black bars on the sides. The Wii remote sensor should also be positioned correctly for optimal gameplay.
Expert Insights
According to retro gaming experts, the Wii to HDMI adapter can make a noticeable difference in image clarity. Even though the Wii’s native output is 480p, the digital HDMI signal reduces noise and ghosting that often appears with analog cables. This makes older games look surprisingly good on today’s high-resolution screens.
Comparing Connection Methods: HDMI vs AV Cables
There are two main ways to connect your Wii to a TV. You can use the original AV cables, or you can upgrade to HDMI with an adapter. Both methods work. But they are very different in quality and convenience.
| Feature | AV Cables (Composite) | HDMI with Adapter |
|---|---|---|
| Signal Type | Analog | Digital |
| Picture Quality | Standard, may have interference | Cleaner, sharper image |
| Audio | Separate red and white cables | Single cable carries audio and video |
| Cable Clutter | Three cables minimum | One HDMI cable |
| Modern TV Compatibility | Requires AV-to-HDMI converter | Direct connection to HDMI port |
| Cost | Included with console | Adapter costs 15 to 30 dollars |
| Setup Difficulty | Very easy | Slightly more steps |
HDMI Connection Benefits
The HDMI connection offers several clear advantages. First, the digital signal is much more stable. You will not see static or flickering. Second, everything runs through one cable. That means less mess behind your TV stand. Third, modern TVs recognize HDMI inputs immediately. There is no need to adjust TV settings manually.
For retro gaming enthusiasts, HDMI is the clear winner. Your classic Wii games deserve to look their best. The improved screen quality makes a real difference, especially on larger TVs. Colors pop more. Text is easier to read. And the overall experience feels much more polished.
Traditional AV Cable Setup
The original AV cables are not bad. They work perfectly fine on older CRT TVs. If you still own a tube television, these cables are all you need. They also cost nothing extra since they come with the console.
However, on modern LCD or LED TVs, AV cables can look quite poor. The image may appear blurry or have color bleeding. The separate audio cables also add clutter. If you want the best experience on a modern TV, upgrading to HDMI is the way to go.
Which Method Is Right for You?
If you have a modern TV and want the best picture, go with HDMI. If you have an older TV or want a no-cost setup, the original AV cables work fine. Many gamers keep both options available. This way, they can switch between setups depending on which TV they are using.
Common Mistakes
- Buying the wrong adapter: Make sure the adapter is specifically for the Wii. Adapters meant for other consoles will not work properly.
- Skipping display settings: Even with HDMI, you must configure the Wii screen settings for the best results.
- Using a low-quality HDMI cable: A cheap or damaged cable can cause signal drops. Invest in a good one.
- Forgetting to power off: Always connect cables while the console is off to avoid potential damage.
Common Problems and How to Fix Them
Even with the right equipment, you might run into issues. This is normal with any setup. The good news is that most problems have simple solutions. Here are the most common issues and how to fix them.
No Signal on Your Screen
If your TV shows no signal, do not panic. This is the most common problem and it is usually easy to fix. First, check that all cables are firmly plugged in. A loose connection is the number one cause. Unplug the HDMI cable from both the adapter and the TV. Plug it back in firmly.
Next, make sure your TV is on the correct input. Use your TV remote to cycle through the HDMI ports. The input number should match the port where you plugged in the cable. If you still see nothing, try a different HDMI port on your TV.
Another fix is to power cycle your equipment. Turn off the Wii and unplug it. Unplug your TV as well. Wait 30 seconds. Plug everything back in and turn it on. This resets the connection and often solves the problem instantly.
Poor Picture Quality Issues
If your picture looks blurry or has static, the issue is usually with the adapter or cable. Try a different HDMI cable first. A faulty cable can degrade the signal. If that does not help, check your Wii to HDMI adapter. Make sure it is firmly seated in the console.
You can also adjust the display settings on your Wii. Lowering the resolution sometimes improves stability. Go to Wii Settings, then Screen, and try a different resolution setting. Sometimes the TV and adapter do not agree on the default resolution. Switching it can fix the problem.
Audio Problems
If you have video but no sound, check your TV audio settings. Make sure the TV is not muted and the volume is up. Also, go into the Wii settings and verify that audio output is set to HDMI. Some adapters default to analog audio, which will not work when using HDMI.
If the problem persists, try a different HDMI port on your TV. Some ports have issues with certain inputs. Switching ports often resolves audio problems quickly and easily.
Quick Tips
- Keep spare HDMI cables on hand. They are cheap and can save you hours of troubleshooting.
- Write down which HDMI port you use for the Wii. This saves time when switching inputs.
- Update your TV firmware. Sometimes TV updates improve compatibility with older devices.
Expert Tips for Better Picture and Sound Quality
Once your Wii console is connected via HDMI, you can take extra steps to get the best possible experience. These tips come from experienced retro gamers and tech enthusiasts. They will help you squeeze every bit of quality from your setup.
Optimizing Your TV Settings
Go into your TV settings and look for game mode or PC mode. This reduces input lag and makes gameplay feel more responsive. Also, check your TV’s sharpness and contrast settings. For the Wii, a slightly lower sharpness setting can reduce visual noise. This makes the image look cleaner and more natural.
Make sure your TV is set to the correct aspect ratio. Widescreen mode works best for most Wii games. This fills the screen properly and gives you the full gaming experience. If your TV has an HDMI scaling setting, set it to “1:1” or “Native” for the most accurate image.
Getting the Most from Retro Gaming
The beauty of retro gaming is reliving classic titles. The Nintendo Wii has an incredible library of games. From Mario Kart to Zelda, these games still hold up today. Connecting via HDMI lets you experience them with modern clarity.
Consider using a USB loader to play games from an external drive. This keeps your discs safe and loads games faster. Just make sure your Wii remote and sensor bar are positioned correctly for the best motion control experience. A clean setup enhances every aspect of your gaming sessions.
Expert Insights
Retro gaming communities widely recommend using a Wii to HDMI adapter from brands like RetroTINK or Nyko. These adapters are known for reliable performance and minimal lag. Pairing a quality adapter with a good HDMI cable can make your Wii look almost as good as a native HDMI console. The difference is especially noticeable on 4K TVs with upscaling features.
The Role of Upscaling
Modern TVs have built-in upscaling. This means the TV takes the 480p signal from the Wii and stretches it to fit your screen. A good TV does this very well. A cheap TV may produce a blurry or distorted image. If you want the best results, consider the upscaling capabilities of your TV when choosing a display for your gaming console.
The video output from the Wii is fixed at 480p. No adapter can change that. But a quality HDMI adapter ensures that the signal reaching your TV is as clean as possible. This allows your TV’s upscaling to work its magic. The result is a smooth, clear picture that honors the original games.
Final Thoughts and Setup Checklist
Connecting your Wii to a TV with HDMI is one of the best upgrades you can make for retro gaming. The process is straightforward, affordable, and delivers immediate results. You do not need to be a tech expert to pull it off. With a Wii to HDMI adapter and a standard HDMI cable, your classic games will look better than ever.
Remember to check your model, gather the right equipment, follow the steps carefully, and adjust your settings. If you run into trouble, the fixes are simple and quick. The Nintendo Wii remains a beloved console. It deserves to be enjoyed on modern displays with crisp screen quality and clear audio output.
Whether you are revisiting old favorites or introducing a new generation to classic titles, the HDMI setup makes it all worthwhile. Grab your Wii remote, fire up your console, and enjoy the magic of retro gaming in stunning digital clarity.
Frequently Asked Questions
Do I need a special adapter to connect my Wii to a TV with HDMI?
Yes, the Nintendo Wii does not have an HDMI port built in. You need a Wii to HDMI adapter to convert the analog signal to a digital HDMI output. These adapters are widely available and easy to use.
Will connecting my Wii via HDMI improve picture quality?
Absolutely. HDMI delivers a digital signal that is much cleaner than the analog signal from standard AV cables. You will notice sharper images, better colors, and no static or interference on your screen quality.
Can I use a Wii Mini with an HDMI adapter?
Yes, the Wii Mini can be connected using HDMI just like the standard Wii. You will need the same type of Wii to HDMI adapter. The setup process is nearly identical across all Wii models.
Does the Wii to HDMI adapter support audio?
Yes, the HDMI cable carries both video and audio through a single connection. You do not need separate audio cables. Just make sure your TV audio settings are set to the correct HDMI input.
Can I connect a Wii U to a TV with HDMI directly?
Yes, the Wii U has a built-in HDMI port. You do not need any adapter. Simply plug an HDMI cable directly from the console to your TV. This makes the Wii U setup even simpler than the original Wii.
What resolution does the Wii output over HDMI?
The Wii outputs at a maximum of 480p, even when using an HDMI adapter. However, the digital signal still looks much better than the analog AV connection. Your TV’s upscaling features will also help display the image clearly on larger screens.
=== CONCLUSION ===
Can I connect Wii to TV with HDMI? The answer is a definitive yes. With the right Wii to HDMI adapter and a standard HDMI cable, you can enjoy your favorite Wii games on any modern TV. The setup is quick, affordable, and the improvement in picture and sound quality is immediately noticeable. Whether you are a longtime fan or just discovering the joy of the Nintendo Wii, this upgrade transforms your retro gaming experience. Follow the steps in this guide, avoid common mistakes, and you will be playing in style in no time.