How Do I Create Triangles In Photoshop Step By Step
Creating triangles in Photoshop is simple once you know the right tools and techniques. This step-by-step guide covers three easy methods: the Polygon Tool, the Pen Tool, and Custom Shapes. You will learn how to draw, edit, color, and transform triangles like a pro.
Have you ever needed to draw a triangle in Photoshop and felt stuck? You are not alone. Many designers and beginners alike look for a quick way to add triangles to their projects. The good news is that Photoshop makes it surprisingly easy once you know the right steps.
In this guide, I will walk you through how to create triangles in Photoshop using three different methods. Each method has its own strengths. Whether you want a quick equilateral triangle or a custom shape, you will find the right approach here. Let us dive in and get you drawing triangles like a pro.
Key Takeaways
- Three easy methods: You can create triangles using the Polygon Tool, Pen Tool, or Custom Shapes in Photoshop.
- The Polygon Tool is the fastest: Just set the sides to three and drag to draw a perfect triangle shape layer.
- The Pen Tool gives you full control: Use it to draw custom triangle paths with precise angles and curves.
- Custom Shapes save time: Photoshop has built-in triangle shapes you can add with one click.
- Editing is easy: You can resize, recolor, reshape, and mask your triangle vector shape anytime.
- Triangles are versatile: They are useful for graphic design, icons, patterns, and web layouts.
📑 Table of Contents
- Why Triangles Matter in Photoshop Design
- Method 1: Create a Triangle Using the Polygon Tool
- Method 2: Draw a Triangle with the Pen Tool
- Method 3: Use Photoshop Custom Shapes
- Editing and Customizing Your Triangle
- Common Mistakes to Avoid When Creating Triangles
- Expert Insights: Advanced Triangle Techniques
- Conclusion
Why Triangles Matter in Photoshop Design
Triangles are one of the most used shapes in graphic design. They appear in logos, icons, patterns, and web layouts. A well-placed triangle can add direction, balance, and visual interest to any design. Learning how to create them opens up many creative possibilities.
When you know how to draw triangles in Photoshop, you gain more control over your compositions. You can use triangles as design elements, background shapes, or even as masks for interesting effects. The key is understanding the tools available to you.
The Role of Triangles in Visual Design
Triangles carry strong visual weight. They point in a direction, which guides the viewer’s eye. In web design, triangles often serve as arrows or dividers. In logo design, they can represent stability, movement, or harmony. No matter the use, a clean vector triangle always looks sharp.
Photoshop handles triangle shapes as vector layers. This means you can scale them up or down without losing quality. You can also change colors, add strokes, and apply effects. The flexibility of a triangle shape layer makes it a valuable asset in any project.
Method 1: Create a Triangle Using the Polygon Tool
The Polygon Tool is the fastest way to make a triangle in Photoshop. It is built into the Shapes group and works with just a few clicks. This method is perfect when you need a clean, precise triangle every time.
Step-by-Step Polygon Tool Tutorial
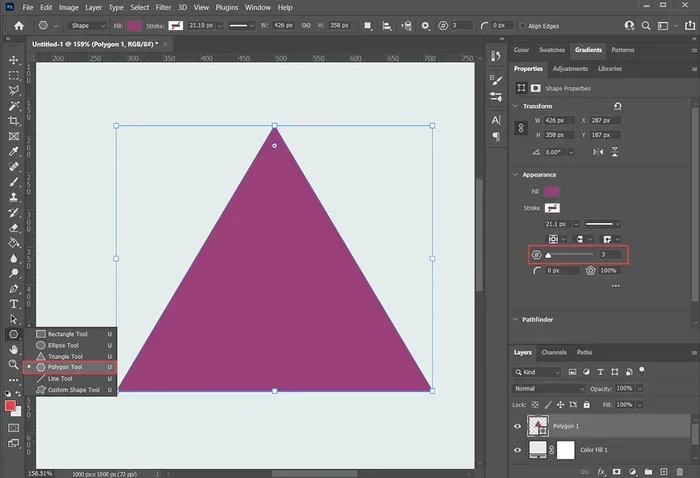
Follow these simple steps to create your first triangle using the Polygon Tool:
- Open Photoshop and create a new document or open an existing project.
- Select the Rectangle Tool from the toolbar on the left side.
- Right-click on the Rectangle Tool icon to reveal the hidden shape tools.
- Choose the Polygon Tool from the menu that appears.
- In the top options bar, set the number of sides to 3.
- Click and drag on your canvas to draw the triangle.
- Hold the Shift key while dragging to create a perfectly symmetrical equilateral triangle.
That is it! You now have a vector triangle on its own shape layer. You can change its fill color, add a stroke, or resize it freely. The Polygon Tool gives you a clean starting point every time.
Adjusting Polygon Tool Settings
Before you draw, take a moment to check the top options bar. There are a few settings that can improve your workflow:
- Sides: Always set this to 3 for a triangle.
- Shape Layers: Make sure this option is selected for a non-destructive shape layer.
- Fill and Stroke: Choose your preferred fill color and stroke style here.
- Alignment: Use the alignment options to center your triangle on the canvas.
These small adjustments make a big difference. They help you create triangles that are perfectly sized and positioned from the start.
Method 2: Draw a Triangle with the Pen Tool
The Pen Tool offers the most control when creating triangles in Photoshop. While it takes a bit more practice, it lets you draw any type of triangle with exact precision. Use this method when the Polygon Tool does not give you the shape you need.
Pencil vs Pen Tool for Triangle Paths
Some beginners wonder whether to use the Pencil Tool or the Pen Tool. The Pencil Tool creates pixel-based drawings, which can look jagged when resized. The Pen Tool creates smooth vector paths that scale perfectly. Always choose the Pen Tool for clean, professional triangle shapes.
Here is how to draw a triangle path using the Pen Tool:
- Select the Pen Tool from the toolbar (shortcut: P).
- In the top options bar, make sure Path is selected (not Shape or Pixels).
- Click once on the canvas to place the first point.
- Click again to place the second point.
- Click a third time to place the final point.
- Click back on the first point to close the path and complete your triangle.
Now you have a closed triangle path. To turn it into a shape, go to the Layers panel and click the Fill Path button at the bottom. You can also right-click the path and choose “Fill Path.”
Creating a Right Triangle with the Pen Tool
A right triangle has one 90-degree angle. The Pen Tool makes it easy to draw one. Start by clicking to place your first point. Then, click directly to the right for the second point. Finally, click directly below the first point for the third. Close the path by clicking back on the first point.
This creates a perfect right triangle every time. You can then fill it with any color or gradient you like. Right triangles are especially useful in web design and UI mockups.
Method 3: Use Photoshop Custom Shapes
If you want the quickest method of all, Custom Shapes are your best friend. Photoshop comes with a library of pre-made shapes, including triangles. You can add them with a single click and customize them however you want.
Accessing the Custom Shapes Panel
Here is how to find and use the triangle custom shape in Photoshop:
- Select the Rectangle Tool from the toolbar.
- Right-click and choose the Custom Shape Tool.
- In the top options bar, click the Shape dropdown arrow.
- Click the gear icon to load more shapes if needed.
- Select All from the list to load the full shape library.
- Scroll through the shapes and find a triangle you like.
- Click on the canvas to place your triangle shape layer.
Photoshop includes several triangle variations. You will find right triangles, equilateral triangles, and even decorative triangle designs. The Custom Shape Tool is a great time-saver when you need a triangle shape fast.
Creating Your Own Custom Triangle Shape
You can also save your own triangle as a custom shape. Once you create a triangle using the Polygon Tool or Pen Tool, follow these steps:
- Select the triangle layer in the Layers panel.
- Go to the Edit menu and choose “Define Custom Shape.”
- Give your shape a name and click OK.
- Your custom triangle will now appear in the Custom Shapes panel.
This is a great way to build your personal shape library. You can reuse your custom triangle in any future project without having to draw it again.
Editing and Customizing Your Triangle
Once your triangle is on the canvas, the real fun begins. Photoshop gives you many options to edit and customize your shape. You can change colors, add borders, apply effects, and much more.
Changing Triangle Colors and Fills
To change the fill color of your triangle, look at the Layers panel. You will see a color swatch next to your shape layer thumbnail. Click it to open the Color Picker and choose a new fill color. You can also use the Shape Fill option in the top options bar.
For gradient fills, click the gradient swatch instead. Photoshop offers many preset gradients, or you can create your own. A gradient fill can add depth and dimension to a simple triangle shape.
Adding a Stroke to Your Triangle
Adding a stroke (outline) to your triangle makes it stand out. Here is how:
- Select your triangle shape layer.
- Click the Stroke option in the top options bar.
- Choose a color, size, and position for your stroke.
- Pick a stroke type: solid, dashed, or dotted.
A thick stroke can turn a simple triangle into a bold graphic element. A thin stroke gives it a clean, minimal look. Experiment with different stroke settings to find what works best for your design.
Transforming and Resizing Triangles
Need to resize or rotate your triangle? Photoshop makes it easy:
- Select the triangle shape layer.
- Go to Edit > Free Transform (or press Ctrl+T / Cmd+T).
- Drag the corner handles to resize.
- Move your cursor outside the bounding box to rotate.
- Press Enter to apply the transformation.
You can also use the Transform Path options for more precise adjustments. Hold Shift while resizing to maintain the aspect ratio. Hold Alt (Option on Mac) to resize from the center.
Using Triangles as Masks
Triangles make excellent masks in Photoshop. You can use a triangle shape to reveal only part of an image. This technique is popular in web design and photo editing. Here is how:
- Place your image on a layer above the triangle shape.
- Right-click the image layer and choose “Create Clipping Mask.”
- The image will now appear only within the triangle shape.
This is a powerful way to add visual interest to your designs. You can use any triangle shape as a mask, whether it is a vector triangle or a custom-drawn one.
Common Mistakes to Avoid When Creating Triangles
Even simple tasks in Photoshop can lead to common mistakes. Here are a few to watch out for when creating triangles:
- Forgetting to set the Polygon sides to 3: This is the most common mistake. If you forget, you will get a different shape entirely.
- Using the Pencil Tool instead of the Pen Tool: The Pencil Tool creates pixel-based shapes that do not scale well.
- Not using Shape Layers: Always work with shape layers so you can edit your triangle later without losing quality.
- Ignoring alignment tools: Misaligned triangles can throw off your entire composition. Use Photoshop’s alignment features.
- Rasterizing too early: Keep your triangle as a vector shape for as long as possible. Rasterizing limits your editing options.
Avoiding these mistakes will save you time and frustration. It will also help you produce cleaner, more professional results.
Quick Tips for Perfect Triangles
Here are some quick tips that will improve your triangle workflow:
- Use the Shift key to constrain proportions when drawing.
- Use the Alt key (Option on Mac) to draw from the center outward.
- Enable Smart Guides (View > Show > Smart Guides) for alignment help.
- Use the Properties panel for precise size and position values.
- Save your favorite triangle settings as presets for future use.
These small habits add up over time. They will make your triangle creation process faster and more accurate.
Expert Insights: Advanced Triangle Techniques
Once you are comfortable with the basics, you can explore more advanced techniques. These methods will take your triangle designs to the next level.
Creating Triangle Patterns in Photoshop
Triangles repeat beautifully to create patterns. You can use your triangle shape to build seamless patterns for backgrounds and textures. Define a pattern by arranging triangles, then go to Edit > Define Pattern. Apply it to any layer using the Layer Styles panel.
Combining Triangles for Complex Shapes
You can combine multiple triangle shapes to create more complex designs. Use the Shape Builder or the Path Operations in the top options bar to merge, subtract, or intersect triangle paths. This opens up endless design possibilities.
For example, overlapping two triangles and using the “Subtract Front Shape” option creates a star-like effect. Experiment with different combinations to discover unique shapes for your projects.
Adding Triangle Effects with Layer Styles
Layer Styles can transform a basic triangle into something stunning. Try adding a drop shadow, inner glow, or bevel and emboss to your triangle shape layer. These effects add depth and make your design pop.
You can also apply a color overlay or a gradient overlay for a more polished look. The best part is that all these effects are non-destructive. You can adjust or remove them at any time.
Conclusion
Creating triangles in Photoshop is easier than you might think. You now know three reliable methods: the Polygon Tool, the Pen Tool, and Custom Shapes. Each method has its place, and you can choose the one that fits your needs best.
Remember to work with shape layers for maximum flexibility. Use the editing tools to customize colors, strokes, and transformations. Avoid common mistakes, and do not be afraid to experiment with advanced techniques.
Whether you are designing a logo, building a web layout, or creating a graphic element, triangles are a powerful tool in your Photoshop toolkit. Now that you know how to create them, you can add this essential shape to your design workflow with confidence.
Frequently Asked Questions
What is the easiest way to create a triangle in Photoshop?
The easiest way is to use the Polygon Tool. Simply set the number of sides to 3, click and drag on your canvas, and you have a perfect triangle shape layer in seconds. This method works great for beginners and pros alike.
Can I create a triangle without using the Pen Tool?
Yes, absolutely. You can use the Polygon Tool for a quick equilateral triangle or the Custom Shape Tool for a pre-made triangle. Both methods are faster and simpler than using the Pen Tool for basic triangles.
How do I make a right triangle in Photoshop?
Use the Pen Tool to click three points: one corner, one point directly to the right, and one point directly below the first. Close the path by clicking back on the first point. Fill the path with your desired color to complete the right triangle.
Can I resize a triangle without losing quality?
Yes, as long as you keep it as a vector shape layer. Photoshop shape layers use paths, not pixels, so you can scale your triangle up or down infinitely without any loss in quality or sharpness.
How do I change the color of a triangle after I draw it?
Select the triangle shape layer in the Layers panel. Then click the fill color swatch in the top options bar or the Layers panel. Choose a new color from the Color Picker, and your triangle will update instantly.
Can I save my triangle as a reusable custom shape?
Yes, you can. Draw your triangle, then go to Edit > Define Custom Shape. Give it a name, and it will be saved in your Custom Shapes panel for use in any future Photoshop project.