Can You Plug Xlr Into Computer Here Is What You Need To Know
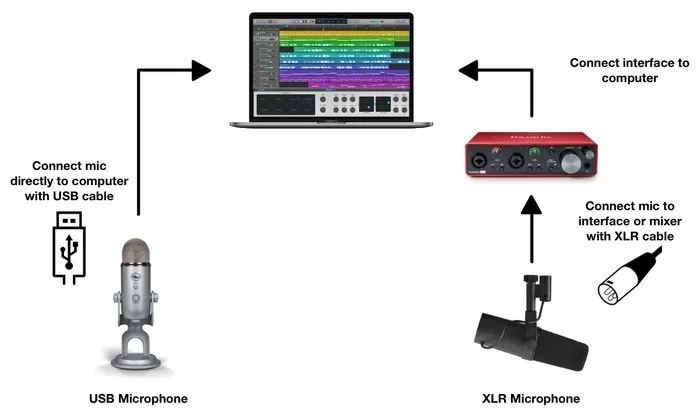
Yes, you can plug XLR into a computer — but not directly. You need an audio interface, a USB XLR adapter, or a specialized sound card to make the connection work. In this guide, we break down every method so you can connect your XLR microphone or gear to your computer with confidence and get studio-quality audio.
Key Takeaways
- XLR cables cannot plug directly into a computer: Computers lack XLR inputs, so you always need an intermediary device like an audio interface or USB adapter.
- Audio interfaces offer the best sound quality: A dedicated audio interface converts your balanced XLR signal to digital with minimal noise and latency.
- USB XLR adapters are budget-friendly: These compact gadgets are great for beginners who need a quick and affordable XLR-to-USB solution.
- Phantom power matters: Many XLR microphones need 48V phantom power, so check whether your interface or adapter supports it before buying.
- Common mistakes waste time and gear: Plugging XLR straight into a 3.5mm jack or forgetting gain staging are errors that hurt your audio quality.
- Proper setup unlocks studio-quality recording: With the right connection method and software, your computer can rival a home studio for podcasts, music, and streaming.
📑 Table of Contents
- Can You Plug XLR Into Computer? Here Is What You Need To Know
- What Is an XLR Connector and Why Does It Matter?
- Can You Plug XLR Directly Into a Computer?
- How to Connect XLR to a Computer: Step-by-Step Methods
- Audio Interfaces: Your Best Bet for XLR-to-Computer Connection
- Common Mistakes When Connecting XLR to Computers
- Expert Tips for Getting the Best Audio Quality
- Conclusion
Can You Plug XLR Into Computer? Here Is What You Need To Know
If you have ever held an XLR cable and stared at your laptop wondering whether it would fit, you are not alone. This is one of the most common questions among podcasters, musicians, streamers, and anyone who cares about audio quality. The short answer is: yes, you can get an XLR signal into your computer — but you cannot just plug it in straight. You need the right hardware to bridge the gap between an analog audio signal and a digital one your machine can understand.
This guide covers everything you need to know. We will explain what an XLR connector is, why computers do not have XLR ports, and walk you through every method to connect XLR gear to your PC. By the end, you will know exactly which path to take for your setup.
What Is an XLR Connector and Why Does It Matter?
Before we talk about plugging XLR into a computer, let us cover the basics. An XLR connector is a type of audio connector with three pins (the standard is a 3-pin XLR). You see them on professional microphones, mixing consoles, speakers, and stage equipment. They carry what is called a balanced audio signal, which means the cable is designed to reject interference over long distances.
Here is why this matters for your computer:
- Balanced signals cancel noise. Unlike unbalanced cables (like TRS or instrument cables), XLR keeps the audio clean even when runs are 50 feet or longer.
- They lock in place. The circular connector with a twist-lock mechanism keeps cables from falling out during live performances or studio sessions.
- They handle professional audio levels. XLR carries line-level and mic-level signals that consumer ports on a sound card simply are not built to receive.
So an XLR cable is built for professional audio recording and live sound. Your computer, on the other hand, is built for consumer-level connections. That gap is the entire reason you need intermediary gear.
Why Computers Do Not Have XLR Ports
Most computers only have a few audio jacks: a headphone output, a microphone input (usually 3.5mm), and sometimes a line-in port. These ports are designed for everyday use — headphones, built-in laptop mics, and basic audio playback. They cannot process a balanced XLR signal.
Your computer sound card is not built to handle the voltage, impedance, or signal type that an XLR cable carries. Trying to force the connection without the right adapter will not work and could potentially damage your equipment. That is why an audio interface or a USB adapter becomes essential.
Can You Plug XLR Directly Into a Computer?
The honest answer is no. You cannot take an XLR cable and plug it straight into any port on a standard desktop or laptop computer. There is no XLR input on consumer-grade machines. The XLR connector shape does not match any standard computer port, and even if it did, the internal electronics would not know what to do with the signal.
But here is the good news. There are several easy and effective ways to get that XLR audio into your machine. Let us walk through each one.
Common Methods to Connect XLR to a Computer
There are three main paths you can take:
- Use an audio interface. This is the most popular and highest-quality option. You plug the XLR cable into the interface, then connect the interface to your computer via USB or Thunderbolt.
- Use a USB XLR adapter. These are compact, all-in-one devices that combine an XLR input and a USB output in one small unit. Great for beginners.
- Use a dedicated XLR sound card. Some specialized sound cards include XLR inputs alongside standard jacks. These are less common but useful in certain studio setups.
Each method has its pros and cons. Here is a quick comparison:
| Feature | Audio Interface | USB XLR Adapter | XLR Sound Card |
|---|---|---|---|
| Audio Quality | Excellent | Good | Very Good |
| Price Range | $50–$300+ | $15–$50 | $80–$200 |
| Phantom Power | Yes (most models) | Some models | Often yes |
| Portability | Moderate | Very High | Low |
| Best For | Studio recording, music | Beginners, streaming | Multi-input setups |
How to Connect XLR to a Computer: Step-by-Step Methods
Method 1: Using an Audio Interface
An audio interface is the gold standard for connecting XLR gear to a computer. It acts as an external sound card that converts your analog XLR signal into a digital one your PC can process. Almost every content creator and musician uses one.
Here is how to set it up:
- Choose an interface with at least one XLR input. Popular budget options include the Focusrite Scarlett Solo and the PreSonus AudioBox USB 96.
- Connect your XLR cable from your microphone (or other gear) into the input on the interface.
- Plug the interface into your computer using the included USB cable.
- Install the driver software (most interfaces are class-compliant, but check the manufacturer website).
- Open your recording software (like Audacity, GarageBand, or OBS) and select the interface as your input device.
- Adjust the gain knob on the interface until your audio levels look healthy — aim for peaks around -12dB to -6dB.
Quick Tip: If your XLR microphone requires phantom power (also called 48V), make sure your interface has a phantom power button. Most budget interfaces include this feature, and it is essential for condenser microphones.
Method 2: Using a USB XLR Adapter
A USB XLR adapter is a smaller, more affordable alternative to a full audio interface. These devices typically have one XLR input, a gain control, and a USB plug that goes directly into your computer.
Setup is even simpler:
- Plug the USB end into your computer.
- Connect your XLR microphone to the adapter.
- Install any required drivers.
- Select the adapter as your audio input in your software.
Quick Tip: USB XLR adapters are perfect for single-microphone setups like solo podcasting or streaming. If you need multiple inputs, step up to an audio interface.
Method 3: Using an XLR-Compatible Sound Card
Some external sound cards are designed specifically for studio recording and include XLR inputs alongside standard 1/4-inch and 3.5mm jacks. These are ideal if you already have a collection of audio gear and want one hub for everything.
These tend to cost more than basic interfaces but offer extra I/O options. If you are running a home studio with multiple microphones and instruments, this could be your best bet.
Audio Interfaces: Your Best Bet for XLR-to-Computer Connection
We keep coming back to audio interfaces because they genuinely are the best option for most people. Here is why they outperform other methods for getting XLR audio into your computer.
Why Audio Interfaces Deliver Better Sound
The preamps inside a quality audio interface are designed to amplify microphone signals cleanly. They produce less noise and handle audio levels more precisely than the circuitry inside a USB adapter or your laptop’s built-in sound card. The result is a cleaner, more professional digital audio signal.
Additionally, audio interfaces typically offer:
- Higher sample rates. Many support 96kHz or even 192kHz recording, which captures more detail than standard 44.1kHz.
- Better converters. The analog-to-digital and digital-to-analog converters inside a good interface are superior to those in budget adapters.
- Low latency. Proper drivers (ASIO on Windows, Core Audio on Mac) keep delay to a minimum, which is critical for real-time monitoring.
- Multiple inputs. You can record several sources at once — a vocal on one channel, a guitar on another, for example.
Popular Audio Interfaces for XLR Input
Here are a few well-regarded options across different price points:
- Focusrite Scarlett Solo — One XLR input, great for solo creators. Excellent preamps for the price.
- Focusrite Scarlett 2i2 — Two XLR inputs, perfect for duets, interviews, or multi-track recording.
- PreSonus AudioBox USB 96 — Two XLR inputs with solid software bundle included.
- Universal Audio Volt 2 — Vintage-style preamps that add warmth to your audio signal.
- MOTU M2 — Exceptional converters and metering for discerning audiophiles.
Quick Tip: Always check whether your chosen interface provides phantom power if you plan to use a condenser microphone. Most do, but some budget models do not. A dynamic microphone does not need phantom power, so this matters less for that type of mic.
Common Mistakes When Connecting XLR to Computers
Even experienced users make avoidable errors when setting up XLR connections. Here are the pitfalls to watch out for:
Plugging XLR Straight into a 3.5mm Jack
Some people try to jam an XLR plug into a 3.5mm microphone or headphone port on their computer. This will not work. The pin configurations are completely different, and forcing the connection can damage both the cable and the port. Always use the proper adapter or interface.
Ignoring Gain Staging
Gain staging means setting the correct audio levels at every stage of your signal chain. If you set the gain too high on your interface, you get clipping and distortion. Too low, and your recording is buried in noise. Always monitor your levels while speaking into the mic and adjust until the peaks hit the sweet spot.
Forgetting to Select the Right Input Device
One of the most frequent mistakes is plugging in an audio interface but leaving the computer’s default input set to the built-in microphone. In your operating system settings and recording software, make sure you have selected the interface or adapter as your input. Otherwise, your XLR microphone will not be heard at all.
Using a Damaged or Cheap XLR Cable
Not all XLR cables are created equal. A worn-out cable can introduce crackling, intermittent dropouts, or buzzing. Invest in a decent cable from a reputable brand. Your audio is only as strong as your weakest link.
Neglecting Driver Installation
On Windows especially, you may need to install specific drivers for your audio interface to function correctly. Check the manufacturer website before assuming plug-and-play will work. Mac users are usually fine with class-compliant devices, but it never hurts to check for updates.
Not Checking for Phantom Power Compatibility
If you own a condenser microphone that requires phantom power and your interface does not provide it, your mic will not work. Always verify compatibility before making a purchase. Some adapters do include 48V phantom power, but always double-check the specs.
Expert Tips for Getting the Best Audio Quality
Once you have your XLR gear connected to your computer, you want the best possible audio recording quality. Here is advice from experienced producers and engineers:
1. Position Your Microphone Correctly
Keep the mic about 6 to 8 inches from your mouth. Use a pop filter to reduce plosive sounds (hard P and B sounds). Angle the mic slightly off-axis to minimize sibilance.
2. Record in a Quiet Room
Even the best audio interface cannot fix a noisy environment. Turn off fans, close windows, and soft furnishings help absorb reflections. A closet full of clothes is a surprisingly effective emergency vocal booth.
3. Use the Right Software
Your choice of recording or streaming software matters. Popular options include:
- Audacity — Free, open-source, great for recording and basic editing.
- OBS Studio — Free, ideal for streaming and screen recording with audio.
- Adobe Audition — Professional-grade editing with powerful noise reduction.
- Logic Pro (Mac) — Full-featured DAW for music production.
- Reaper — Affordable and highly customizable for any audio project.
3. Monitor While You Record
Always use headphones to monitor your audio in real time. Closed-back headphones are best because they prevent sound from leaking into the microphone. This helps you catch issues like clipping, buzzing, or background noise before your recording is ruined.
4. Keep Your Drivers Updated
Audio interface manufacturers regularly release driver updates that improve performance and fix bugs. Check for updates every few months. Updated drivers mean lower latency and fewer audio glitches.
5. Use a Shock Mount and Pop Filter
A shock mount absorbs vibrations from your desk or floor, preventing them from reaching your microphone input. A pop filter tames harsh consonants. Together, they make a noticeable difference in your final audio. These are inexpensive additions that pay off immediately.
6. Set Your Buffer Size Wisely
In your recording software, you can adjust the audio buffer size. A lower buffer (like 64 or 128 samples) gives you less latency but demands more from your computer. A higher buffer (256 or 512) is more stable but adds delay. Find the balance that works for your system. During recording, aim for the lowest buffer you can use without audio dropouts.
Conclusion
So, can you plug XLR into a computer? Yes — with the right gear. You cannot connect an XLR cable directly, but an audio interface, a USB XLR adapter, or a compatible sound card bridges the gap perfectly. Each option serves a different need, from beginner podcasting to professional studio recording.
The key is to match your connection method to your goals. If you want the best audio quality for music, podcasts, or streaming, invest in a solid audio interface with phantom power and clean preamps. If you are just getting started, a USB XLR adapter gets you recording quickly without breaking the bank.
Avoid the common mistakes we covered, follow the expert tips, and you will be producing clean, professional-grade audio in no time. Your computer is more than capable of handling serious audio work — you just need to give it the right connection. Now go set up your XLR gear and start creating.
Frequently Asked Questions
Can I plug an XLR mic straight into my laptop?
No, laptops do not have XLR input ports. You need an audio interface, USB XLR adapter, or XLR-compatible sound card to connect an XLR microphone to your laptop.
Do I need phantom power to use an XLR microphone with my computer?
It depends on your microphone type. Dynamic microphones do not need phantom power, but most condenser microphones require 48V phantom power. Check your mic’s specifications and make sure your audio interface or adapter provides it.
What is the cheapest way to connect XLR to a computer?
A USB XLR adapter is the most affordable option, typically ranging from $15 to $50. It plugs directly into your computer and provides an XLR input with basic gain control. It is ideal for beginners and single-microphone setups.
Can I use an XLR cable for video calls on my computer?
Yes, if you connect your XLR microphone through an audio interface or USB XLR adapter, your computer will recognize it as an audio input device. You can then select it in Zoom, Teams, or any other video call platform for much better audio than a built-in mic.
Is an audio interface better than a USB XLR adapter for recording music?
Yes, an audio interface generally delivers superior sound quality, lower latency, better preamps, and more inputs. If you are serious about music production or professional audio recording, an audio interface is the recommended choice over a basic USB adapter.
Will my computer recognize an XLR device without drivers?
Many modern audio interfaces and USB XLR adapters are class-compliant, meaning they work without installing drivers on both Windows and Mac. However, some Windows users may need to download drivers from the manufacturer’s website for the best performance and lowest latency.