Can I Put My Projector On A Table And Get Great Results
Yes, you can absolutely put your projector on a table and get excellent picture quality. Many homeowners and movie lovers prefer a projector table setup because it is simple, affordable, and easy to adjust. Whether you are setting up a home theater or a backyard movie night, a table-mounted projector can deliver stunning visuals. The key is getting the right projector placement distance, angle, and surface to avoid blurry or distorted images. This guide covers everything you need to know to make your table projector setup work perfectly.
So, you just bought a projector, and now you are wondering, can I put my projector on a table? The short answer is yes. The longer answer is that it depends on a few important factors. A projector table setup can work beautifully if you get the placement, distance, and angle right.
Many people assume that projectors only work when mounted on the ceiling. That is simply not true. A table-mounted projector can deliver a fantastic viewing experience. Whether you are building a home theater, setting up a gaming station, or hosting a backyard movie night, placing your projector on a table is a practical and effective choice.
In this guide, we will walk you through everything you need to know. We will cover projector placement tips, the best surfaces to use, common mistakes to avoid, and how to compare table placement with ceiling mounting. By the end, you will feel confident about your projector on a table setup.
Key Takeaways
- Table placement is a viable option: A projector on a table works great if you follow the right setup guidelines.
- Distance and angle matter: Getting the right throw distance and keystone correction ensures a sharp, clear image.
- Ventilation is critical: Projectors can overheat on enclosed tables, so airflow must be a priority.
- Table stability affects image quality: A wobbly table causes image shake and misalignment.
- Ceiling mount vs. table: Both options have pros and cons depending on your room and budget.
- Short throw projectors are ideal for tables: They work well in smaller rooms with limited distance.
- Cable management keeps setups clean: Proper planning prevents tripping hazards and clutter.
📑 Table of Contents
- Why You Might Want to Place Your Projector on a Table
- How to Set Up Your Projector on a Table for the Best Picture
- The Best Tables and Surfaces for Projector Placement
- Common Problems When You Put a Projector on a Table
- Projector on a Table vs. Ceiling Mount
- Quick Tips and Expert Advice for Table Projector Setup
- Key Takeaways
Why You Might Want to Place Your Projector on a Table
There are many reasons why people choose a projector table setup over other options. Let us look at the biggest ones.
It Is Simple and Affordable
Ceiling mounting requires brackets, drilling, and sometimes professional help. A table setup needs zero installation. You simply set the projector down and point it at the screen. This makes it perfect for renters or anyone who wants a quick setup without any hassle.
It Is Easy to Adjust
When your projector sits on a table, you can move it around easily. Need to change the throw distance? Just slide it closer or farther from the screen. Want to adjust the height? Place it on a taller or shorter surface. This flexibility is a huge advantage.
It Works Great for Temporary Setups
Outdoor movie nights, presentations, and game nights often need a projector that can be set up and taken down quickly. A portable projector table setup is perfect for these situations. You do not need to worry about ceiling height or wall mounting.
It Saves You Money
Ceiling mount kits, cables, and professional installation can add up. A simple table or shelf costs much less. A projector table stand or even a basic bookshelf can do the job without breaking the bank.
How to Set Up Your Projector on a Table for the Best Picture
Setting up a projector on a table is not just about putting it down and turning it on. There is a science to getting the best image quality. Let us break it down step by step.
Step One: Find the Right Throw Distance
Throw distance is the space between your projector and the screen. Every projector has a specific throw ratio that tells you how far it needs to be from the screen to produce a clear image. Too close, and the picture will be small and blurry. Too far, and it will be dim and stretched out.
To find the right distance, check your projector’s manual or use an online projector distance calculator. Most manufacturers list the ideal throw distance for different screen sizes. For example, a 100-inch screen might require the projector to be placed 8 to 12 feet away from the wall.
Here are some quick tips for getting the throw distance right:
- Measure the distance from the table to the screen before you set up.
- Use a laser measuring tape for accuracy.
- Test the image before locking in the final position.
- Consider a short throw projector if your room is small.
Step Two: Level the Projector Properly
A level projector produces a square, undistorted image. If the projector is tilted too much, the picture will look like a trapezoid. Most projectors come with keystone correction, which digitally adjusts the image shape. However, it is always better to get the physical angle right first.
Use a small bubble level or your phone’s level app to check that the projector is sitting flat. If the table is uneven, try placing the projector on a thin piece of cardboard or a small shim to level it out.
Step Three: Adjust the Keystone and Focus
Even with the best physical setup, you might still need to use keystone correction. This feature adjusts the image to make it rectangular again. Most modern projectors offer both vertical and horizontal keystone adjustment.
After adjusting the keystone, use the manual focus ring or the remote to sharpen the image. A slightly out-of-focus projector can ruin the entire viewing experience. Take your time with this step.
Step Four: Manage Your Cables
Cable management is often overlooked but incredibly important. Loose cables on the table can trip people or get pulled off the projector. Use cable ties, cable clips, or a cable cover to keep everything neat and safe.
For a cleaner look, consider using HDMI cables that match your table color or running cables through a small hole in the table surface. This keeps the setup looking professional and organized.
The Best Tables and Surfaces for Projector Placement
Not every table works well for a projector table setup. The surface needs to be stable, the right height, and large enough to support the projector safely.
What Makes a Good Projector Table?
Here are the features to look for in a table for your projector:
- Stability: The table should not wobble or shake. Even small vibrations can cause the image to blur or shake during movie scenes.
- Height: The projector should be at or slightly below eye level when people are seated. This prevents viewers from blocking the light beam.
- Size: The table should be large enough to hold the projector and any accessories like speakers or streaming devices.
- Material: A solid wood or sturdy plastic table works best. Avoid flimsy folding tables that can bend under the weight.
- Ventilation space: The table should allow air to flow around the projector. Avoid enclosed cabinets that trap heat.
Popular Table Options for Projector Setup
Here are some common options people use for a table projector setup:
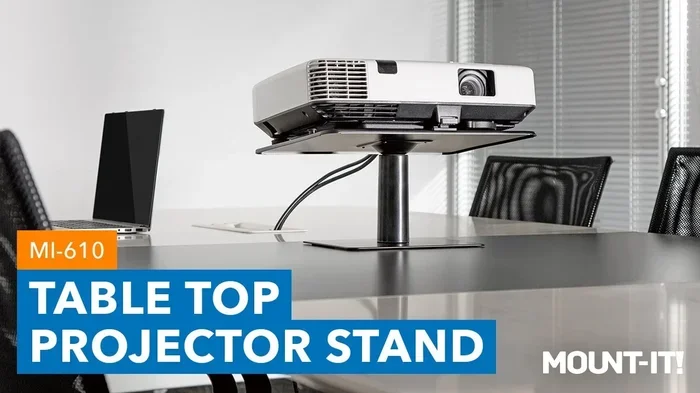
- Projector table stands: These are purpose-built stands designed specifically for projectors. They often include shelves for cables and accessories.
- TV stands and media consoles: Many media consoles are tall enough and sturdy enough to hold a projector securely.
- Bookshelves: A sturdy bookshelf can work well, especially if you place the projector on a lower shelf.
- Outdoor tables: For backyard movie nights, a sturdy folding table works fine as long as it is on flat ground.
- DIY projector carts: Some people build custom carts with wheels so they can move the projector easily from room to room.
Common Problems When You Put a Projector on a Table
A table projector setup is not without its challenges. Understanding these problems ahead of time helps you avoid frustration.
Overheating
Projectors generate a lot of heat. If you place yours inside an enclosed cabinet or on a surface that blocks the vents, it can overheat. Over time, this reduces the projector’s lifespan and can even cause permanent damage.
To prevent overheating, make sure the projector has at least 4 to 6 inches of free space on all sides. Do not place it directly against a wall or inside a closed shelf. If your room gets warm, consider using a small fan to improve airflow around the device.
Image Distortion from the Wrong Angle
When a projector sits on a table, it is usually pointed upward toward the screen. This can cause the image to appear taller at the top and shorter at the bottom, a problem known as keystoning. While keystone correction can fix this digitally, it slightly reduces image quality.
The best approach is to position the projector as level as possible with the screen. Some projectors come with adjustable feet or feet that you can reposition to tilt the device slightly.
Shadow Interference
If people walk between the projector and the screen, their shadows appear on the image. This is a common issue with table-mounted projector setups because the projector sits at a lower height than ceiling mounts.
To minimize shadow interference, position the projector behind the seating area if possible. Use a longer throw distance so the projector is farther from the screen and less likely to be in someone’s path.
Vibration and Image Shake
A table that vibrates from people walking nearby, loud music, or even a washing machine in an adjacent room can cause the image to shake. This is especially noticeable during fast-moving scenes in movies or video games.
To reduce vibration, place the projector on a heavy, solid surface. Avoid lightweight tables that can bounce easily. If vibration is a persistent problem, consider adding rubber pads or a vibration-dampening mat under the projector.
Projector on a Table vs. Ceiling Mount
So, how does a table projector setup compare to a ceiling mount? Both options have their strengths and weaknesses. Let us look at a quick comparison.
| Feature | Table Setup | Ceiling Mount |
|---|---|---|
| Ease of Installation | Very easy, no tools needed | Requires drilling and mounting hardware |
| Cost | Low, uses existing furniture | Moderate, requires mount and cables |
| Portability | Very portable, easy to move | Fixed in one location |
| Image Quality | Good, but can have keystone issues | Excellent, perfectly aligned image |
| Ventilation | Usually good with open tables | Can be restricted depending on mount |
| Best For | Renters, temporary setups, small rooms | Permanent home theaters, large rooms |
Neither option is better overall. It depends on your situation. If you rent your home or want a setup you can change quickly, a projector on a table is the way to go. If you have a dedicated home theater and want the best possible image quality every time, a ceiling mount is the superior choice.
Quick Tips and Expert Advice for Table Projector Setup
Here are some proven tips that will help you get the most out of your table projector setup:
- Test your setup before the big event. Do a trial run before your movie night or presentation. Adjust the distance, focus, and keystone until the picture looks perfect.
- Keep the projector away from direct light. Ambient light can wash out the image. If possible, set up the projector away from windows or bright lamps.
- Use a projector screen, not a white wall. A proper screen improves color accuracy and brightness significantly compared to a plain wall.
- Clean the projector lens regularly. Dust and fingerprints on the lens can make the image look blurry or hazy.
- Turn off the projector properly. Always use the power button and let the fan cool it down before moving it. This prevents internal damage from heat shock.
- Consider a short throw projector. These projectors work well in small rooms where the table cannot be placed far from the screen.
- Use a surge protector. Projectors are sensitive to power fluctuations. A surge protector protects your investment and extends its life.
Expert Insight: The Best Projectors for Table Placement
Not all projectors are created equal when it comes to table placement. Short throw projectors and ultra-short throw projectors are the best choices for a table setup because they can produce a large image even when placed close to the screen. This is ideal for smaller rooms where you cannot place the projector far from the wall.
If you are buying a new projector specifically for table use, look for models with built-in keystone correction, adjustable feet, and good ventilation. These features make the setup process much smoother and the viewing experience much better.
Key Takeaways
- Table placement is a viable option: A projector on a table works great if you follow the right setup guidelines.
- Distance and angle matter: Getting the right throw distance and keystone correction ensures a sharp, clear image.
- Ventilation is critical: Projectors can overheat on enclosed tables, so airflow must be a priority.
- Table stability affects image quality: A wobbly table causes image shake and misalignment.
- Ceiling mount vs. table: Both options have pros and cons depending on your room and budget.
- Short throw projectors are ideal for tables: They work well in smaller rooms with limited distance.
- Cable management keeps setups clean: Proper planning prevents tripping hazards and clutter.
So, can I put my projector on a table and get great results? Absolutely. A table projector setup is one of the simplest and most affordable ways to enjoy big-screen entertainment at home. As long as you pay attention to throw distance, leveling, ventilation, and table stability, you will get a picture that rivals a ceiling-mounted setup.
The beauty of a projector on a table is its simplicity and flexibility. You do not need special tools, expensive mounting hardware, or a permanent installation. Just find a sturdy table, set the projector down, adjust the angle, and enjoy.
Whether you are a first-time projector user or someone looking to switch from ceiling mount to table placement, the tips in this guide will help you succeed. Start with the basics, test your setup, and fine-tune as needed. Before long, you will be enjoying movies, games, and presentations on a big screen with the comfort of knowing your projector table setup is dialed in perfectly.
Now go ahead, set up your projector on that table, and turn your living room into the best movie theater in town.
Frequently Asked Questions
Can any projector be placed on a table?
Most projectors can be placed on a table, but the results depend on the model and your setup. Check if your projector has adjustable feet or keystone correction, as these features make table placement much easier. Some projectors are designed specifically for ceiling mounting and may not work as well on a table.
What is the best height for a projector on a table?
The projector should be at or slightly below eye level when the audience is seated. This prevents viewers from blocking the light beam and ensures a comfortable viewing angle. A typical table height of 24 to 30 inches works well for most setups.
Do I need a special table for a projector?
You do not need a special table, but the surface should be sturdy, stable, and large enough to hold the projector securely. A solid wood table or a media console works great. Avoid flimsy or wobbly surfaces that can cause image shake.
Will my projector overheat on a table?
Not if you set it up correctly. Make sure the projector has at least 4 to 6 inches of free space on all sides for proper airflow. Avoid placing it inside enclosed cabinets or against walls that block the vents.
How do I prevent keystone distortion with a table setup?
To minimize keystone distortion, level the projector as much as possible using a bubble level or your phone’s level app. Adjust the projector’s feet if it has them. Use keystone correction as a last resort, since it can slightly reduce image quality.
Is a table setup good for outdoor movie nights?
Yes, a table setup is excellent for outdoor movie nights. It is portable, easy to set up, and does not require any permanent installation. Just make sure the table is on flat ground and the projector is protected from wind and moisture.