Can Any Projector Be Used For Halloween Decorating
Can any projector be used for Halloween decorating? The short answer is yes, but not all projectors deliver the same spooky impact. This guide covers everything you need to know about choosing the right Halloween projector for your haunted displays. You will learn what features matter most, how to set up your projector for Halloween, and creative ideas that will wow your neighbors. Whether you want a simple window projection or a full-yard Halloween light show, this article has you covered.
Every fall, neighborhoods come alive with jack-o-lanterns, cobwebs, and eerie decorations. But there is one tool that takes Halloween displays to a whole new level: a projector for Halloween. If you have ever walked past a house with spooky ghosts floating on the wall or skeletons dancing across the yard, you know the effect is magical.
But here is the big question. Can any projector be used for Halloween decorating? The answer is more interesting than you might think. While technically yes, not every projector will give you the results you want. Brightness, resolution, and setup all play a role in how scary your display turns out.
In this article, we will walk through everything you need to know. You will learn what to look for in a Halloween projector, which types work best, and how to set up your own projector Halloween setup like a pro. We will also share creative ideas and common mistakes to avoid. By the end, you will feel confident enough to create a haunted projection that will make your whole street jealous.
Let us dive in and explore how a simple projector can turn your home into the most haunted house on the block.
Key Takeaways
- Any projector can work for Halloween, but brightness and resolution make a big difference in your spooky display.
- Mini projectors are great for window decorations, while brighter models shine for outdoor yard displays.
- Proper setup includes choosing the right surface, positioning the angle correctly, and protecting gear from weather.
- Common mistakes like buying low lumens or ignoring fog effects can ruin your Halloween projection experience.
- Creative ideas like animated ghosts, graveyard scenes, and window projections can transform any home into a haunted attraction.
- Budget-friendly options exist, so you do not need to spend a fortune to create impressive Halloween decorations.
📑 Table of Contents
- Why a Projector Makes Halloween So Much Better
- What to Look for in a Halloween Projector
- Best Types of Projectors for Halloween Decorating
- How to Set Up Your Projector for Halloween
- Common Mistakes People Make with Halloween Projectors
- Creative Halloween Projector Ideas You Can Try Tonight
- Conclusion
Why a Projector Makes Halloween So Much Better
There is a reason why Halloween projector displays have become so popular over the last few years. A projector transforms any flat surface into a spooky scene. You can make ghosts appear on your walls, skeletons dance across your fence, or full animated graveyards light up your yard. The effect is immersive and captivating in a way that static decorations simply cannot match.
Unlike traditional decorations that sit in one place, a projector Halloween display moves. It captures attention from far away. Kids love it. Adults love it. Even the neighbors who normally ignore your decorations will stop and stare. A projector Halloween yard display can be seen from across the street, drawing people toward your home.
The best part is that a projector for Halloween is reusable year after year. You buy it once, download new content each season, and you have a fresh display without buying new decorations. It is also eco-friendly since you are not throwing away cardboard tombstones or plastic skeletons every November.
The Magic of Outdoor Halloween Projections
Outdoor projector Halloween yard displays are the most impressive of all. Imagine projecting a life-sized witch flying across your garage or a swarm of bats circling your porch. These effects create an atmosphere that makes people feel like they have stepped into a real haunted house.
Outdoor projector Halloween setups can cover entire walls, fences, or even the side of your house. With the right Halloween light show projector, you can light up your entire front yard with spooky animations. Some homeowners even use Halloween projection mapping to wrap images around 3D objects like trees, tombstones, or garden statues. The possibilities are truly endless when you understand how powerful a projector for Halloween can be.
Many people also combine their projector Halloween display with other decorations like fog machines, colored lights, and sound systems. This multi-sensory approach creates an unforgettable experience for everyone who walks by your house.
Indoor vs Outdoor Halloween Projections
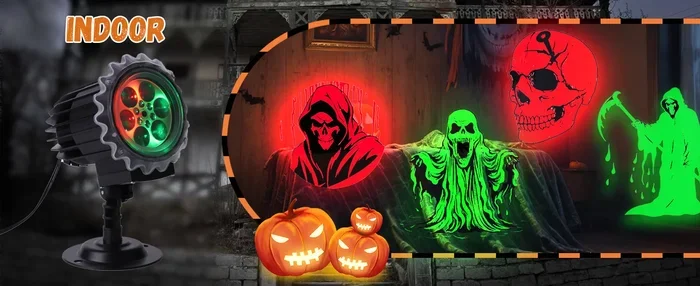
Indoor projector Halloween decorations work great too. You can project spooky scenes onto your living room wall or shine spooky projections through your windows for passersby to see. Indoor setups usually require less brightness since there is no ambient light to compete with. A basic projector can look fantastic indoors, making this a great entry point for beginners.
Outdoor setups need more power. You need a brighter projector to overcome streetlights and ambient light. But the payoff is huge. A well-lit outdoor display can be seen from the street and draws people right to your door. If you are serious about creating a haunted projection that impresses the whole neighborhood, outdoor is the way to go.
Quick Tip
If you are doing an outdoor display, start setting up at least an hour before dark. This gives you time to adjust the angle and focus while there is still light. It also lets you see how your projector Halloween effects look from the street. Test from different distances to make sure your display is visible to everyone passing by.
What to Look for in a Halloween Projector
Not all projectors are created equal. When you are shopping for a projector for Halloween, there are a few key features you need to consider. Let us break them down so you can make a smart choice.
Brightness Matters for Halloween Displays
Brightness is measured in lumens, and it is the most important spec for any projector for Halloween. For outdoor Halloween displays, you want at least 2,000 lumens. If you live in a very bright area or plan to project during twilight, aim for 3,000 lumens or higher.
For indoor window projections, 1,000 to 1,500 lumens may be enough. The key is to match brightness to your environment. A dim projector in a dark room can still look amazing. But a dim projector outdoors will look washed out and disappointing. When evaluating a Halloween projector display, always check the lumen rating first.
Here is a simple rule of thumb. The brighter your projector, the more flexible your setup options. A high-lumen unit lets you project in areas with some ambient light, while a low-lumen unit requires a darker environment. For most Halloween setups, 2,000 to 3,000 lumens hits the sweet spot between performance and price.
Expert Insight
Many people buy cheap projectors with low lumen counts and wonder why their Halloween projector display looks faded. Brightness is the single most important factor for a great Halloween projection. Do not skimp here if you want your spooky projections to really pop. Investing in a brighter unit will pay off every Halloween season.
Resolution and Image Quality
Resolution determines how sharp your image looks. For Halloween decorations, 720p is the minimum you should consider. Full HD (1080p) is even better, especially if you are projecting detailed animations like haunted houses or flying bats.
Higher resolution also means you can project larger images without losing quality. If you want to cover a big wall or fence with your projector Halloween setup, 1080p will give you a crisp, clear image that really pops. Lower resolution projectors may look fine on a small surface, but they get blurry when you stretch the image across a large area.
When shopping for a projector for Halloween, look for native resolution rather than supported resolution. Native resolution is what the projector actually produces, while supported resolution is what it can accept. Always go with the native number for the best results.
Portability and Setup Flexibility
Halloween setups change every year. You might want to project on the front porch one year and the garage the next. A portable projector Halloween setup is much easier to move around and store between seasons. Look for projectors that are lightweight and come with built-in handles or carrying cases.
Some modern projectors also have built-in speakers, which saves you from needing a separate audio source. Others come with pre-loaded Halloween content stored on an internal memory card. This makes setup super simple, especially if you are not tech-savvy. A portable projector Halloween kit with everything included is a great option for beginners.
Common Mistakes
One of the biggest mistakes is buying a projector based only on price. A cheap projector might seem like a good deal, but if it lacks brightness or has poor color accuracy, your spooky projections will look dull and lifeless. Always check the lumen rating, resolution, and reviews before you buy. Reading real user feedback about projector Halloween setup experiences can save you from buying the wrong unit.
Best Types of Projectors for Halloween Decorating
So what kind of projector for Halloween should you actually buy? There are several types on the market, and each has its own strengths. Let us look at the best options so you can choose with confidence.
Mini Projectors for Window Displays
Mini projectors are small, portable, and perfect for projector Halloween window displays. You can set one on your windowsill and project spooky animations directly through the glass. People walking by will see the ghosts and goblins shining through your windows, creating an eerie and inviting effect.
Mini projectors usually have lower brightness, so they work best indoors or in dark areas. They are also very affordable, with many quality options under $100. If you are new to projector Halloween decorations, a mini projector is a great starting point. You can experiment with different content and setups without a big investment.
Look for mini projectors that support HDMI or USB input so you can connect a USB drive with your Halloween videos. Some models even have built-in batteries, which gives you even more flexibility in where you place them.
Standard Projectors for Yard Displays
For larger outdoor displays, a standard projector is your best bet. These units offer higher brightness, better resolution, and stronger image quality overall. They can project onto large walls, fences, or even specialized screens for a truly cinematic Halloween experience.
Standard projectors are heavier and need a stable surface or mount. But the results are worth it. A haunted house projector setup with a standard unit can create an incredibly immersive experience that fills your entire yard with spooky visuals. If you want your home to be the talk of the neighborhood, a standard projector is the way to go.
When choosing a standard projector, pay attention to the throw ratio. This determines how far the projector needs to be from the surface to produce a given image size. A short-throw projector can create a large image from a shorter distance, which is perfect for smaller yards or porches.
LED Projectors vs Traditional Bulb Projectors
LED projectors use LED lights instead of traditional bulbs. They last longer, use less power, and are more durable. This makes them a great choice for outdoor projector Halloween setups where the projector might be left on for hours at a time.
Traditional bulb projectors can be brighter in some cases, but they also generate more heat and need bulb replacements after a few hundred hours of use. For most Halloween setups, an LED projector is the smarter choice. You will save money on replacement bulbs and have fewer maintenance headaches.
| Projector Type | Best For | Brightness Range | Price Range |
|---|---|---|---|
| Mini Projector | Window displays, indoor use | 500 – 1,500 lumens | $30 – $100 |
| Standard Projector | Yard displays, large walls | 2,000 – 4,000 lumens | $150 – $500 |
| LED Projector | Long outdoor sessions | 1,500 – 3,500 lumens | $100 – $400 |
| Halloween-Specific Projector | Plug-and-play spooky content | 1,000 – 2,500 lumens | $50 – $200 |
As you can see from this comparison, there is a projector type for every budget and every Halloween vision. You do not need to spend a fortune to create an impressive display. Even a budget-friendly unit can produce stunning results when paired with the right content and setup.
How to Set Up Your Projector for Halloween
Setting up your projector Halloween setup is easier than you might think. With a few simple steps, you can have your display running in no time. Here is a practical guide that anyone can follow.
Choosing the Right Surface
The surface you project onto matters a lot for image quality. White walls work great. So do white fences, garage doors, and even bedsheets stretched on a frame. The key is to use a light-colored, flat surface for the best image clarity and brightness.
Avoid projecting onto dark or textured surfaces. A dark wall will absorb the light and make your image look dim and lifeless. A textured surface will distort the image and make it look blurry or uneven. If you only have a dark surface available, consider hanging a white sheet or projector screen to create a better projection area.
For outdoor setups, a clean white wall or a purpose-built projector screen works best. Some people use a white tarp stretched between two posts as a DIY screen. This is a cheap and effective solution that produces surprisingly good results for projector Halloween decorations.
Positioning and Angle Tips
Place your projector on a stable surface or mount it on a tripod. The angle depends on where you want the image to appear. If you are projecting upward onto a wall, place the projector lower and angle it up. If you are projecting straight onto a fence, keep the projector level with the surface.
For projecting through windows, place the projector inside close to the glass. Make sure there are no obstructions between the projector and the window. Even small objects like plants or decorations can block part of the image and ruin the effect. The closer the projector is to the window, the sharper the image will be on the outside.
Quick Tips for Perfect Positioning
- Use a tripod or sturdy shelf to keep the projector steady and prevent image shake.
- Test your angle during daylight so you can adjust easily before it gets dark.
- Keep cables covered and out of walkways to avoid tripping hazards for trick-or-treaters.
- Face the projector away from the street to avoid glare in people’s eyes while walking by.
- Use a remote control or extension cord so you can adjust settings without walking outside in the dark.
Connecting Your Media Player
Most projectors connect to a media player via HDMI cable. You can use a laptop, a USB drive, or even a smartphone with the right adapter. Many Halloween projection videos are available for free online or come pre-loaded on Halloween-specific projectors.
For the best experience, use a USB drive with your Halloween videos pre-loaded. This way, you do not need to keep a laptop running all night. Just plug in the USB drive, select your video, and let the show run. Make sure your USB drive is formatted correctly and that the video files are compatible with your projector.
Expert Insight
Producers of Halloween animation content often create videos in 1080p resolution with high contrast. Look for videos labeled “Halloween projection” or “haunted projection” to get the best results. Some popular options include animated ghost scenes, flying bat sequences, and spooky graveyard animations. Always download content from trusted sources to avoid malware or low-quality files.
Adding Fog and Atmosphere
Here is a secret that makes Halloween projections look ten times better: fog. A small fog machine placed near the projector beam creates a dreamy, eerie atmosphere. The light scatters through the fog and makes your projector Halloween effects look like they are floating in mid-air. It adds a whole new dimension to your display.
You do not need an expensive fog machine. Even a small handheld unit from a dollar store can add a surprising amount of atmosphere. Just be careful not to aim the fog directly at the projector lens, as this can blur the image. Position the fog machine slightly to the side and let the fog drift naturally through the light beam.
Some people also use dry ice in a bucket of warm water near the projector beam. This creates a low-lying fog effect that hugs the ground and adds an extra layer of creepiness to your projector Halloween setup. Both methods are affordable and easy to set up.
Common Mistakes People Make with Halloween Projectors
Even with the best intentions, people make mistakes with their projector Halloween setup that ruin the experience. Here are the most common ones and how to avoid them so your display looks amazing every time.
Buying the Wrong Brightness Level
This is the number one mistake people make. Many people buy a projector based on price alone and ignore the lumen rating. The result is a dim, washed-out image that nobody can see from the street. Your neighbors will not even notice your display if the projector is too dim.
For outdoor displays, always go with 2,000 lumens or higher. If you are projecting in an area with streetlights or other ambient light, push that number to 3,000 lumens or more. The extra brightness makes a huge difference in how vivid your spooky projections look. It is the difference between a display that gets noticed and one that gets ignored.
Ignoring Weather Protection
If you are projecting outdoors, your projector is exposed to the elements. Dew, rain, and even dust can damage the unit or ruin the image quality. Always bring your projector inside when not in use. Leaving it outside overnight is a quick way to ruin the device.
For extended outdoor use, consider a weatherproof cover or a simple projector enclosure. Some people build basic boxes out of plastic storage bins to protect their gear from moisture and debris. A little protection goes a long way in extending the life of your Halloween video projector and keeping it working for many seasons to come.
Using the Wrong Content
Not all Halloween videos look good when projected. Low-resolution videos will look pixelated and blurry on a big wall. Always use high-quality videos that match or exceed your projector’s native resolution. A 720p projector cannot display a 4K video properly, so match your content to your hardware.
Also, make sure the content is designed for projection. Some Halloween videos are optimized for small screens and will look too dark or too bright when projected large. Test your content before Halloween night to make sure it looks right on your chosen surface. Spend some time tweaking the brightness and contrast settings on your projector for the best results.
Quick Mistakes Checklist
- Did you check the lumen rating before buying your projector?
- Did you test your full setup before Halloween night?
- Did you bring the projector inside when not in use?
- Did you use high-resolution Halloween content?
- Did you consider adding fog for extra atmosphere?
- Did you check that all cables are secure and out of walkways?
- Did you verify that your media player is compatible with your projector?
Creative Halloween Projector Ideas You Can Try Tonight
Now for the fun part. Here are some creative ideas to bring your projector Halloween decorations to life. These ideas work with most projectors and require minimal setup. You can start simple and build up as you get more comfortable.
Animated Ghosts and Skeletons
Ghost and skeleton animations are classic Halloween projector effects for a reason. They are easy to find, look incredible when projected large, and appeal to all ages. Project them onto your side wall or garage door for maximum impact. The movement catches people’s attention from far away and draws them closer to your display.
You can find free Halloween projection videos on YouTube and other sites. Search for “Halloween projection mapping” or “animated Halloween projector content” to find tons of options. Download them to a USB drive and plug them right into your projector. Mix and match different animations to keep your display fresh and interesting throughout the night.
Spooky Forest and Graveyard Scenes
Nothing sets a spooky mood faster than a dark forest or a graveyard scene. Project a spooky forest animation onto a large tree in your yard. Add some fake fog and you have an instant haunted atmosphere that feels like something out of a horror movie.
Graveyard scenes work great on fences or blank walls. You can even mix and match different animations to create a unique display. Start with a forest scene and transition to a graveyard for a dynamic storytelling effect. This kind of Halloween projection mapping makes your display feel like a narrative rather than just a collection of random images.
Halloween Window Projections
For a subtler but still effective approach, try projector Halloween window displays. Place your mini projector on the windowsill and shine the image through the glass. People walking or driving by will see the spooky scene glowing from inside your home. It creates an elegant, mysterious vibe that is different from the full-on yard display.
Window projections work especially well with silhouettes of witches, black cats, and full moons. They create a sophisticated haunted aesthetic that appeals to both kids and adults. Plus, indoor projectors do not need to be as bright, so you can save money by choosing a smaller, more affordable unit.
Interactive Halloween Light Shows
For the ambitious decorator, consider creating an interactive Halloween light show with your projector. Some projectors can sync with music or respond to motion sensors. Imagine guests walking up to your porch and triggering a ghost to appear on the wall. The wow factor of an interactive display is unmatched.
This requires a bit more setup and some basic tech knowledge, but the results are unforgettable. There are many online tutorials that walk you through creating motion-activated Halloween projections using affordable equipment like Arduino boards or simple motion sensors. Start with a simple setup and add complexity as you gain confidence with your projector Halloween setup.
Quick Tip
Start simple. You do not need to build an elaborate system on your first try. A basic projector with a USB drive full of Halloween videos can create an amazing display that impresses everyone. Once you get comfortable, you can add fog, music, and interactive elements to level up your setup for future Halloween seasons.
Conclusion
So, can any projector be used for Halloween? Can any projector be used for Halloween decorating? Absolutely. With the right projector, proper setup, and creative content, you can transform any home into a Halloween masterpiece. A bright, high-resolution unit will give you vivid, clear spooky projections that light up your yard and impress everyone who passes by.
Whether you choose a mini projector for your windows or a powerful standard projector for your yard, the key is to match the projector to your specific setup. Consider brightness, resolution, and portability. Avoid common mistakes like buying low-lumen units or using poor-quality content. And do not forget the power of fog and atmosphere to take your display from good to unforgettable.
Can any projector be used for Halloween decorating? Yes, it can. And now you have all the knowledge you need to make it work beautifully. Set up your projector for Halloween, add some fog, put on your favorite Halloween animation, and get ready to create the most haunted house on the block. Happy haunting, and enjoy showing off your amazing projector Halloween display to the whole neighborhood!
Frequently Asked Questions
Can I use any projector for outdoor Halloween decorations?
Yes, you can use any projector outdoors, but brightness is critical. For outdoor displays, look for a projector with at least 2,000 lumens. A brighter projector will produce vivid images even with ambient light from streetlamps or porch lights. Always bring the projector inside when not in use to protect it from moisture and dust.
What is the best projector for Halloween window displays?
A mini projector is the best choice for window displays. These compact units are lightweight, easy to set up on a windowsill, and perfect for projecting through glass. Look for one with at least 1,000 lumens for the best visibility at night. Many mini projectors also come with built-in Halloween content, making them a great plug-and-play option for beginners.
Do I need a special projector for Halloween projection mapping?
You do not need a special projector, but a higher-resolution model (1080p or above) works best for projection mapping. This technique involves projecting images onto irregular surfaces like trees or tombstones. A standard Halloween video projector with good brightness and resolution can create stunning projection mapping effects with the right content and proper positioning.
Can I use a projector indoors for Halloween decorations?
Absolutely. Indoor projectors work great for Halloween and do not need to be as bright as outdoor models. A projector with 500 to 1,000 lumens is usually sufficient for indoor use. You can project onto walls, ceilings, or even create a haunted atmosphere by projecting through windows for people outside to see.
What kind of content works best for Halloween projector displays?
High-resolution Halloween animations work best for projector displays. Look for videos labeled as “Halloween projection content” or “haunted projection animations.” Avoid low-resolution clips, as they will look pixelated when projected large. Many free options are available on YouTube, or you can purchase pre-made Halloween projection packs online for a more curated experience.
How can I make my Halloween projector display more realistic?
Adding fog is the single best way to make your Halloween projector display look more realistic. Fog scatters the projector light and creates a dreamy, atmospheric effect that makes ghosts and animations appear to float in mid-air. Position the fog machine slightly behind the projector beam but never directly in front of the lens to avoid blurring the image and reducing clarity.
=== CONCLUSION ===
Can any projector be used for Halloween decorating? The answer is a definitive yes. With the right projector, proper setup, and creative content, you can transform any home into a Halloween masterpiece that turns heads and delights everyone who passes by. Remember to focus on brightness, choose the right projector type for your space, and avoid common setup mistakes that can ruin your display.
The most important thing is to have fun and let your creativity shine. Your neighbors will be talking about your Halloween projector display for years to come. So grab a projector, find some spooky content, and get ready to create the most unforgettable Halloween experience on your street. Happy haunting!